Chain Chain Chaaaaaain

Last time I checked, this wasn’t Worldwide Wrestling, and I checked five minutes ago.

– Chazz Busby

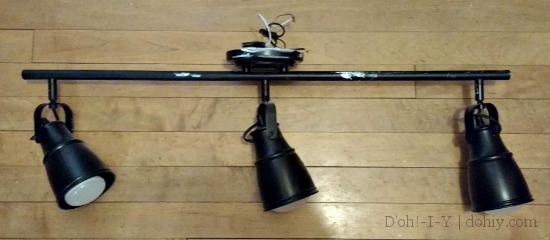
After I became embittered over tiles, I started working on the master closet. I had purchased a three-light fixture on clearance for it, but I wasn’t happy with how the light worked in there. I found something less obtrusive and took down the original.

as

Managed to get primer all over it before removal

Our basement is unfinished and dark, so I thought, hey, how about sticking this bright light down there? The only issue is that most of the lights in the basement are on pull-chains and this is not a pull-chain light. Fortunately, that’s an easy fix.

1. Buy one of these.

Garn http://www.amazon.com/Gardner-Bender-GSW-31-Plated-Switches/dp/B000BVXWCQ/ref=pd_sim_60_4?ie=UTF8&dpID=419A83en4hL&dpSrc=sims&preST=_AC_UL160_SR160%2C160_&refRID=0775EWNEW9HP44G7PBY6

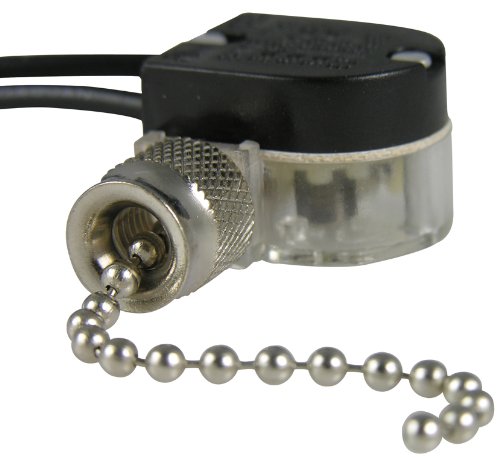
Gardner Bender Pull Chain Switch (or Westinghouse or another brand, about $4 and typically available in nickel or brass at your big box store or online)

2. Drill a hole through the ceiling canopy.

Pick a spot away from the wiring and the mounting holes and make sure there’s enough clearance inside the canopy for the switch.

adf

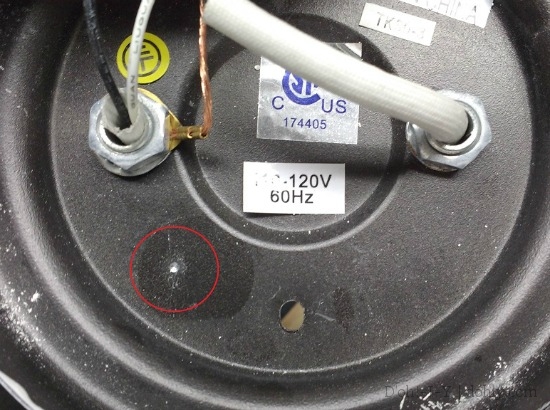
Switch spot selected

Choose a drill bit just a tiny bit larger than the threaded nipple that the chain comes through. The packaging should give that size, or you can just unscrew the metal nut and measure it. Ours was 13/32″ and I used a 7/16″ drill. File off any burrs.

3. Stick the threaded nipple through the hole, then screw on the nut to hold it in place.

switchnut

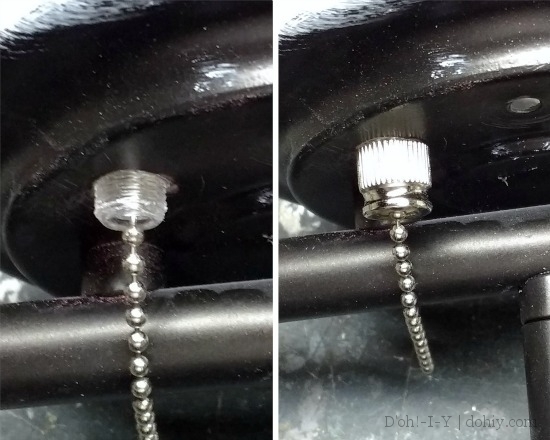
Left, the threaded nipple stuck through the canopy; right, with the nut.

4. Wire the hot (black) wire through the switch as shown in the instructions.

Use a small enough wire nut to secure these two small-gauge wires.

instructions

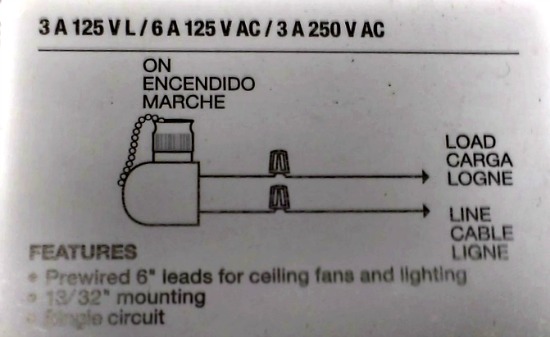
The “load” is the fixture side and the “line” is the power.
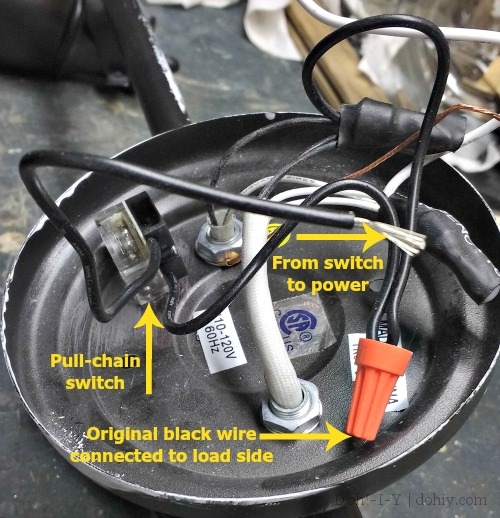
Wiring it up

Wiring it up

5. Hang the fixture.

With THE CIRCUIT OFF, get a stepladder and install it as normal (make sure you know how to do that), with the hot wire now the wire from the switch. I just used regular nuts to hold up the fixture from a cross-bar attached to the box. If you are installing someplace nicer than our basement, find bolts the right length for using decorative cap nuts. If I ever find the ones that came with this fixture, I might switch out the bolts.

When I did this part, I was wearing a full-length flannel nightgown of the Laura-Ingalls-was-not-sexy variety. It’s super-comfy for winter evenings.

Same idea, but not as sexy as this one from L.L. Bean

Same idea, but not as sexy as this one from L.L. Bean.

As I finished the job, unbeknownst to me, the front of my voluminous and highly tear-resistant gown draped over the top of the stepladder. When I reached the floor, I found myself alarmingly entangled with the thing.

Bewildered, I sought clarification. “BWAKK?!” I inquired of no one in particular. I tried to back away from the stepladder, which toppled painfully against my shins but insisted on staying under my skirt while I staggered about.

“OOOOOOWWWWWWWWIEEEEEEEEOWOWOW!” I commented.

Thrown off balance but maintaining a continuous yowl, I stepped onto a pile of lumber, which slid out from under me. I just managed to kick the stepladder away to cope with this new challenge.

My brain said, “It appears this nightgown is inappropriate attire for ladder work.”

My mouth said, “AAAAAAAAAAAAAARRRRRRRRFFFFFGT!”

I never did fall completely over, but I am a bit hoarse. The nightgown was unharmed.

Here it is...? Super glamorous basement light!

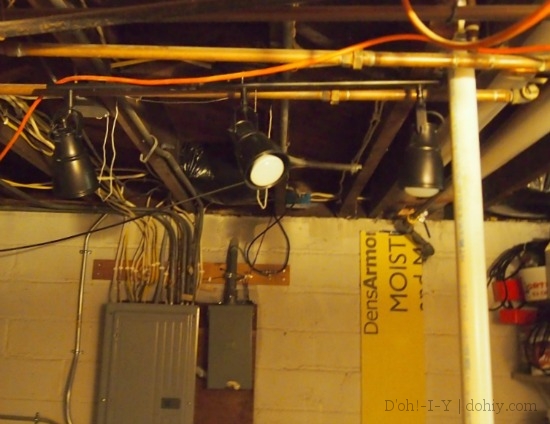
Super glamorous basement light (it’s level, just doesn’t look it.)

You’re probably not installing a pull-chain light anywhere glamorous. I didn’t! But it makes a huge difference to the visibility of our paint shelves.

I can see! That I need to organize these shelves!

Perhaps the darkness was preferable.

Anyway, that’s how to add a pull chain to a hard-wired ceiling light fixture, and what not to wear while doing it.

Posted in D'oh!, Electrical | Tagged , | 8 Comments

Insulation v. Winter

Colin: And if we just kept our thermostats at 68 in the winter…
Lisa: …we’d be free from our dependency on foreign oil in 17 years!

A couple of years back, we ordered an energy audit on the house (complete with blower test). The test showed that the house was tighter than many modern houses (yay, 1920s construction!), but there was much room for improvement. The results indicated that our exterior doors were leaky, so we replaced them, front and back, and caulked some corners and gaps. The test also said that we should add much more insulation upstairs. We didn’t want to spend a ton on insulation if we were just going to tear it out for a remodel a year or two later, so we just threw down another layer of fiberglass in the attic. That did make the house cozier, but it wasn’t a serious solution.

Closed cell spray foam insulation? That’s a serious solution.

Reminds me of snowdrifts only, you know, upside-down.

Foam in process

After spraying, our builder also added one-inch rigid foam between the rafters and the sheetrock to avoid heat transmission through the rafters. Heat gets through solid wood more slowly but can still cause ice dams.

Can you spot the rafters?

Can you spot the rafters?

Despite our El Nino winter (milder than usual), we’ve had some frigid stretches (down to -14F/-25C), and I’m loving this insulation.

Thing to Love #1: The ground floor is warmer. We knew we were losing heat through the top of the house before, but we overestimated the insulating power of an entire half-story above the main living area. In past winters, I’ve rushed to finish the window insulation on the first really cold day as it became uncomfortable inside. With less heat loss from above, the house isn’t drawing as much cold air through the older windows. I didn’t even do plastic this year (although it’s still a good idea).

jh

We’re as warm and snuggly as Mayya was on Christmas, but much happier.

Thing to Love #2: Our energy bills are lower. We receive a monthly email from the power company to congratulate or shame us on our energy consumption. We’re usually low-average. Since winter started, we’re suddenly one of the “efficient neighbors” and our bills are noticeably smaller. It’s going to take a ridiculous time to break even, but (a) that wasn’t the point and (b) it’s nice to see an actual effect.

Actually, BETTER than efficient neighbors

Actually, 1% better than efficient neighbors

It’s hard to say how far down the bills are in real terms are because last winter was colder; this season would have been cheaper in any event. But as far as I can estimate, we’re down about 10 to 15%.

Thing to Love #3: We need less heat upstairs. The remodel floor plan involved moving a radiator because its original location was going to be inside a closet.

new plan

After BTU calculations, we determined a smaller radiator would work, so we disconnected the old one and capped the lines pending that purchase. But we’ve never needed it. The original radiator in the reading room and the heat captured from the ground floor keep it plenty warm up there. We’ll probably put in a radiator at some point–after we install the bedroom door, we’ll get less shared heat from the reading room–but there’s really no rush.

Thing to Love #4: Our attic storage is warm! When we formerly stored items out in the attic space, it was Really Very Cold out there. And it was Really Very Hot in the summer. Because we did a complete cold roof, the insulation covers the whole roof deck, so the storage space is insulated the same as the living areas (although the ceiling is plywood, not sheetrock).

Temperate storage is terrific. We take the time to put things away properly because we’re not worried about eminent frostbite or heatstroke, and we also make better use of the space overall. It’s so comfy up there, we’re even making a fort for the nephews.

Inspiration photo (via)

Inspiration photo (via)

It might really be a fort for me, in truth (update: here it is).

Thing to Love #5: No ice dams! Until a warm spell this week, we were one of the few local houses with snow mostly on the roof in snow form.

OLYMPUS DIGITAL CAMERA

This was Reason One for the insulation, so hurrah!

Posted in Construction, Energy, Siding & Roof | Tagged , , , , | Leave a comment

The Course of Tiled Walls Never Did Run Smooth

Marge: I have an idea.
Homer: What? What’s your idea?
Marge: When my father was first trying to catch my mother’s eye, he sent her a box of candy with his photo in it. After that, she never forgot him.
Homer: That’s all well and good, but it’s not really YOUR idea, is it now?

A while back, I ran across this image from a vintage Vitrolite ad, and I fixated on the wall tile pattern.

kuh

See more vintage ad images at Antique Home Style

I liked how it was both a staggered and a straight pattern at the same time, and how I hadn’t seen it on Pinterest. MINE, ALL MINE!!!!

Initially, I tried to match the scale of the tiles in the picture. We’re using plain white tiles from Menards, so I picked up a box of 9 x 12″ tiles and one of 4 x 12″ subways (in the absence of 3 x 12 tile, which looked like it would match the image more closely). I ended up taking it all back because:

  1. Despite all new walls, large-format tiles will tend to exaggerate anything not square or perfectly flat.
  2. More fundamentally, the 4 x 12 tiles were actually about 4.25 x 12.75 inches, while the 9 x 12 tiles were pretty much 9 x 12. They wouldn’t line up.

Oh, woe! I dragged my depressed self around the tile section in hopes of a new solution. I found one, and all I had to do was dial down my expectations. I could still follow the same basic pattern — row of large tiles, offset row of subway tiles, etc. — if I used square tiles for the “large” row. Reinvigorated, I bought out the store’s entire stock of white 6 x 6″ and 3 x 6″ tiles.

We wanted to have a contrasting liner tile, and had dark green in mind. I was surprised at the cost of many liner tile options. I may be super-cheap, but roughly a buck an inch seems like too much for a silly accent tile. Intent on cheapness, I ran to ebay and bought vintage dark green liner tile: under $40 for enough to go around the whole room.

The floor is so handy for everything.

Pattern mocked up on the floor

The liner tile is cool. It’s got a slight bevel and I like the color.

green2

Darker green in person; closer to the mock-up above

It’s new old stock 1950s plastic tile, and came in its original box with most of the tiles still wrapped in bundles.

plastic wall tile

PLASTIC?! Well, yeah, but my thought was it would look just like ceramic tile when installed. The problem: it’s practically flat compared to ceramic tile. We would have to have furred out under the plastic tile somehow to make it look right. Hurrah, I’m going to have to re-sell it!

Instead, I ordered Interceramic liner tile from Lowes in the right color (and material).

I mean, it's not $40 for the whole room, but come on.

It’s not $40 for the whole room, but come on.

It’s the right thickness and it’s a nice (darker than shown) green, so on the wall it went. I finished above the liner tile with white 6-inch bullnose.

Here’s my stolen tile pattern in process.

OLYMPUS DIGITAL CAMERA

I’m not the best tiler the world has ever seen, but I am using white grout, which is going to blend in and minimize any amateur effect.

Some grouting, some painting

Some grouting, some painting

Here’s one with the liner tile in place.

withtrim

What I like about this pattern is that it is both straight and offset, it’s unusual but not weird, and it looks period-appropriate. If you want to try this pattern, here are my tips:

  • Make sure that your tiles’ actual size works for the pattern. The nominal size (what is says on the package) might not be the real size. You also need to allow for grout lines (not a problem if the tile sizes work and you use consistent spacing).
  • Use a long level to make sure that the horizontal and verticals are all lining up row after row. This pattern isn’t hard to do, but the look relies on the tiles lining up.
  • Plan so tiles at edges and corners aren’t tiny slivers. Your walls might not be perfectly square, but if you have more to work with, it won’t be as obvious if you have to taper a bit to keep things straight.

I thought I had the tiling done except for a Big Grouting Weekend when Kev reminded me that the shower door is six foot tall.

Aqua Ultra Hinge Shower Door -- we got ours from Wayfair, and it's well worth signing up for their sale emails and lying in wait for the best price.

Aqua Ultra Hinge Shower Door — we got ours from Wayfair, and it’s well worth signing up for their sale emails and lying in wait for the best price.

The tile doesn’t go up to six feet around the shower, and it’s going to look dumb if the shower door is taller than the tile. Here’s where the door mounting channel will be:

kji

Channel for door will be on the right edge.

Currently, the channel would rise past the tile, meaning there would be a tile-depth gap for the last few inches. It just seems like the gap is going to make the door look shoehorned in. Right? HEY, I HAVE REAL PROBLEMS TOO, I JUST DON’T BLOG ABOUT THEM!

Is it worth ripping off bullnose and bringing the shower tile higher? Instead of making a decision, I stopped working on the bathroom and started on the closet. If I let the issue roll around in my head, I’ll reach a decision. I will probably redo it, but I might be convinced otherwise. Kev’s certainly trying.

Posted in Bathroom, D'oh!, Decor, Salvage, Walls & Floors | Tagged , , , | Leave a comment

Nice Shower Niche, Part 1

Marge: What if something goes wrong?
Homer: What if? What if I’m taking a shower and I slip on a bar of soap? Oh my god, I’d be killed!

So, this upstairs bathroom. It has plumbing and a floor, but despite tile prep and waterproofing, we aren’t showering up there just yet pending tiling. One of the things that slowed the tile work was my decision to install and tile a niche. You know, for soap and shampoo and stuff.

Here's one from This Old House.

Here’s one from This Old House.

A professional tiler/blogger known as The Floor Elf has a four-part series on putting in a shower niche. His tutorial includes placement, framing, waterproofing, tiling, and a bit of a screed against hacks. The Floor Elf advises complete fabrication of shower niches. Did I follow his tutorial? Not really, no, mainly because (a) I was out of concrete board to line a niche, and (b) a preformed niche seemed more my speed.

What I did take away, though, was the importance of aligning the niche with grout lines. This niche, for instance, is randomly inserted into the middle of the tile pattern with lots of tile slivers around the edges.

(via Houzz user mikema0477)

Not desirable (via Houzz user mikema0477)

The Floor Elf’s fabrication method allows the tiler to set the niche exactly in line with the tile and size the hole to fit the pattern. Here’s his example:

(via)

(via)

The Floor Elf’s niche is exactly within the pattern and requires no extra grout lines, so it blends right in. Fabricating the niche on site allows for this level of precision.

I’m on board with lining it up, but I also like “framed” niches, such as this one that is both framed AND lined up with the larger pattern.

framed niche

(via pinterest; source unknown)

I wanted to achieve something like the framed niche, using a pre-formed niche insert, while lining up all the tiles. No problem!

spongedust

But I had to do it with my existing skill set (I laughed too). First thing, I bought a preformed niche that jibed with my tile sizes. The tiles are all sized in multiples of three inches, so I looked for inside measurements divisible by three.

There are a lot of niche manufacturers; I bought an Intrafoam because it fit my measurements.

There are many niche manufacturers; I bought an Intrafoam preformed niche because it fit my measurements. It’s just extruded foam with a coating (still costs >$40). Most preformed niches are designed to fit between studs on 16″ centers.

Second thing, I marked the studs that the niche was going to fit between and started tiling the shower walls from the bottom. My BRILLIANT IDEA was that I would tile up to one or two rows below the proposed niche, THEN insert the niche when I was sure the tiles were going to align. I also started the tiles from the side wall so that there wouldn’t be slivers around the sides of the selected stud space.

Tiling started for plumber purposes and to line up niche. That's a sunbeam on the wall. I miss the sun.

Tiling started for plumber purposes and to line up niche. That’s a sunbeam on the wall, not Kylo Ren cutting his way into the bathroom.

When I (eventually) got near the niche area, I measured, remeasured, then used masking tape to stick tiles to the wall to make SURE I knew where the niche should go. Then I traced around the niche, lining up with the studs, and cut out the space.

Tracing

Tracing

I drilled around the edge to make it easier and less dusty to cut out.

I drilled around the edge to make it easier and less dusty to cut out.

Stunningly, the hole was the perfect size! Ah, the DIY joy of something going right the first time!

When we put in the vapor barrier, we added extra plastic inside these studs so that we could drape it around the niche.

Extra vapor barrier (and duct tape)

Extra vapor barrier (and duct tape)

With some trepidation, I sliced through the plastic so I could build a support for the niche inside the wall. (I later patched all the plastic together with duct tape; I know you were worried.) A support was not required by the niche’s documentation, but it’s an early step in the Floor Elf tutorial, and it seemed prudent for the shelf-made-out-of-foam to have structural back-up.

I followed the Floor Elf’s directions for adding a shelf inside the wall. I popped some blocks into the studs to hold the shelf level with the hole in the cement board. I laid the shelf in, then I stuck in the niche…and it was floating in the hole just above the shelf.

Ratfart.

Ok, but, BUT?? I had a box of 1/8″ tile spacers, so my kludge was to glue a bunch of those to the shelf supports, which raised the shelf surface enough to support the niche. Someone’s going to open up this wall someday and say, “What the…” but I’ll be gone, so I WIN!

The actual instructions for the niche say to use silicon glue to attach it to the studs, which I did after re-draping the vapor barrier, but I also popped a few finish nails through the side so it didn’t drift outwards while the glue cured.

OLYMPUS DIGITAL CAMERA

Just to be all extra-ridiculous I painted the niche with Redgard waterproofing membrane before and after install.

Then I sealed around the edges with silicon caulk and later painted all that with MORE REDGARD.

READY TO TILE! Check out Part 2.

Posted in Bathroom, Construction, Walls & Floors | Tagged , , , | 3 Comments

Walling and Waterproofing the Shower

Water, water, everywhere, so let’s go have a drink!

– Homer Simpson

The primary mission of a shower is to get you clean. The associated mission–especially when the shower is on an upper floor–is to contain the water necessary to get you clean. And you probably also want to avoid water containment side effects such as mold spores and rotten framing members.

Since we were completely in charge of tiling the bathroom, we inherited the workspace with sheetrock installed everywhere in the bathroom except right around the shower.

OLYMPUS DIGITAL CAMERA

The missing shower walls were a little confusing, because we thought that the sheetrockers would just keep putting wallboard around there, albeit cement or tile backer board. We waited for the sheetrockers to come back with cement board, until I finally called our builder and found out … that was on us.

billbailey

If you are splitting up tasks with a contractor, this is the sort of issue you’ll want to define! We were fine with doing it, just blissfully unaware.

Job one, then, was installing a vapor barrier. This is just a 4 or 6 mil plastic sheet around the outside of the shower area — a last defense if water gets through everything else we will put in its way. Some people say not to do it, others say it’s essential; it was easy, so we did it. It’s just stapled in place, and then drapes inside the flange on the shower base.

OLYMPUS DIGITAL CAMERA

Next thing was lining the shower area with cement backer board. Cement board doesn’t absorb water and doesn’t foster mold and mildew. Durock or Wonderboard (seriously) appear to be the most commonly available brands.

Durock cement board

Durock cement board

A few things to know about cement board:

  • It’s heavy! But brittle! That image says “Lighter” but it’s still HEAVY. Between the weight and its fragility, you’ll want to plan so you can buy the smallest possible sizes at a time when you have help to move it.
  • You need half-inch thickness for walls. There are quarter-inch pieces that are very tempting, but they are meant for lighter duty.
  • Even though most cutting is by scoring the surface and breaking the piece, there will be lots of dust and grit — pick up dust masks and new box cutter blades.
Trimming up an edge -- see how crumbly and gritty it is?

Trimming up an edge — see how crumbly and gritty it is?

Cement board is installed pretty much like sheetrock (except using cement board screws), but because it is (a) brittle and (b) backing for tile, it needs to be installed as flat as possible. While sheetrock bends a bit when drilled in, cement board will just crack or pull through the screw heads. The Kev spent substantial time furring out the studs around the shower so that the cement board would be flat on the wall. Then we cut the cement board and put it up (check out this cement board tutorial for more detail).

Good times!

OLYMPUS DIGITAL CAMERA

The cement board extends down over the shower pan’s wall flange, leaving a 1/4″ gap (achieved with tile spacers) that will be caulked later.

After install, the joints needed to be filled. Instead of papery tape and joint compound (both of which can mold), use cement board tape and thin-set mortar to close up joints. We also had to fiddle with the sheetrock/cement board intersection to make it line up neatly (another reason to fur out the shower studs), so we taped those gaps too.

I used this stuff, but there are a lot of options; just make sure to get one for cement board.

We used this, but there are other options; just make sure to get tape designed for cement board rather than for sheetrock.

Embed the tape in thin-set mortar and smooth it out so everything is even. Then, I used a different type of tape immediately outside the shower enclosure. On the sides of the shower, there are two outside corners connecting with regular sheetrock. I used corner tape that you wet down and smooth into place to make those angles strong and defined.

Makes outside corners sharp and less prone to denting

Makes outside corners sharp and less prone to denting

Apparently, I wasn’t taking lots of pictures, but I found this one:

OLYMPUS DIGITAL CAMERA

Ok, if this wasn’t all laborious enough, I decided to coat the cement board with waxy waterproofing goop.

This stuff

This stuff

Many internet-commenting tile professionals hold that waterproofing cement board is pointless (the guy who tiled our main bathroom certainly didn’t do it). But, look, they are professionals. If I’m tiling this puppy, I want all the back-up I can get. Goop it is.

Said goop applies just like paint (but use old throw-away brushes or rollers). After an hour or so, add another coat to cover up any tiny holes you can’t see.

They are NOT KIDDING about the RED.

They are NOT KIDDING about the RED.

RedGard is around $50 a gallon, but guess what? No one ever finishes exactly a gallon, so you can pick up left-overs on Craigslist. I paid $20 for 3/4 of a gallon, and I have quite a bit left — I’ll probably sell it on for $10.

With the vapor barrier, cement board, taped joints, and membrane coating before we even get to the tile, I feel good about keeping the water where we want it. Should we ever end up showering in there.

Posted in Bathroom, Construction, D'oh!, Walls & Floors | Tagged , , , | 14 Comments

The Third Appliance

Earlier this year, I noted that appliance deaths come in threes. We’d done a dishwasher and a range, and I was hoping the next replacement would be a cheapie.

It wasn’t. The victim? We had a Whirlpool washing machine that came with the house. Judging by the styling, it dated from the early 1980s. I don’t have a picture, but it was similar to this one, but cleaner (and with a fake woodgrain panel).

washing machine 1970s

Our laundry is in an unfinished basement, so it didn’t bother me (much) that it was unattractive. We fixed it twice, and it worked, despite trying to break itself into pieces against the dryer whenever we washed towels. It could have been fixed again, but it just wasn’t cleaning very well anymore. Thirty-odd years is enough.

In an attempt to get a DEAL, we perused the Sears Outlet listings. Sears Outlet clears floor models, damaged goods, scratch and dents, and outdated products from regular Sears stores, including appliances. You can search by distance from your location, and they provide information on the condition of each particular item, sometimes with pictures. You can also go see the unit and buy there or online.

so screen

Browsing SearsOutlet.com

Since I have little interest in creating a pretty laundry room, I didn’t care if the washer had a minor ding or two as long as it was fairly efficient and cleaned clothes for a reasonable price.

So not my laundry room (via)

So not my laundry room (via)

We decided on a Maytag high-efficiency top-loader. I know it’s not stylish these days, but I like top loaders, and it fit into the space we had available.

washer

There were two of this model available locally. One was a floor model, and it was said to have a side dent and scratches on the front and top. The other was also a floor model, and it did not list any condition issues. They were the same price, so I bought the one without condition issues. SMART! I bought it online, unsight unseen. LESS SMART!

Either there were condition issues that weren’t listed or the warehouse guys ran into it with the forklift. And some chains. These machines aren’t boxed or crated, so anything could happen. I received a call from the delivery driver about an hour before he arrived, saying, “We’ll be there soon, ummm …. and ……….. umm ……. well ……. you-know-how-this-unit-has-a-huge-dent-in-the-back?”

Lana

We agreed he would bring it anyway so we could decide if we still wanted it. I didn’t take a picture, but it was a pretty damn big dent in the bottom frame and back cover. The frame piece was kinked about two inches out of square at impact, which had warped the back cover and side. But nothing was touching the machinery, it was under warranty, and we needed to wash some clothes, so we took it. Kev beat out the dents and reassembled the back, and I primed the bare metal. With the high-contrast yellow primer we had on hand. IT’S THE BACK OF THE MACHINE.

After installation and clean-up, though, I realized I was going to need some white appliance paint. There were some substantial scratches that hadn’t been mentioned in the product listing. Anyway, painted it up and it’s fine now.

Spectacular, right?? I told you it wasn't a pretty laundry room.

Spectacular, right?? I told you it wasn’t a pretty laundry room.

And it runs great — I’m pleased with it. But would I use Sears Outlet again? Probably not.

The good:

  • The website is good for narrowing down items by characteristics, price, and location.
  • They have a great selection.
  • The discounts are good.
  • The products generally have a full warranty.

The bad: 

  • Pick-up is free, but delivery (including haul-away) is a separate charge.
  • Once the delivery charge was added, we saved maybe a bit over $100 over getting the same unit delivered from a big-box store. That’s a fair bit of money, but that unit would have been boxed and pristine.
  • The delivery scheduling call is really just an opportunity to pitch you the extended warranty.
  • The machine had undisclosed damage that may or may not have existed when it was in the shop, and an unboxed washer is probably also going to get a scratch or two during delivery.
  • I would’ve expected a bigger discount given the delivered state of the machine, and if Kev didn’t have a background in metal work, we probably would have refused it.

If you want to give Sears Outlet a try, definitely go to the store and take your own pictures of the appliance, especially if you have a yen for a pretty laundry room.

By the way, where the heck have I been?? Ben and Lois got married (yay!!!!), so we’ve been out of the country for that, then holidays, work emergencies, teaching, etc. Let’s call it a blog sabbatical.

Posted in D'oh!, Energy | Tagged , , | Leave a comment

Fixer Uppers: 5 Not-so-Easy Ways to Get the Look

Lisa: He’s just peddling a bunch of easy answers.
Carl: And how!

So I saw this on Pinterest:

fixer upper

My initial reaction was, “BUY A FIXER UPPER AND PUT IN THE TIME!” followed by some muttering about “Easy, you think it’s easy, well I’ll tell you a thing or two….” and so forth.

It didn’t take me long to realize it was actually talking about an HGTV show.

I didn’t think of this show when I saw “10 Easy Ways” because I cancelled HGTV years ago. Why? Because I was spending time watching it that I could have been spending on actually fixing up our home and garden. That rigamarole eats up some serious time.

Sisyphus cat

But I’m sure it’s a lovely program, and while that emotionally charged (for me) pin went nowhere, there are several articles out there about how to emulate the show’s signature style:

The hosts have their own old house and work on older homes for the show, but the decor style is often implemented in newer homes. People should do what they want with their own houses, but I’ll admit to some bemusement over rustic farmhouse style inside brand new homes. Having a house with character means having a house with age, and with age comes other people’s mistakes and constant maintenance. If you want a new place, embrace its compelling virtues, like HVAC systems that work and paint that actually adheres to the walls. The benefits and features are legion! I sometimes dream of what it would be like.

Anyway, tongue firmly in cheek, here’s my list:

Five Not-So-Easy Ways to Get a Fixer-Upper Look

1. Buy a Fixer-Upper. That gives you a leg up right there!

Delapidated_House2

(via)

2. Play Hide and Seek. Search all the house’s nooks and crannies for doors, windows, hardware, and woodwork that was jettisoned by former owners (who, incidentally, wanted the house to look more modern because that was what people used to want).

Via

(via)

3. Do Your Research. Find out what’s missing and what would have been in the house originally. Determine whether those items are functional enough for your real-life purposes (you still gotta live there!). Set up recurring eBay searches. Hunt through Craigslist. Haunt salvage places. Find the basic things you are missing (over the course of years).

(via)

(via)

4. Get Your Hands Dirty. All that stuff has to be cleaned up! Plus all the ongoing maintenance and painting and caulking and repairs.

law of repair

5. Love It. Love the place despite itself. A house with character can be lovable. It can also make you nuts. It’s like your great-uncle with the wonderful stories who smells a little weird and refuses to put in his teeth on the weekends.

gurning-applause

Yeah, you can’t buy that sort of character. Even if you wanted to.

Posted in Decor | Tagged , , , | 3 Comments

Bathroom Floor Tiling Dos and Don’ts

Ned: Floor feels a little gritty here.
Moe: Yeah we ran out of floorboards there, so we painted the dirt. Pretty clever!

– The Simpsons

DO!

1. Plan the pattern.

For larger tiles, the experts say to start from the center. We were using smaller tiles in mosaic sheets, so centering wasn’t such a big deal.

Sausalito mosaic by American Olean (available at Lowes)

Sausalito mosaic tile by American Olean (available at Lowes)

What was a big deal was making sure that there wasn’t a weird sliver of tile running along any straight edge. I spent a fair bit of time fussing with the layout before starting. I was most concerned about how the tiles would line up against the edge of the shower and across the threshold, since those places would be most obvious, but I didn’t want less than a third of a tile on other walls. This is one thing that went relatively well on the job, so the fussing was worthwhile!

2. Use a straight edge and square.

Once you start slapping down tiles, it’s easy to get carried away (more on this below), and once you get carried away, it’s easy for the pattern to slip. A little error in spacing multiplies across the floor, with unsexy results. Religiously using a straight edge and a square to check how everything is lining up will avoid your having to pull up tiles later.

Using level as a straight edge to make sure all the points are equally pointy.

Using straight edge to make sure all points are equally pointy.

3. Go freestyle with mosaic sheets.

After following my “straight edge and square” advice assiduously for the majority of the floor, I got to the point where I believed that the mosaics were meshing just right and lining themselves up.

HA HA HA!

HA HA HA!

HA!

They were not lining themselves up. It wasn’t a problem until the last corner.

Can you see the issue?

Can you see the issue? From space?

For the squares to make it to the edge of the wall, they were off further out in the pattern.

Me: I’m pulling it up.

Kevin: Don’t. No one is going to notice. It’s fine.

[some days later]

Me: I pulled it up.

Kevin: I knew you would.

The issue was that the mosaic spaces the tiles out uniformly. If you get into a corner, you can’t pare down (or spread out, as necessary) the spacing a tiny bit to fix anything that is off.

The answer was to cut apart a couple of sheets of mosaics and re-lay the corner with individual tiles. In order to avoid intra-tile interference, I shaved the adhesive bits off the edges as well (this after I tried laying them with the bits still attached and found them bumping into each other and generally thwarting me). After I had enough tiles, I set them one by one in the corner until I was happy with the spacing. Then, I mortared one row at a time into place, checking alignment as I went. As I should have done in the first place!

Same area, pre-grout.

Same area, pre-grout.


DON’T! Just don’t.

1. Get mortar all over (or above) your tiles.

I already moaned about this one. Just get a wet rag and wipe up drips and smudges as you go. I found out that glass cleaner and a kitchen scrubbing pad (with elbow grease) worked pretty well to get most of it off. If you use sanded grout (I used TEC sanded grout in “Pearl”), it has the great side effect of knocking down any remaining residue, then an eraser sponge helps finish it off before you seal the grout. What would have been easier? Keeping the mortar off the top of the tiles in the first place.

OLYMPUS DIGITAL CAMERA

Good lord.

And don’t forget mortar that bulges up between tiles! Remove that excess while it’s wet, or you’ll end up scraping channels for the grout to go into. In that case, it helps if your mortar matches your grout. Ours did not.

2. Use a tile nipper where you are laying tiles.

Tile nippers are really useful. They aren’t precise enough for most wall tile cuts, but for thicker floor tiles, they are quicker for knocking off extra edges that will be covered up by trim tiles.

Tile nippers

Tile nippers

But the “nibbler” (which I generally call the thing) throws off tile shrapnel, which causes Problems. Thing one, tile shrapnel is sharp and painful on feet. Thing two, even though it’s often hard to see, tile shards are three-dimensional. If a piece lands where you are going to lay tile, things won’t be level. You’ll find yourself digging through mortar for tile fragments in order to get the floor to lie down flat. Little jagged bits of tile are not fun to extract from fingertips.

Use the tile nibbler in another room, possibly inside a trash bag.

3. Mix up too much mortar or grout at a time.

I had a huge bucket. It was a very useful huge bucket, with measuring lines and a comfortable handle. Now it’s a useless rock because I tried to mix an entire bag of mortar in it. As soon as I did it, I knew it was a mistake, so I tried to get through as much of it as possible, which was about a third of the mixture. Dang.

It does set up fast (via).

It does set up fast (via).

Better and easier, just mix up as much as you’re going to need for the next half-hour or so. Then mix more. I stopped doing the precise measurements, and just went for a peanut-butter consistency. Same concept works for grout. I haven’t thrown away any more buckets since I changed to this method. Progress!

Despite it all, I persevered. It’s a floor!

OLYMPUS DIGITAL CAMERA

Done enough for the plumber to come back and put in the toilet and sink, anyway, which means we’re operational in half-bath form. As you can tell, the walls are still being tiled, so while the shower is plumbed, there’s no showering as yet.

And it only took 43 years! Check back in 2072 for how the wall tiling went.

Posted in Bathroom, D'oh!, Walls & Floors | Tagged , , , , | 5 Comments

My Bad

Things were said, mistakes were made. Let’s end this madness and get on with our lives.

– Homer Simpson

Best first line of a YouTube instructional video ever: “If you’re lookin’ at this video, that means you made a mistake like I did.”

Yep, that’s right. I was super-messy when putting down floor tiles, and I need to remove some mortar spots. (SOME?! Ok, several. MANY. Shut up! Like you never made a mistake. Pffffft.)

I went to YouTube because scraping off mortar with a razor blade is more punishment than I think I deserve (even though I’m pretty annoyed with myself). This short and sensible video covers dried grout, but I have high hopes.


Note that the guy says in the comments that a finer-grade nylon brush would have been a better choice. That’s the one I’m going to be looking for when I go out shopping tomorrow (along with some acetone as suggested by a commenter).

Anyway, the work continues…


Posted in Bathroom, D'oh!, Walls & Floors | Tagged , , , | 2 Comments

Picking White Paint

Paint my chicken coop!!!!!

– Abe Simpson

As the loft progressed, we decided to try soft white walls in the bedroom and reading room. I want to bask in all the fresh light.

But white paint is tricksy. What if it comes out too yellow? What if it’s too sterile? What if thinking about minor differences in paint colors is a control mechanism engineered by our insect overlords to distract us from impending doom? What if it looks dingy?!

seal in a dinghy

Dingy dinghy

I spent some quality time with Google, and found a gajillion opinions on white paint. Some articles list considerations for picking the right one:

And various interior decor blogs provide some good, brand-specific recommendations for different situations:

  • The Best White Paint Colors (from Kelly & Olive: “moonlight white OC-125 [Benjamin Moore] – a great white for more traditional homes where you may want the clean fresh feel of white walls [with] natural green undertones.”)
  • Ten Tried and True Decorating Rules (in Southern Living; Editor-in-Chief Lindsay Bierman: “When you just want a room to be “warm white,” meaning not too yellow or too peachy or too anything else, then go with Benjamin Moore Ivory White (925). . . . I’ve already done enough agonizing for everyone.”)
  • My Favorite White Paints (from The Hunted Interior; mainly warm-white faves including Moore’s White Dove, F&B Pointing, and SW’s Dover White and Alabaster)

The research helped–soon, I was down to either Benjamin Moore’s Moonlight White…

Benjamin Moore OC-125 Moonlight White

Benjamin Moore OC-125 Moonlight White

or Sherwin Williams’ Alabaster.

Alabaster (Sherwin Williams 7008)

Alabaster (Sherwin Williams 7008)

I also grabbed SW Dover White because everyone swears it’s delightful.

wpc dover white sw 6385

Dover White (Sherwin Williams 6385)

You can’t tell much from blobs on a monitor. Typically, I would buy several samples and paint them on boards or walls to compare (Kev calls this “when you paint stuff the same color and ask me to choose”). This time, though, I picked up (with paint shop permission) several chips of each white and taped them together into approximately s 7″ x 9″ sheet. This method is not the same as a fresh sample, but it’s close enough, especially since designers love these colors for being bullet-proof.

Kev held his tongue, but I agree that the samples looked pretty dang close, regardless of location or light. The camera did not capture the samples well, but here’s the Dover White:

OLYMPUS DIGITAL CAMERA

It’s just a little too yellow. With all the shadows and skylight angles, it has dinginess potential in our space.

To choose between the others, I went to EasyRGB.com. They have a “similar colors” page that allows you to pull up any shade and compare it against other brands the site covers.

easyrgb screen

The site shows the closest comparables on a grid. I started with Moonlight White, and…

easyrgb comparison

…it’s not just me — they really are very similar. I flipped a coin and picked Alabaster, which I bought in SW’s “Cashmere” paint. Cashmere self-levels for a nice finish (they say). Four gallons of that, and one gallon of the regular Super Paint in semi-gloss for the trim.

Totally too fancypants for us, but that's SW Alabaster on the walls. Looks good! (via)
Too fancypants for us, but that’s Alabaster on the walls. (via)

Now we just need to find time to paint (and to report back)!

If you are shopping Sherwin Williams, remember that they are always offering a coupon or having a sale. They had a 35% anniversary sale when I bought most of the paint; when I went back for more, they were having a 30% event. Don’t pay full price!

Related Posts Plugin for WordPress, Blogger...
Posted in D'oh!, Decor, Walls & Floors | Tagged , , , | 5 Comments