A Literal Hot Mess

Don’t do what Donny Don’t does!

– “The 10 Do’s and 500 Don’ts of Knife Safety”

I almost burned down the house being messy.

Well, I was trying to be organized! Or at least, take a step toward organization. We were moving a bunch of tools and materials from upstairs to the basement. Things had accumulated up there for quite a while, so I threw a bunch of stuff into carrier bags to move it in fewer trips. The carrier bags went to the shop, with the plan that they would (eventually) be unloaded, and everything put into its place.

Then, the dream would finally come true (via).

The organizational phase had not started today, when I was looking for a box cutter. I didn’t see the one I was seeking, so I poked around in a bag of miscellaneous stuff. Not there either. A few minutes later, still looking for the stupid box knife, I looked through the same bag more thoroughly.

“What are all those tiny sparkly lights at the bottom of the bag?” asked my brain. In my defense, I’d been looking at solar string lights online earlier in the day. But these tiny sparkly lights were not whimsical. They were steel wool catching fire.

Steel wool be like…

IT TURNS OUT, I’d thrown a defunct battery-powered smoke alarm in the bag, along with loose sandpaper, a box of razor blades, and some steel wool. The battery had come out of the alarm, and my shuffling had put it in contact with the steel wool. If steel wool bridges the terminals on a battery, you get FIRE. The possibility that this might have happened when we weren’t around doesn’t bear thinking about.

Many sites describe the process as a useful hack. (You can achieve the same outcome with a gum wrapper or tinfoil/silver paper). Massively useful come the flaming zombie apocalypse, but undesirable in a carrier bag in one’s basement.

Short version: store your batteries carefully.

Posted in D'oh!, Organization | Tagged , , | 2 Comments

There’s a Hole in the Washer, Dear Liza

Tsk. Anyone who needs this kind of status symbol must have some terrible emotional problems.

– Marge Simpson

Once upon a time, we had a perfectly serviceable dishwasher. It was a real workhorse, and it survived two sets of tenants, innumerable houseguests, and us. Then I decided I wanted a FANCY dishwasher, with hidden controls and super-soundproofing. After much bargain shopping, we bought a KitchenAid.

Like this, only white, because I’m the one person in America who still likes white appliances.

The good: It’s extraordinarily quiet, which is terrific. It also saves water, which is good, too. It doesn’t have front controls in yellowed plastic, which is superb!

The bad: I’m not sure how much water we’re saving when we have to rinse dishes first. The extra insulation means there’s not quite as much room inside. And it has now developed leaks TWICE.

The first time, it was fixed under warranty. The second time was late last year, and we were headed out of town, so we shoved a cookie sheet under it.

One must try capturing errant drips with bakeware.

It’s been a busy year so far (ok?!?), so we’ve been using the dishwasher. Every other time, we siphoned water out of the cookie sheet. As the work-around became increasingly long-term, we called some repair shops, but they all had wait lists. One day, I started yapping about the dishwasher to a cab driver, and he said that he used to be an appliance repair person for [a big box store] and that we could fix it no problem. Why? Because he never had any training in appliance repair — instead, he would look at the appliance, then go to his truck and watch repair videos to figure out what to do. “Most of it’s plug and play,” he said.

Me, in taxi, planning my career in appliance repair, because apparently I already have enough experience and knowledge.

Upon our return, we assaulted the dishwasher. The problem is, the thing is low-slung (ergo the siphoning, rather than taking the cookie sheet out each time). It’s like trying to figure out what’s happening under Inigo.

Not actually sure Inigo even has an underside.

You can’t even get both of your eyes on anything under there, so there was no way to figure out where the drip was coming from without taking everything apart.

Aaaagh, it’s got my arm!

The Kev and I poked at the internet a bit and discovered that the entire sump assembly (dishwasher guts) is around $100 — close to the minimum call-out charge for repair. So we ordered it.
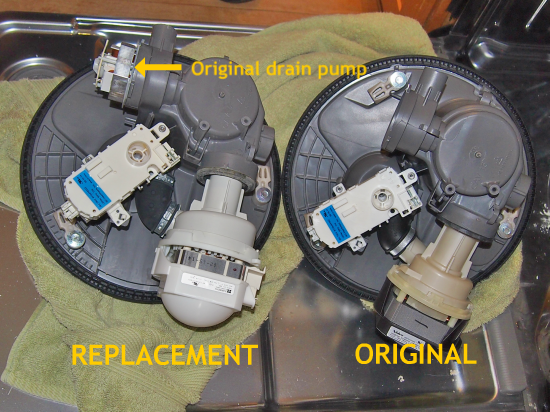
Here is briefly how to swap out this thing, which I offer with the understanding that you will also watch a bunch of YouTube videos for your specific brand. (We liked the articles at Sears Parts Direct and Repair Clinic videos, neither of which are affiliates.)

Before you start, UNPLUG THE THING and turn off its water. Remove all the interior racks and spinners and pipes so you can get most of yourself inside the machine. Then you need to release the old assembly. Grope around sightlessly until you find and undo all the electrical and water connections and the three latches holding the assembly up against the underside of the machine. I took some pictures so I could remember what would plug in where (as if I were going to be able to see it!).
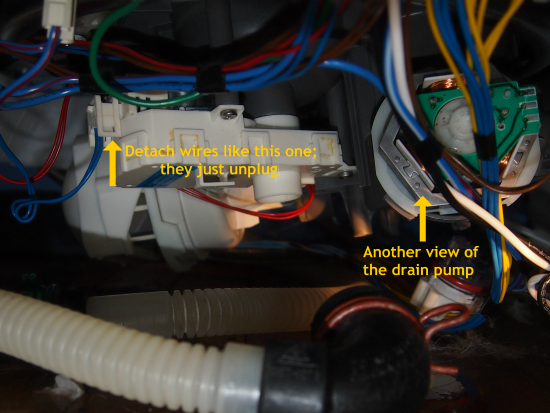
After undoing everything, the assembly is still going to feel like it’s part of the machine when you yank on it from inside the washer. Insert something flat (I used a thin blade screwdriver) between the rubber gasket and the bottom of the machine and twist gently to break the seal. Then, you’ll be able to remove the old assembly through the inside of the dishwasher. At this point, you’ll realize that there’s just a big ol’ hole in the bottom of the machine. Which would rather seem to encourage leaks, but I suppose gravity is helpful in draining.
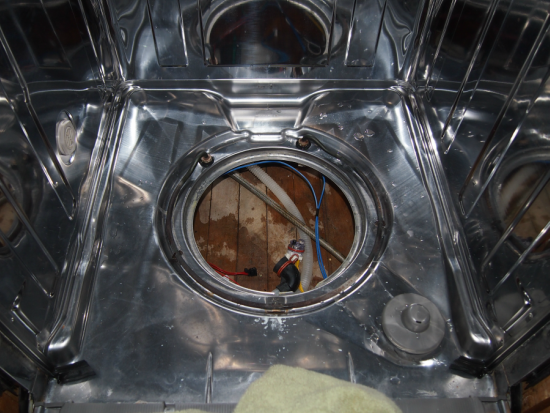
One video said we could “take this opportunity” to clean parts of the machine.

WHAT AN OPPORTUNITY! But in truth, there were some convoluted spots that were somewhat gross. We clean the filter regularly, and I tend to think that the INSIDE OF THE DISHWASHER should otherwise be a pretty clean place. Wrong. Ew.

Places to clean, when you have the opportunity

After everything is super-clean, you throw the new sump assembly in the hole and plug everything back in. Leave it loose so you can move it around as you access different parts of it underneath. Note that for the KitchenAid, the drain pump was NOT in the new assembly (although the main motor was), so we had to take that out of the housing in the old assembly and stick it in the new one (again, check YouTube for your brand — this was no big deal, and it was obvious when we compared the units).
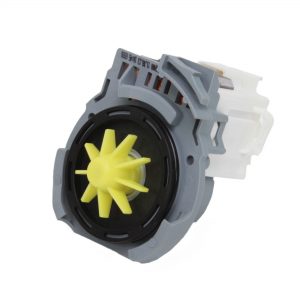
Random drain pump (from Sears Parts Direct) — whole thing is about the size of a baseball (I pointed it out a couple of places up-post; there’s a wiring harness and housing that clips around it underneath the machine)

Then, orient the assembly so that the attachments inside the compartment will line up. Wipe the edges of the hole down with rubbing alcohol, then rub the edges of the rubber gasket with dish soap to help make a good seal. While the Kev (or your equivalent) presses down on the assembly from inside the machine, turn the three latches on the underside so that the unit is clamped on.

Put everything back together, plug it in, turn on the water, and run it! Dry as a bone. So far.

The thing about replacing the whole sump assembly is that you don’t have to know what seal or part is bad — you’re replacing everything that could be bad. As a DIY job, we would otherwise have had to remove the old assembly, figure out the problem, then order that part. The sub-parts of the sump assembly are not all that cheap, so if we had misdiagnosed, we would have ended up spending more on parts than just buying the whole unit. My theory is that this fix also forestalls other near-leaks that just hadn’t happened yet from the old sump. I’m aware I’m rationalizing.

It’s not a tailored solution, but I don’t have to siphon off the cookie sheet anymore.
Posted in D'oh!, Kitchen, Plumbing, Repair & Maintenance | Tagged , , | Leave a comment

Merry Christmas

Aren’t we forgetting the true meaning of this day: the birth of Santa?

– Bart

We went on unintentional hiatus for the last few months — nothing dramatic happened, but I did change jobs. That took up far more of my mental energy than I was expecting, and blogging slipped off the list. I’ve got my feet under me now, and I’ve missed the blog, so more episodes of our continuing saga will be forthcoming.

Happy holidays to you all (and thanks for your patience!).

Posted in Uncategorized | 2 Comments

Cutlery Drawer Makeover (and Why Not)

Where’s that metal dealy you use to dig food?

– Homer

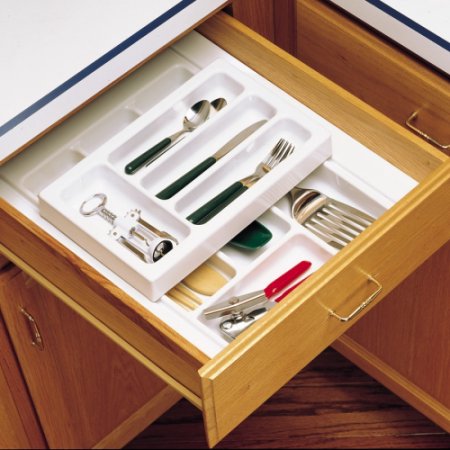
When we remodeled the kitchen (pre-blog, just after we moved out of the cave), the silverware drawer came with inserts something like this:

Rev-a-Shelf (via) — not what we had, but similar

That worked well, but the kitchen (and therefore the drawer) is small. This drawer has only 10 inches of inside width, and the inserts blocked some of the drawer’s cubic inch-age. I first reclaimed that space by taping bits of cardboard inside the drawer.

Not a permanent solution

One day, I got a crazy idea about starting and finishing a project in a reasonable timeframe, so I decided to fix this drawer.

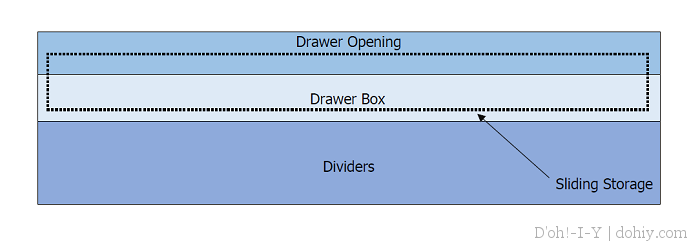
I wanted to have dividers and sliding storage, so I needed to figure out how I could pack all that in the available space.

  • Interior drawer box height: 2-5/8 inches
  • Clearance from top of drawer box to top of drawer opening: 3/4 inch
  • Total available depth (allowing for clearance): 3-1/4 inch

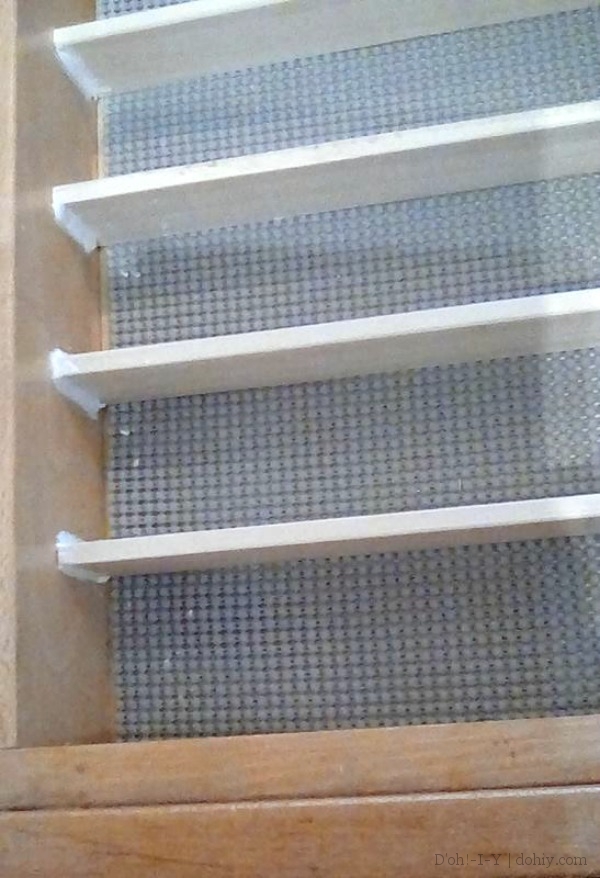
First, the dividers. It turns out, you don’t need a lot of depth; most drop-in organizers are pretty shallow, but do a fine job of corralling forks. I had some flat molding that I ripped down to 1-1/2″, then cut into lengths that fit across the drawer.

But how to attach them to the drawer? About six months ago, I bought some Sugru moldable glue without a specific plan for it. It’s not supposed to last six months, but I had it in the fridge, and it seemed fine, so I gave it a go.

Available at Target and other fine stores

Sugru is a little like Silly Putty. I rolled it into thin lengths and pressed them into the corners.

Sugru holding dividers in place

Once the Sugru set up, the dividers were good to go.

For the sliding part, I was poking around for a pre-existing tray or something I could re-purpose when I found…a painting.

A painting on a wrapped canvas like this one

Wrapped canvases are stapled to fairly heavy-duty wood frames, so I removed the canvas and attached a piece of pegboard to the bottom. Voila, a tray.

The frame/tray is 1-3/8 inch deep. To make it slide, I cut two pieces of half-inch square dowel to just under the outside width of the drawer box, then screwed them to the sides of the frame so that the tray would be against one side of the drawer. The gliders are an 1/8 inch from the top of the frame, making the frame stand 5/8 inch above the top of the drawer box. That gives it a 1/8 inch clearance when closing the drawer.

To keep it square in the drawer, I added a spacer to the other side — just another piece of flat molding under the dowels.

It’s the catamaran of the drawer world.

Retrospectively, I could have made my own tray for this purpose, but it was fun to figure out how to re-use something instead. And it works!

Slider forward…

…and back

Something actually finished! I was starting to think that never happened.

Posted in Before & After, Kitchen, Organization | Tagged , , , | Leave a comment

What Tutorials Don’t Say About Refinishing Wood Floors

I’m happy AND angry.

– Ralph Wiggum

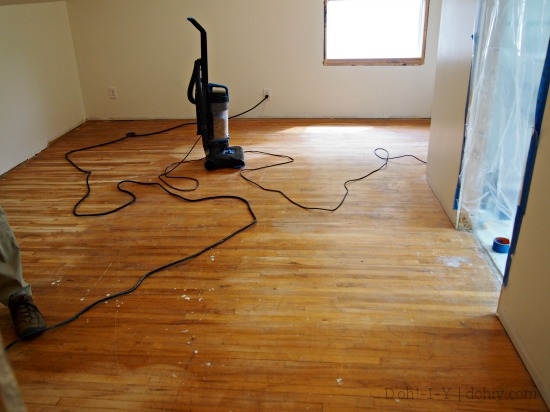
The next step in the upstairs remodel was refinishing the floors. Kevin previously wove salvaged flooring into the existing boards, so now we have actual flooring throughout the upstairs. We decided to do the work one room at a time — moving all the furniture to one side and then the other. We’ve just finished the bedroom:

Before (detail)

During

After (looks fine if you don’t look too closely)

This one room was a hard-won battle, and we learned a lot that we’ll apply to the next room.

Lesson 1: Floor Edgers are Nasty

A floor edger sander is a heavy, violent tool designed to sand along the walls while you use all your willpower to muscle it into position.

Fortunately, most of the floor involves a friendly orbital sander.

Having used an edger now, I question its utility. First of all, using a floor edger is like wrestling a rabid badger on steroids.

Like this, only rabid and with sandpaper on its bottom.

Second, edgers dig in (also like badgers) and leave serious swirl marks on the floor that must be hand-sanded out. Even pros comment that edger swirl is pretty much to be expected, although you can reduce its extent.

On the next room, I’m inclined (against professional advice) to get as close as possible to the edge with the big sander, and then hand sand the edges and corners, using the same grit progression. You have to get the corners by hand (or with a detail sander) anyway, so…I’m having trouble seeing the benefit.

Again, though, professionals say to use them.

Lesson 2: We Are Mammals.

No matter how lustrous and healthy your mammalian hair is, it’s going to fall out while you are applying polyurethane to your wood floor. And no matter how good your eyesight, you’re not going to see that hair in the finish until everything’s dry. In short, this is not a good hatless or nude activity.

Enjoy your hair elsewhere.
Completely cover your hair and remove all pet hair from your clothes before entering the Flooring Zone. And use a really good paint brush for cutting in to avoid bristle loss.
Lesson 3: No Going Back

It took a couple of weeks after sanding to be able to do the finish — we were waiting for the humidity to go down a few points. It’s been cold and rainy, and cold raininess slows down dry and cure. (We used Duraseal satin, by the way, which is a nice product.)

Once it got relatively warm, I had the bedroom window open to promote drying. It was a lovely, warm day, but there was a sudden cloudburst. To prevent the floor from getting wet, I tiptoed to the window to close it. I swabbed the footprints as I backed up, but I missed many of them. I thought I had just barely touched the floor, but the footprints proved otherwise.

If you wander across the wet finish, you will be forced to sand and re-poly the area in a semi-effective way that I would not recommend, and therefore will not even describe. Figure out what you want to do with the window ahead of time.

Lesson 4: “Hardwood” is Not a Misnomer.

We spoke with several knowledgeable people about refinishing this particular floor, and we got a lot of this:

The issue? Ninety-year-old maple and associated finishes are crazy hard and weirdly resistant to mechanical abrasion. If we had it to do over, knowing what we know now, we probably would have hired this out (or at least that would be my vote). But since we’ve started down this road, we’re going to finish the reading room as well. We’re adding a few steps to the process, though:

  1. Chemical stripper to lift most of the old finish instead of sanding through it.
  2. Skipping the edger.
  3. Shaving ourselves entirely bald.

I’m pleased that this room is done, and I know that the flaws that I see will not be noticeable, but I’m still annoyed about them. Of all the projects we’ve done, this was really one of my least favorite to do.

Posted in Before & After, D'oh!, Walls & Floors | Tagged , , | 1 Comment

First Principles Thinking In Action

Homer: Aw, twenty dollars? I wanted a peanut!
Brain: Twenty dollars can buy many peanuts.
Homer: Explain how!
Brain: Money can be exchanged for goods and services.

When my brother and I were kids, if we were trying to puzzle something out, Dad would often interject, “First principles!” in a cheerful fashion. We quickly understood what he meant — think about the givens in a situation, and go from there. Nowadays, Elon Musk makes hay out of “first principles thinking” as if he invented human intelligence all by himself, to which I say, “Shut up, Elon Musk! My dad was advocating first principles when you were in short pants! AND he had the pneumatic transportation idea in the 1970s. You just have venture capital and your carefully crafted charisma.”

(“Also, your surname is ‘Musk’.”)

Recently, between imaginary conversations with the ol’ Muskinator, I discovered that a wall sconce in one bedroom was not working. Nephew Drew was staying in there, and he said it wasn’t turning on. I removed the bulb (one of those fiddly two-prong halogen things) to find a replacement next time I was out.

Ikea Husvik (discontinued)

Over the next week, I undertook the following:

  • Bought a bulb at Menard’s, and determined it was the wrong bulb.
  • Went to a specialist bulb dealer and had them recommend a bulb.
  • Tried the (expensive) special bulb and found it didn’t work.
  • Found the light’s manual online (Ikea!).
  • Conducted several Internet searches for Ikea halogen bulbs and how to refurbish corroded halogen fixtures.
  • Had an argument with the Kev about how he had to keep his light on for me and why didn’t I put a lamp next to the bed temporarily? (We moved to this room because we’re painting and sanding the floors upstairs.)
  • Found a spare lamp and discovered that the cord wasn’t long enough.
  • Hauled the cord for the broken wall light up from behind the bed to use the attached extension cord, and…discovered that it wasn’t plugged in.

So much d’oh.

Right after the D’OH!, I muttered, “First principles!” and laughed. I imagine that Nephew Drew unplugged the light to plug in his phone charger. Why I didn’t check that first, I just don’t know.

Anyway, the point is, don’t jump to a second-level solution first. Eliminate the basic stuff by thinking about first principles. Usually, that will reveal where the problem is. It’s easy to start elsewhere, but take a breath and save yourself a $12 bulb.

I don’t come off well in this post, but I think we can agree that Dad gave me all the mental tools I needed, whether or not I use them on the regular!

Posted in D'oh!, Electrical, Family | Tagged | Leave a comment

Radical Radiator Plan

Who would have thought a whale could be so heavy?

– Moe

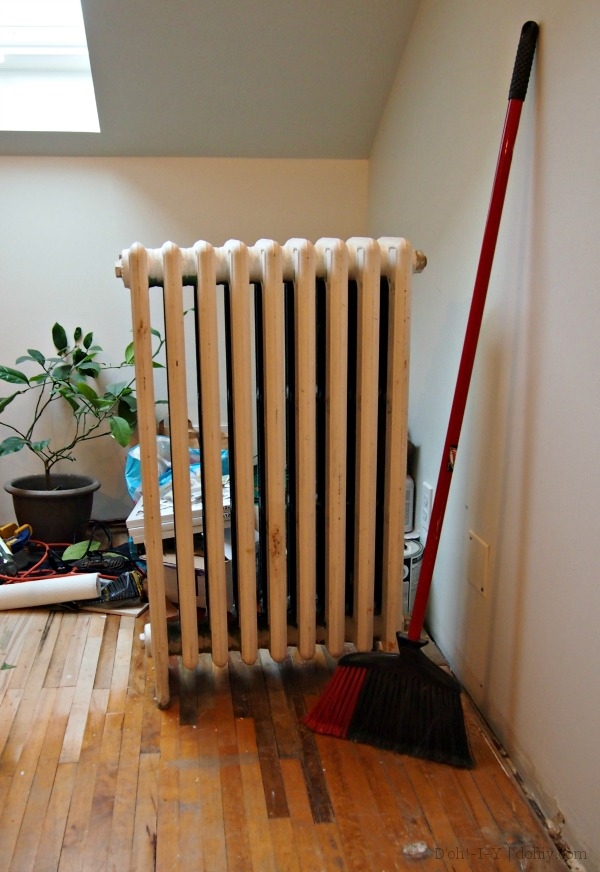
Once, there were two good-sized radiators upstairs. We removed one for floor-plan reasons (it ended up being inside a closet). After draining and disconnecting it, we put it on Craigslist for whoever could get it down the stairs without hurting themselves, us, or the house.  The winner brought about 18 bulky guys (ok, six), at least one of whom was a professional rigger, and it still took them 45 minutes to get the thing out.

With the insulation, the one remaining radiator in the upstairs was more than enough, even over a Minnesota winter. I mean, it is PLENTY warm up there. We decided the ideal case would be two much (MUCH) smaller radiators, which meant the old radiator had to go.

To drain a hot water radiator, you need to shut off your boiler and reduce water in the system by opening it at the lowest point until the water falls below the level of the radiator in question. Open up the bleed valve on the radiator to let air into the system.

(Every system is going to be a little different, so either you feel completely comfortable with this process or you don’t — if in the slightest doubt, check with a plumber. We disclaim all responsibility here (as per usual).)

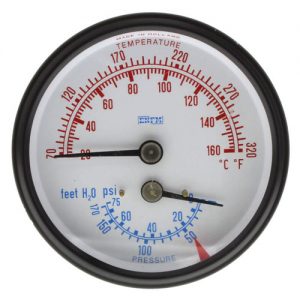
You can hear when the radiator is pretty much empty if you listen while it’s draining, but the boiler pressure gauge shows the “height” of the water in the system, and that helps (if you know how many feet the radiator is above the boiler).

“Feet H2O” at about 8:00

Once drained, use a pipe wrench to detach the lines from the radiator. Kev’s got a big ol’ piece of pipe that he puts over the handle of the pipe wrench to get more leverage when we need it, and we needed it here! Those connections were made a long time ago and had been painted over many times.

Free! Finally free!

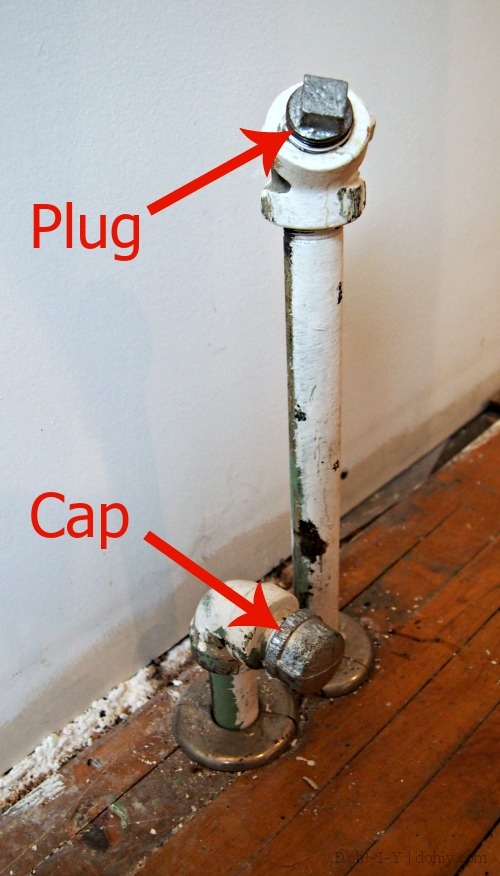
Be careful not to accidentally bend or otherwise damage the lines from the system — that would make it a bigger job. Also, if you unintentionally turn one of the supply pipes, you may loosen a connection elsewhere, and nobody wants a flood. Especially not you in your own house. Cap or plug the pipes (as appropriate) if you are going to refill the system before hooking up another radiator. Use thread tape and really snug ’em up good.

Without 18 (six) bulky guys and a rigger, we were not planning on hauling this thing out by ourselves. Plus, it had some issues that made it not ideal for re-use. So we decided to disassemble it and take it out in pieces for scrap.

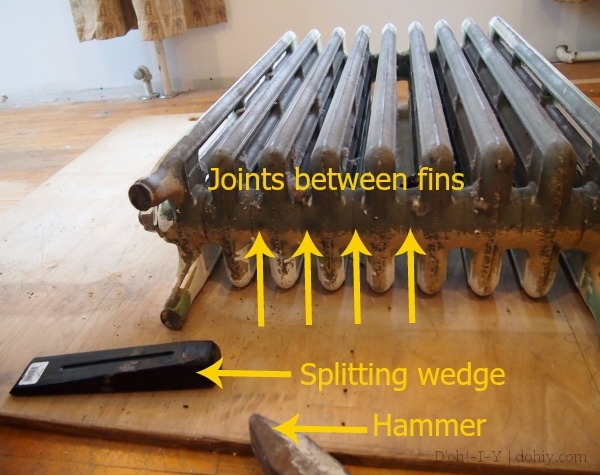
Radiators are cast by the fin, so from what we read, we should be able to pry apart the sections at the joints. We thought a crowbar would do it, but Kev got a splitting wedge just in case.

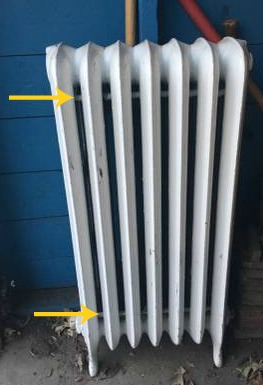
Note that some radiators, although not this one, feature connecting rods holding the fins together; they should be unscrewed prior to dissassembly. No sense fighting more than you have to.

See the connecting rods on this one? You should be able to loosen those at the sides.

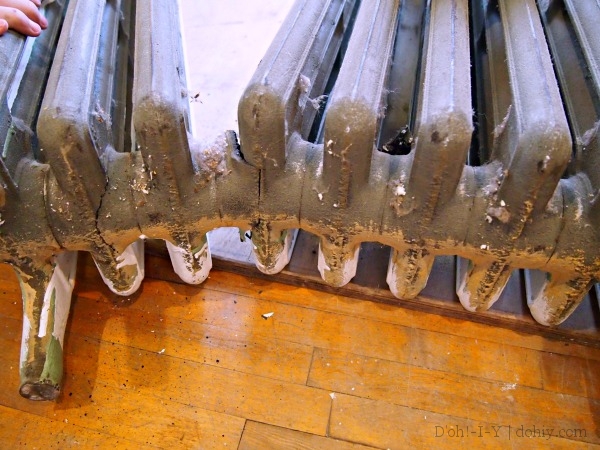
Well, guess what? After eight decades or so, those joints are not so supple. Kev ended up using the splitting wedge, and splitting occurred — just not along the joints.

Well, it’s coming apart…

Cast iron is pretty brittle, and we just ended up cracking the thing. Since we weren’t re-using the radiator, that was fine — but BE YE WARNED should you have highfalutin ideas about disassembling a radiator to resize it.

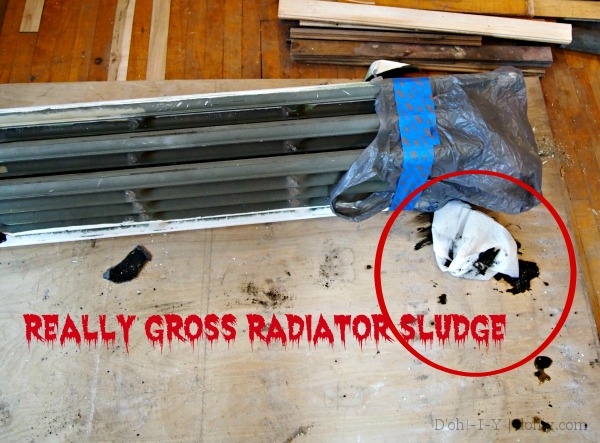
Anyhoo, we proceeded with brute force to break it into three major chunks, which each weighed a manageable amount, maybe 55 lbs/25 kilos. Moving them was pretty straightforward except for all the radiator sludge.

…ergo bagging and taping the open ends…

If you have something like this and don’t want to take it to the scrapyard yourself, you can have ten or more takers in no time by posting it in the “free” area of Craigslist. Radiators are ferrous (iron) scrap, which doesn’t pay very much at all, but for people who scrap for a living, about 150 lbs of ferrous scrap can fill out a load.

This radiator was smaller than the first one we got rid of, so we are semi-wimps, but it still wasn’t worth the risk of injury on steep stairs. It took less than 20 minutes to break it down and move it safely, and now it’s being recycled. If you have a valuable/unusual radiator or one that can be effectively reused, look into moving it. Otherwise, I highly recommend beating it into manageable pieces.

Posted in Energy, Salvage | Tagged , , | Leave a comment

Quartz Countertop Dechippification

Mmmmm, chips!

– Homer Simpson

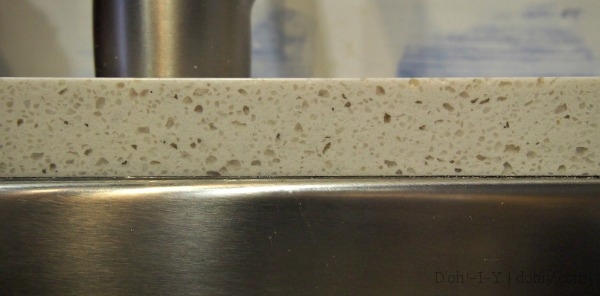
Not too long ago, we found a small chip on the edge of the sink. It was virtually invisible, but we knew it was there, and it made us both a little sad. We can’t think what did it, because the quartz is pretty dang tough. If it’s going to happen anywhere, though, it’s on an edge.

I found a repair kit online with great reviews. I was slightly skeptical (as is my way), but I ordered it.

The kit includes a clear (non-yellowing) epoxy mixer, a UV light, and some polishing compound. You ooze some of the epoxy into the hole and place a piece of clear plastic (a “curing strip”) over the goo to level it. To set it, there’s a tiny UV light. I rigged up the light (taped to a piece of Tupperware in the sink) so that it was directly on the spot. I left it there for much longer than the two minutes the kit specified. This additional time probably didn’t do anything further, but it made me feel virtuous and thorough. Then you buff it with the world’s tiniest piece of sandpaper, and no more chip.

The ProCaliber kit is easy to use and there’s a fair bit of product left over in case we ever have to do this again (although let’s not have that happen). Here’s a video on how to do it (this post NOT sponsored by ProCaliber, incidentally — I imagine there are competitors offering more or less the same thing):

The repair is like a vampire: it doesn’t show up in photos (or is that mirrors?). It looks like nothing ever happened. Can’t even feel a difference in the surface. RESULT!

OLYMPUS DIGITAL CAMERA

I imagine it’s particularly good on light-colored granite and quartz like ours, but the reviews seem to cover all sorts of surfaces. For the price (around $30 online — Google for the best price), it’s certainly worth a try if you have a chip. You can always call a repair service later if it doesn’t work.

PS: If you follow us and wonder what’s been keeping us away from the blog, it’s just a whole lot of Stuff — a little travel, a lot of work, some nasty recurring cold/flu bug, and now the mid-winter slump. On the travel front, we went to see family in the UK, and took a side trip to Munich and Nuremberg, which was great.

Munich, from a tiny platform on top of a church

Getting back into the blog swing now — I have missed it!

Posted in D'oh!, Kitchen, Repair & Maintenance | Tagged , , , , | 2 Comments

Good Fences Make Sore People

Look! Achy Breaky Stacy for a dollar ninety-nine!

One of our New Year’s priorities for 2014(!!!) was repairing our leaning privacy fence.

We didn’t get it done.

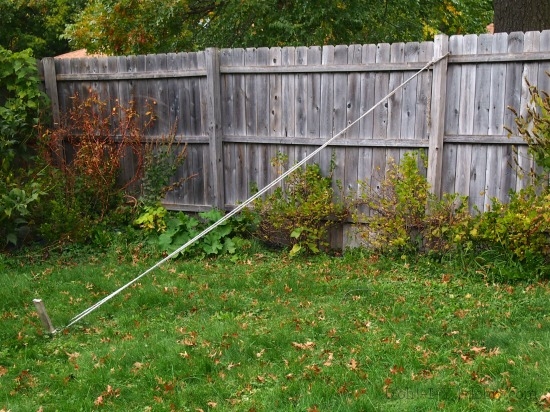
This spring, I was concerned (and embarrassed) enough about the angle that I wanted to either fix it (imagine!), or at least prop it up until we got to it. Because we were going out of town, Kevin figured out a temporary fix.

OLYMPUS DIGITAL CAMERA

Not too shabby, huh? Do you wanna see how he did it?

OLYMPUS DIGITAL CAMERA

Kev done fixed it.

Staking the fence worked well as an interim fix. And we only got tangled up in that there rope two or three times!

dancin

Anticipating summer 2017…

We finally got around to a semi-permanent repair this month. First job was to remove the fence panels and dig out the bad posts. Because we have a panel fence instead of a picket fence, the new posts go in the same spots, and we couldn’t dig out wide craters. To support the posts and make the most of the concrete, you want a hole no bigger around than a nephew.

OLYMPUS DIGITAL CAMERA

He was absolutely indispensable to the project, and not just because he made a good measuring device.

We took out three bad posts, and found out that frost heave was not our problem.

OLYMPUS DIGITAL CAMERA

Creeping Charlie is our problem.

The leaningnest post was rotted almost completely through, and this top-heavy chunk of wood was pulling the posts on either side via the panels. Frost heave is real, but that’s not what happened here.

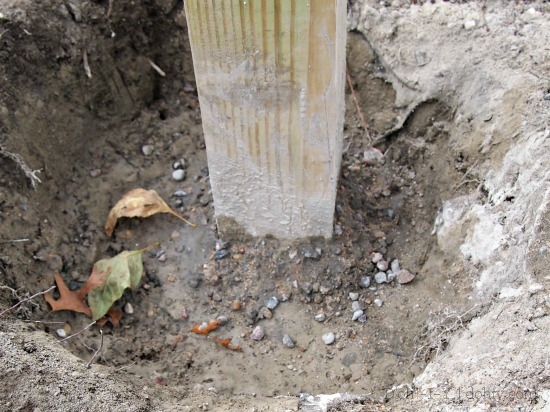
To avoid frost heave and rot with the replacement posts, we dug down below the frost line (3’6″ in this part of the world) and flared out the sides of the hole near the bottom (see detailed how-to here). Pour a little pea gravel in the bottom to help drainage. Then stick in the post (we used 10-foot treated posts, trimmed a little to match the height of the pre-existing ones). Then, Kevin ran a line across the back of the posts from the last one on each side that was actually straight so we could line them up.

OLYMPUS DIGITAL CAMERA

Near hole to be widened a little toward the left.

We used Quikrete fast-setting concrete for posts. First, we’d square up the posts in all directions, then dump the dry mix into the hole (wear a mask). Recheck the level, then add water–no need to stir! It’s a gallon of water for every 50 lbs. (one bag) of mix, so that’s what we did…and then we had to bail out the first hole. Turns out, if you have St Paul clay at the bottom of your hole, it won’t drain well and you need less water. We used three bags per hole, give or take.

Build up the concrete in a slope up to the post so that water (hopefully) runs away from the wood. Concrete stops about five inches below grade.

Slope concrete against the post so that water runs away from it. Fill the last 5-6″ of the hole with soil.

This stuff sets up really fast, so we got the posts rechecked and then nailed temporary buttresses to them while they dried. We probably didn’t need this propping step given how fast the set is, but we were going in for the night and didn’t know who might want to swing on them in our absence.

Arrow shows an out-of-line post we shored up the next day.

Arrow shows an out-of-line post.

The next day, we woke in pain. Digging and hauling concrete and moving 10-foot posts is tiring! Even the nephew felt it a little. But the second day was easier. We only had two posts that had been pulled out of true. For the less bad one, we (Kevin) drove a heavy metal stake alongside and screwed the post to it with stainless screws. For the one shown in the image above, we dug down and around the existing concrete pour, then pushed the post back up straight. While I leaned against it, Kevin braced the post in the right place. Then we dumped concrete and water into the widened hole and up and around the post above the existing concrete. I wouldn’t recommend this technique for a post that was really leaning, but with the support of the new posts, this stiffened the fence up more than enough (especially since there’s no gate on this side causing additional movement).

Then we took some aspirin and sat the heck down for a while before nailing the panels back up.

OLYMPUS DIGITAL CAMERA

After. Unrelated: how do you keep Maximillian sunflowers from flopping?

OLYMPUS DIGITAL CAMERA

Straighter fence, floppy sunflowers, transplanted stuff, and two large blocks of limestone that we should have moved back inside the fence before closing it up.

So that’s one New Year’s resolution from 2014 finished!

Posted in D'oh!, Outdoor Building Projects, Repair & Maintenance | Tagged , , , , | 4 Comments

No Need to Hack: Ikea Mail-Ready Basket

Now there’s no choice but to go…store-bought!

– Marge Simpson

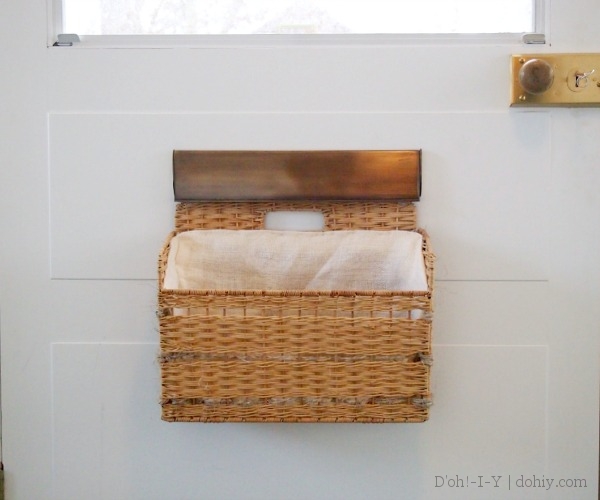
Once upon a time, I cut up an Ikea magazine basket to make a hanging mail basket.

OLYMPUS DIGITAL CAMERA

This hack has held up surprisingly well. But if it starts to fall apart, it seems Ikea has me covered. Check out the Gabbig:

This isn’t being shown as a mail catcher, but if you hang it on the back of a door, that’s a mail catcher, right? I mean, look at this next picture.

basket2

It’s as if Ikea decided not to package hooks with Gabbig, but used this picture to get you most of the way there.

At $12.99, it’s a far sight cheaper than most of the fancy-pants options, which start around $25. It might not be wide enough front to back to catch everything, but for that price, it’s completely worth a go.

Would love to hear from anyone who gives this a try!


Related Posts Plugin for WordPress, Blogger...
Posted in Decor, Organization, Windows & Doors | Tagged , , , | Leave a comment