
Tsk. Anyone who needs this kind of status symbol must have some terrible emotional problems.
– Marge Simpson
Once upon a time, we had a perfectly serviceable dishwasher. It was a real workhorse, and it survived two sets of tenants, innumerable houseguests, and us. Then I decided I wanted a FANCY dishwasher, with hidden controls and super-soundproofing. After much bargain shopping, we bought a KitchenAid.

Like this, only white, because I’m the one person in America who still likes white appliances.
The good: It’s extraordinarily quiet, which is terrific. It also saves water, which is good, too. It doesn’t have front controls in yellowed plastic, which is superb!
The bad: I’m not sure how much water we’re saving when we have to rinse dishes first. The extra insulation means there’s not quite as much room inside. And it has now developed leaks TWICE.
The first time, it was fixed under warranty. The second time was late last year, and we were headed out of town, so we shoved a cookie sheet under it.

One must try capturing errant drips with bakeware.
It’s been a busy year so far (ok?!?), so we’ve been using the dishwasher. Every other time, we siphoned water out of the cookie sheet. As the work-around became increasingly long-term, we called some repair shops, but they all had wait lists. One day, I started yapping about the dishwasher to a cab driver, and he said that he used to be an appliance repair person for [a big box store] and that we could fix it no problem. Why? Because he never had any training in appliance repair — instead, he would look at the appliance, then go to his truck and watch repair videos to figure out what to do. “Most of it’s plug and play,” he said.

Me, in taxi, planning my career in appliance repair, because apparently I already have enough experience and knowledge.
Upon our return, we assaulted the dishwasher. The problem is, the thing is low-slung (ergo the siphoning, rather than taking the cookie sheet out each time). It’s like trying to figure out what’s happening under Inigo.

Not actually sure Inigo even has an underside.
You can’t even get both of your eyes on anything under there, so there was no way to figure out where the drip was coming from without taking everything apart.

Aaaagh, it’s got my arm!
The Kev and I poked at the internet a bit and discovered that the entire sump assembly (dishwasher guts) is around $100 — close to the minimum call-out charge for repair. So we ordered it.
Here is briefly how to swap out this thing, which I offer with the understanding that you will also watch a bunch of YouTube videos for your specific brand. (We liked the articles at Sears Parts Direct and Repair Clinic videos, neither of which are affiliates.)
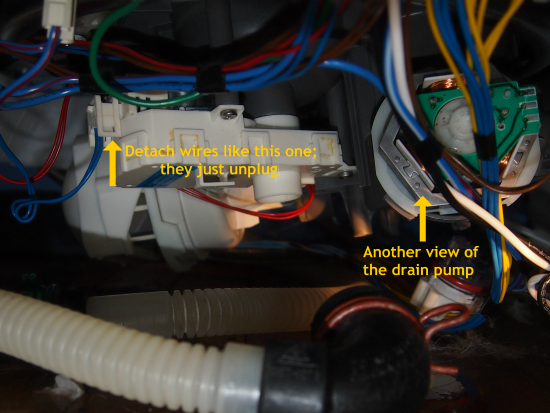
Before you start, UNPLUG THE THING and turn off its water. Remove all the interior racks and spinners and pipes so you can get most of yourself inside the machine. Then you need to release the old assembly. Grope around sightlessly until you find and undo all the electrical and water connections and the three latches holding the assembly up against the underside of the machine. I took some pictures so I could remember what would plug in where (as if I were going to be able to see it!).
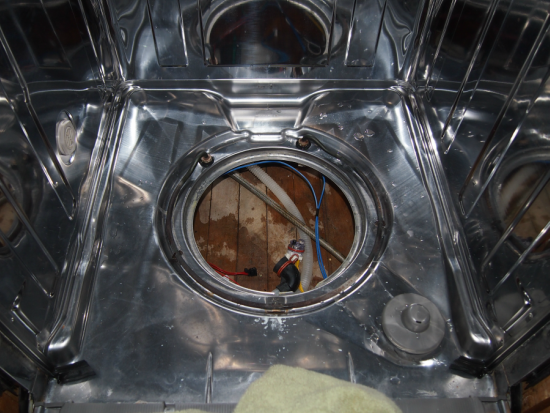
After undoing everything, the assembly is still going to feel like it’s part of the machine when you yank on it from inside the washer. Insert something flat (I used a thin blade screwdriver) between the rubber gasket and the bottom of the machine and twist gently to break the seal. Then, you’ll be able to remove the old assembly through the inside of the dishwasher. At this point, you’ll realize that there’s just a big ol’ hole in the bottom of the machine. Which would rather seem to encourage leaks, but I suppose gravity is helpful in draining.
One video said we could “take this opportunity” to clean parts of the machine.

WHAT AN OPPORTUNITY! But in truth, there were some convoluted spots that were somewhat gross. We clean the filter regularly, and I tend to think that the INSIDE OF THE DISHWASHER should otherwise be a pretty clean place. Wrong. Ew.
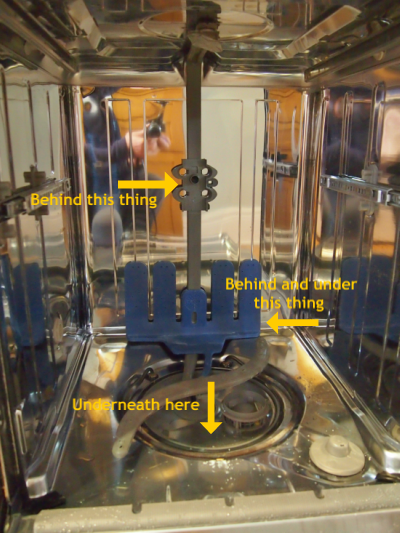
Places to clean, when you have the opportunity
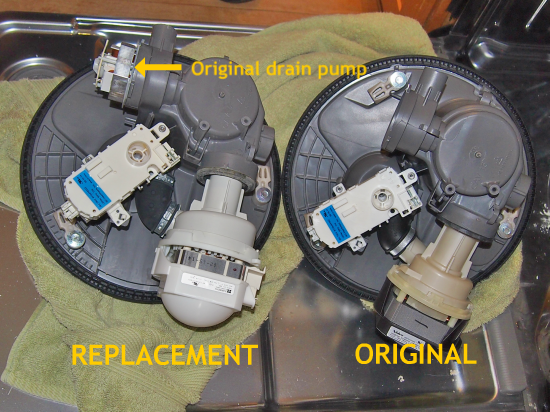
After everything is super-clean, you throw the new sump assembly in the hole and plug everything back in. Leave it loose so you can move it around as you access different parts of it underneath. Note that for the KitchenAid, the drain pump was NOT in the new assembly (although the main motor was), so we had to take that out of the housing in the old assembly and stick it in the new one (again, check YouTube for your brand — this was no big deal, and it was obvious when we compared the units).
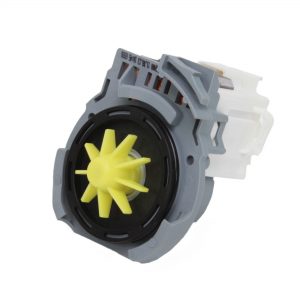
Random drain pump (from Sears Parts Direct) — whole thing is about the size of a baseball (I pointed it out a couple of places up-post; there’s a wiring harness and housing that clips around it underneath the machine)
Then, orient the assembly so that the attachments inside the compartment will line up. Wipe the edges of the hole down with rubbing alcohol, then rub the edges of the rubber gasket with dish soap to help make a good seal. While the Kev (or your equivalent) presses down on the assembly from inside the machine, turn the three latches on the underside so that the unit is clamped on.
Put everything back together, plug it in, turn on the water, and run it! Dry as a bone. So far.
The thing about replacing the whole sump assembly is that you don’t have to know what seal or part is bad — you’re replacing everything that could be bad. As a DIY job, we would otherwise have had to remove the old assembly, figure out the problem, then order that part. The sub-parts of the sump assembly are not all that cheap, so if we had misdiagnosed, we would have ended up spending more on parts than just buying the whole unit. My theory is that this fix also forestalls other near-leaks that just hadn’t happened yet from the old sump. I’m aware I’m rationalizing.
It’s not a tailored solution, but I don’t have to siphon off the cookie sheet anymore.
