A Little Off the Top

simpsons2

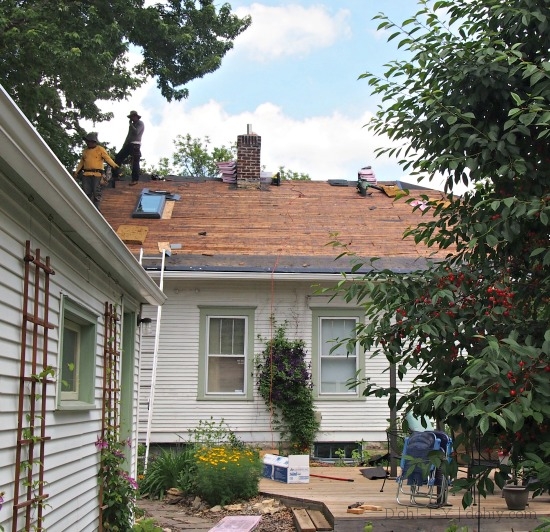
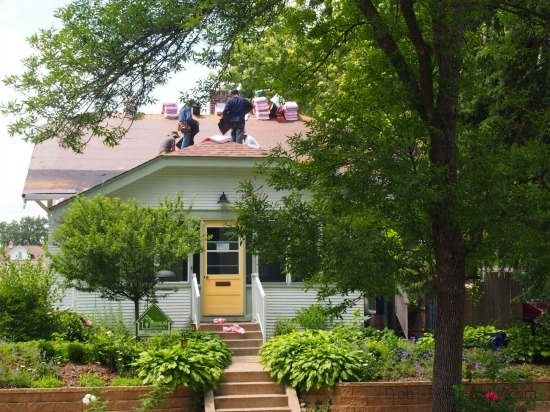
On Thursday, six guys tore the roof off the house and garage and put on another. We were expecting it would take at least two days, but they started at 6:45 a.m., left at 9:15 p.m., and only took about 20 minutes for lunch. If I hadn’t seen it, I wouldn’t have believed it was possible.

And sooo polite. The youngest guy was sent to ferry drinks from the fridge periodically. I told him he could just come in whenever, but instead he knocked every time and removed his cap when he came in the house. Not sure how I never met this kid while my parents were raising him.

Remember I was obsessing about roof colors (while Kevin rolled his eyes)? When it came down to it, the subcontractor was using Owens Corning Oakridge shingles instead of the GAF colors we were anticipating, so the obsessing started all over again. It was more fun this time, because Owens Corning has a page where you can try options out, and one model house was ridiculously close to our house colors (and not too far off the period and style). We knew we wanted a warm color to coordinate with the hardscaping, and settled on Aged Cedar.

Owens Corning roof visualization

Owens Corning roof visualization screenshot

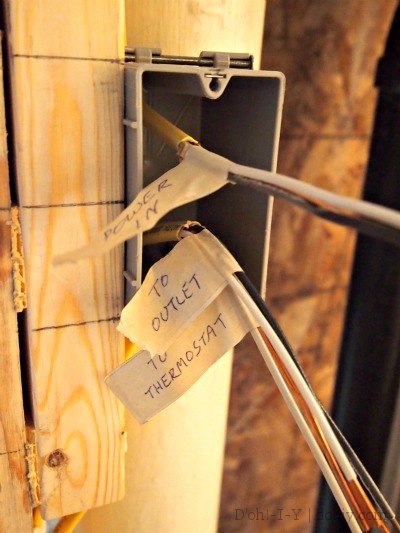
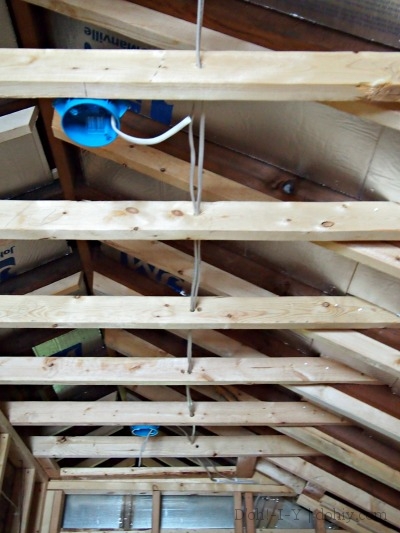
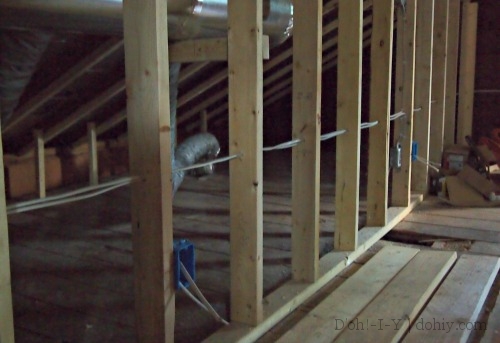
We also moved some stacks around, and went for a roof ridge vent rather than the vent boxes shown near the ridge in the before shot. This is all part of the cold-roof system that is best demonstrated by diagrams from people who know what they are talking about:

(via)

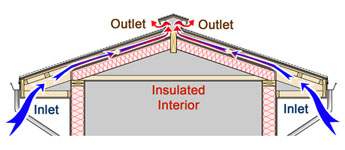
The cold air enters above the roof insulation and is pulled along outside the insulation and exits at the ridge, keeping the roof deck cold to avoid ice dams (via).

Instead of soffit vents, we have corresponding low-roof vents under the shingles themselves.

The soffit vent alternative (via)

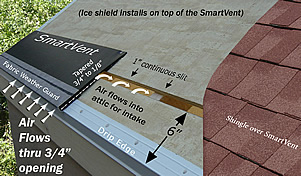
The shingle vent alternative (via)

Ok, so the roof mechanics are conceptually sound, and the shingle color was really just a detail. I still woke up during the night before thinking, “What if we’ve picked something way too dark and weird!?” But as long as it would still keep rain and snow off us, the aesthetics were just a bonus.

We prepped by moving all the plant containers, bird feeders, and porch furniture away from the house. And we bought soda and snacks. Beyond that, there was nothing we could really do ahead of time.

Dawn and roofers arrived early on Thursday. Once the tar paper came off the roof (by about 10:00 am), I was surprised how slatted the actual roof deck is.

Once the tarpaper's off, you can really see through the roof.

No good for vampires.

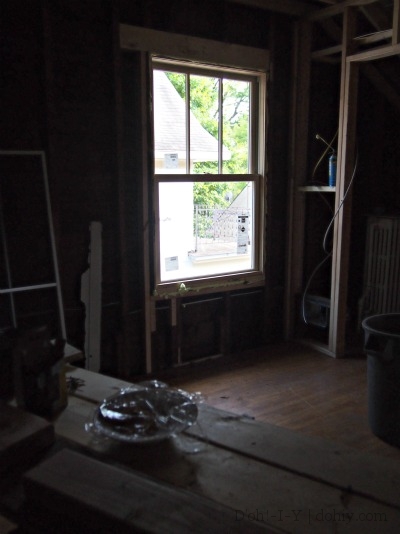
The crew also installed our two skylights.

One skylight in!

Roof off, one skylight in!

The immediate difference it made inside was remarkable. It’s positively airy up there! I did a small dance.

The first look up at the skylight. TREEHOUSE EFFECT!

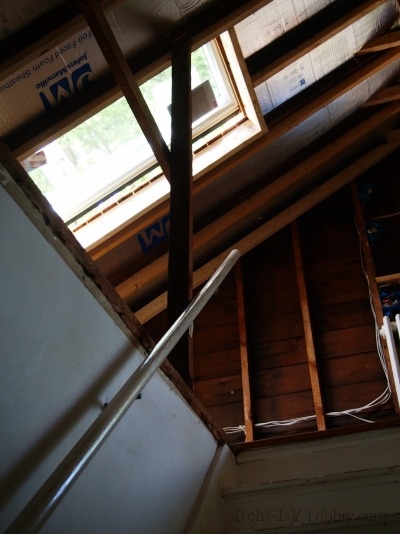
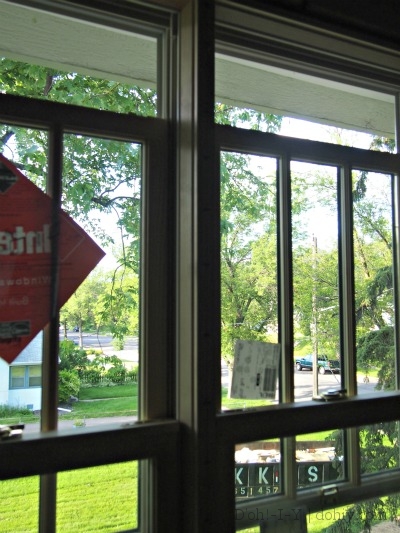
The first look up the stairs at the skylight. TREEHOUSE EFFECT!

A guy with a crane dropped the many shingle packages on the roof mid-morning. The whole house shook, and some cats were displeased. The actual shingling kicked off early afternoon.

Porch roof on

Porch roof on

The crew put down tarps all around the house. I still anticipated that there would be a big mess afterwards — it’s a messy job. I grew up in a new subdivision, and we were always playing with shingles and siding pieces that had been left behind. That’s not an option for the neighborhood kids here.

mess v not mess

During and after

It went so well, I might have dreamed this re-roof, except that we have an actual new roof. Here’s the old roof:
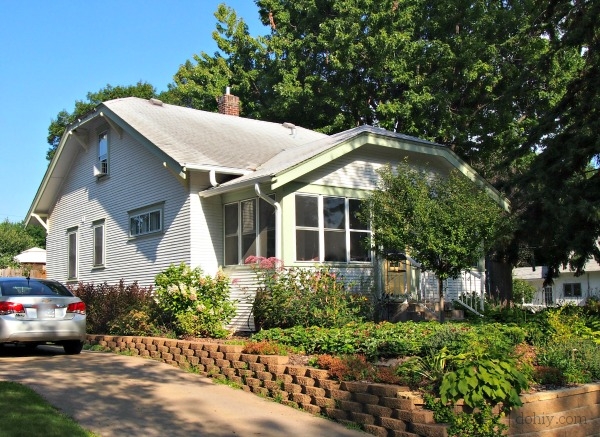
OLYMPUS DIGITAL CAMERA

Here’s the new:

I know conventional wisdom says white house/gray roof, but I like the cedar color. Makes the place more cottage-y and snuggly. Coordinates with the hardscaping. And maybe someday the house won’t be white.

Posted in Before & After, Garage, Siding & Roof | Tagged , , , , , | 6 Comments

Retrofitting Air Conditioning to an Older Home

Moe: Now he’s ragging on air conditioners!
Carl: Hey, they keep us cool in the summer, pal!

When we bought the house, it had one window air conditioner of limited cooling power. A former owner removed one of the original piano windows for this purpose. Did he bother to save the window for later use? Nope.

Over the years, we replaced that unit and added others. It doesn’t get very hot here for much of the summer, but when it does, it is (in my opinion) UNBEARABLY hot. In recent years, I seem to be turning into a Sebacean, at least from a hate-to-be-overheated perspective.

aeryn sun

Since we were remodeling anyway, we decided to get some pricing on AC installs. We received two bids in the brand-new-nice-car range and one that seemed–at least in comparison–semi-achievable. Nice-used-car. It’s expensive, no two ways about it, but shopping around made a big difference.

Each company quoted ductless mini-splits. These are the units that you hang on the wall that attach directly to an exterior AC unit.

Fujitsu_Multil_Wall_Mounted__ASU_System

A mini-split/ductless system by Fujitsu. The units are mounted to exterior walls, then a pipe runs outside the house to the fan/cooling unit thing. The system typically needs an exterior run to each individual unit, but that allows for zone cooling (via remote, apparently).

The first two bidders also quoted mini-duct systems, also called small-duct or high-velocity AC.

unico

Unico mini-ducts. The ducts are skinny and flexible, so they can be snaked through walls for fewer or no soffits. The cooled air is forced through at speed and exits through these classy vents.

And two of the bids included “regular” central air conditioning.

We had talked about this kind of conventional AC with a few HVAC people over the years. Generally, they would conclude with, “But you have radiator heat.” In other words, we didn’t already have the larger ducts in place that a forced air furnace system uses. People with forced air heat can add AC reasonably easily. If your house has radiators, though, the ductwork needs to be retrofitted. Unlike mini-duct systems, though, regular AC ducts are pretty large (flexible ducts about 6 inches in diameter and metal ducting about 8 x 10 inches). It’s a fair bit to retrofit. That rhymed.

Based on our research and the information from potential installers (who got sick of our questions), here is our non-definitive take on the pros and cons of each of these three options.

1. Mini-Splits (a/k/a Ductless AC)

Pros:

  • Zoning only cools where you want.
  • Lack of ducting reduces energy lost from air leaks.
  • Sticking to a small number of individual wall units makes it fairly affordable.
  • No major remodeling required.

Cons:

  • Several articles (and two of three installers) say the units are not as efficient as hyped.
  • May be difficult to locate the wall units to cool effectively, and multiple condensers might be required outside.
  • After a couple of wall units, the price goes up rapidly. One of our quotes for a mini-split was more than for a mini-duct system by another installer.
  • Multiple exterior units and lines may be unsightly.

2. Mini-Ducts (a/k/a High Velocity AC) (The many minis confused me too, by the way.)

Pros:

  • No major remodel (unless there’s a problem snaking a duct somewhere, in which case, they might open up a wall — but no chases/soffits).
  • Historically sympathetic to architectural features.
  • Efficient.

Cons:

  • Some dislike the “high velocity” aspect or find them noisy.
  • Blimey, is it EXPENSIVE! One quote was above $26,000.
shocked cat

How many bags of nip I could buy for that? I don’t know, I’m not Math Cat.

3. Central Air

Pros:

  • Less expensive than most options (only a very limited mini-split installation was cheaper in our quotes).
  • Serves entire house.
  • Lower ongoing maintenance costs (according to all three installers).

Cons:

  • Ductwork must be accommodated inside the house, maybe requiring chases and soffits (or loss of closet space).
  • Less efficient than mini-split systems.
  • System requires large air returns to circulate displaced air back into the system.
These sorts of things, with filters that need to be changed.

These things, with filters that need to be changed.

Just because we are aware of these three major options, though, does not mean that (a) there aren’t other options, or (b) that you will be able to tell which option is which on any given bid. On this latter point, HVAC people aren’t trying to be misleading — it’s just that their quotes can be technical or inaccessibly worded.

Case in point: the company we went with (Metro Heating in St. Paul — not sponsored, they don’t know we blog) included an option for a system involving ductwork in the walls. They said we should be able to get the ductwork inside walls easily and that the vents would be pretty small. We took this to mean they were talking about a mini-duct system. When we talked in more detail, it was actually a standard central air system, but with smaller vents than we anticipated, and they had a plan for tucking in the larger ductwork.

Central air ticked the following boxes for us:

  • Minimal piping on the outside of the house.
  • Comparatively affordable pricing (both initially and for maintenance).
  • Relatively low-profile vents.
  • No more window units!!!

Installation was just completed this week, so I’ll tell you all about it in the next AC post (now available here).

Posted in Construction, Energy | Tagged , , | 2 Comments

Geemanetty!

Is “hell’s bells” a prayer? Because Daddy says it all the time.

– Lisa Simpson

I spent much of the weekend finishing plaster repairs in preparation for reconnecting the ground floor ceiling lights. My neck and shoulders did not thank me for the exercise.

If you need to chisel out a hole for a new electrical box in a plaster-lathe wall, it’s a good idea to use masking tape on the line to be cut. It helps hold the plaster together so that cracks don’t propagate.

Kevin pointing out the lack of tape (retrospectively).

Kevin pointing out the lack of tape. This one turned out ok.

I forgot this step and ended up with an awful mess.

Well, nertz.

This one did not.

To fix plaster screw-ups of this magnitude, cut pieces of sheetrock (UK: plasterboard…?) to fill in as much of the huge void as possible.

I got your huge, gaping void right here.

I got your huge, gaping void right here.

Make sure that the sheetrock is no thicker than the depth of the missing plaster. Measure and sketch the gaps — my measurements turned out to be wrong, so I put a piece of paper on the ceiling and rubbed the side of a pencil lead along the edge to “trace” the hole. Then I cut the pieces a titch smaller than the pattern.

A sheetrock insert near the hall light -- I didn't get a photo of the inserts for the worse mess around the bedroom light.

Insert near the hall light; it’s actually flush with the plaster, despite the weird shadows.

Screw the pieces into the lathe. Or crack the piece of sheetrock while trying to screw it to the lathe, and nail the smaller pieces in place instead. Or try Liquid Nails — strong initial tack! — and come back 10 minutes later to find the piece on the floor. Whatever works, just get it up there. Use painter’s caulk to take up some of the space in the cracks, but keep the caulk above the level of the ceiling surface (it doesn’t sand well).

Hall light with some joint compound applied and drying

Hall light with some joint compound applied and drying

After that’s all set, slather on some joint compound to make it all smooth. Thin coats are more durable, so you may need to build up the coverage. Make sure you really push the compound into the gaps so you don’t end up with new holes when you sand.

If you are having a weekend like mine, you may need to do this multiple times to get it right. If you are good, you can apply the compound smoothly enough that it requires almost no sanding. I am not good.

Bedroom light with joint compound

MORE JOINT COMPOUND!

Wait until the compound is really dry all the way through before sanding (remember thin coats), and wear a mask and eye protection. And use drop cloths and an air cleaner for the room. And a mop and dust cloth. IT WAS A TIRING WEEKEND. But even I was able to put together a reasonable plaster repair using this method.

I still need to paint, but this is the bedroom ceiling that had the horrible gaps.

Bedroom ceiling with the horrible gaps filled in. The lines show where plaster ended or sheet rock began, and will disappear under paint. Hopefully.

Prime the fresh surfaces, then you can repaint. I haven’t repainted yet, but the ceiling is THERE, which is an advance on last week.

Hall light -- the primer coat is more obvious here.

Hall light — the primer coat is more obvious here.

Once the ceiling was fixed, I was able to reinstall the lights with their fresh, this-century wiring. While the Kev worked on running a circuit for our eventual in-floor bathroom heat, I put up the lights, then turned off the power and ran the new wire into the breaker box and hooked everything up. I flipped the breaker on and we ran upstairs to party like it was 1899.

Only nothing worked. It didn’t make sense! NO SENSE WAS MADE. I was speechless, but Kev managed to ask, “Did you make all the connections in the junction boxes?”

Oooooooooh!

Oooooooooh!

I was so focused on the fixtures that I completely forgot connecting all the lines to the POWER. Ten minutes later, everything worked, and much wailing and weeping was averted.

Post-script: The post title is a Texas-ism from way back before my time — an expression to avoid blasphemy. I don’t always avoid blasphemy, especially this weekend.

Posted in Construction, D'oh!, Electrical, Repair & Maintenance, Walls & Floors | Tagged , , , | 2 Comments

Electrical Rough-in: Not So Rough

Grade me…look at me…evaluate and rank me!

– Lisa Simpson

The electrical inspector was here this morning. Last night, we went on a wire-labelling and tidying spree, and each of us still woke up thinking, “Oh, we should have also…[something-ed].”

OLYMPUS DIGITAL CAMERA

I hear a fair bit about “those St. Paul inspectors” but we’ve always had constructive experiences. If something is wrong, they will tell us very specifically what it is and how to make it right. But we really wanted to pass first time to put the project back on schedule (more or less).

The inspector first reviewed the electrician-installed subpanel and the AC wiring, which passed no problem. He looked around at our work and commented, “Wow, you really labelled everything!”

Yes. Yes, we did.

OLYMPUS DIGITAL CAMERA

 OLYMPUS DIGITAL CAMERA

We also had our load calculations available for review and the working circuit map, which turned out to be unnecessary, but it would have been hard to explain without the documentation if the inspector had asked.

The upshot: we passed! Sweeeeeeeeeeet.

mitchell

If you are doing your own wiring project (under permit, of course), here are our tips for rough-in inspections:

  1. Do everything to code. Right? As I’ve said before, I don’t feel comfortable telling you how to wire (there are many electrician-produced resources), but the first step is to DO IT RIGHT. Beyond that, though, you can help the process along in several ways.
  2. Remove trip hazards and clean up. The inspector will be happier if s/he doesn’t have to risk life and limb to check the work out, and a clean workspace shows that you actually give a rip. And of course, turn off any live circuits that the inspector is looking at! Shocking the inspector is no way to pass a rough-in.
  3. Label. Label label label. This is a good practice anyway, because it’s hard to figure out what wire came from where once the walls are closed up. In addition to wires in boxes, label any feeders waiting to be put into the panel.
  4. Make the wires final-ready. Cut back the sheathing to show the individual wires, and strip the ends. Everything should be ready to start hooking up once rough-in is approved. Keep in mind you shouldn’t have anything wired in yet — switches and outlets go in after the wiring itself is approved.
  5. Be consistent. The code might not require that all your wires be run at a certain height in a certain situation, but if you keep things tidy and consistent, it’s easier to inspect.
  6. Be knowledgeable. Know what you did and why. When the inspector asks what’s on a specific circuit, know what’s on that circuit, its amperage, and which panel it runs to. Know if there are GFCIs on the circuit, where the beginning and end of the run are, what type of wire you used, how many items are on the line, and what kind of breaker you will install. This is all stuff you will know if you plan your circuits and install and label it yourself, but you might want to review before rough-in.
  7. Ask questions. If you aren’t sure about something you’ve done or how you are going to finalize it, just ask. Inspectors are a terrific resource, and they want to see you do it right. You paid for the permit — ask the question!

I am so relieved!

Posted in Construction, Electrical | Tagged , , | 2 Comments

We Can’t Come to the Blog Right Now

Look busy and keep your mouth shut.

– Mr. Burns

It’s magical to have a contractor, but since we are doing some of the work (and since the schedule relies on our doing that work soonish), it’s been semi-crazy around Chez D’oh. We are finishing the electrical work (and found an electrician to do the AC), but here’s a general update on everything else.

The framing is complete.

Including the soffit for the AC

Including the soffit for the AC

Looking through the bedroom door (and wall)

Looking through the bedroom door (and wall)

There’s a new window in the reading room. I am in love with this window. It opens from top and bottom, it’s got great proportions, and it makes me feel like I’m in a treehouse.

OLYMPUS DIGITAL CAMERA

Only open at the top because Mayya (lounging in foreground) was VERY INTERESTED (screens aren’t in yet)

Great view of trees and street and dumpster

Great view of trees and street and dumpster

There’s a new window in the bedroom.

We've promised our neighbours not to just stare at them all the time.

View of neighbors’ balcony

The plumbing is roughed in (and approved!).

Shower (the pocket door runs behind it)

Shower (the pocket door runs behind it)

More flexible water lines and complicated venting for most of the house

More flexible water lines and complicated venting

The AC is in and wired.

Promised the neighbors we would fence this in after everything is final

Promised the neighbors we would fence this in after everything is final

Soooon...sooooon....cold air will flow through the walls...

Soooon…sooooon….cold air will flow through the walls…

The subpanel is in and wired.

It's very petite.

It’s very petite.

Almost all of the new boxes for the former knob and tube wiring are in (plaster repairs to follow).

Remember I said to tape before chiseling plaster? I didn't.

Remember I said to tape before chiseling plaster? I didn’t.

Mayya is over being freaked out by having new guys in the house.

Worksite? What worksite? This is all mine.

Worksite? What worksite? This is all mine.

Inigo is better, but still worried. He meows mournfully whenever a big noise happens, and he’s prone to this reaction:

Eeeek

I’m telling you, it’s MONSTERS.

Once we get our electrical rough-in inspected (oh, please, let it be this week), things will start to move in a hurry. Roofing, insulation, and drywall are up next.

Posted in Construction, Plumbing, Walls & Floors | Tagged | 2 Comments

The Trick is Knowing When to Stop

For the love of God, help me! I’ve been here for four days, and a turtle’s got a hold of my teeth!

– Abe Simpson

We opted to do our own electrical work for the loft remodel. Here’s our scorecard to date:

Days taken off to wire: 7 total

Trips to store: 10

Trips to store to buy knee pads: 1

Head bumps on framing: 106

Head bumps specifically experienced by Kevin: 105

Drill bits expired: 2

Headlamps purchased: 2

Declarations of love for headlamps: 31

Ladders fallen off of: 1

Splinters extracted: 12.5

Money saved: TBD, but in the four figures

Completion level versus original plan: 80%

Completion level versus revised plan: 95%

Originally, we were going to do all the wiring — the new parts, the alterations to existing circuits, a subpanel, and the air conditioning connections. After we strip and label a few wires, we’re going to be ready for rough-in inspection on the new circuits and the updated wiring (replacing knob and tube from the 1920s).

There will be ceiling lights.

There will be ceiling lights.

OLYMPUS DIGITAL CAMERA

Here’s a run Kevin did. His wiring is perfectly neat every time. Shut up, Kevin!

My dad is in town, and he helped us with the last of the standard wiring over the weekend. We asked him to help us figure out the air conditioner wiring, because Dad is wise in the ways of wires.

Frightening enough just sitting there.

The AC unit is frightening enough just sitting there.

Kev and Dad opened up the AC while I was finishing a run in the reading room. There was a long silence from the eaves, then Dad said, “I think you should hire an electrician for this.” Dad is the original King of DIY, so I knew he must be serious if he suggested hiring someone.

“Why’s that?” I asked.

“Soooo many wires,” Kev said.

Perhaps Harry Tuttle could stop by?

Perhaps Harry Tuttle could give us a hand?

We could figure this thing out to the satisfaction of the inspector, absolutely. But it would take us many moons compared to an electrician, who could probably do this in his/her sleep. And if we are hiring an electrician to do that, there’s also the subpanel that we have pending. I really hate wrangling large-gauge wires, so maybe an electrician would like to take that on, too. MAYBE AN ELECTRICIAN WOULD LIKE TO PICK UP OUR GROCERIES AND CHANGE OUR OIL!

You want me to do what now??

You want me to do what now? (See the angry face?)

I don’t think it’s a good idea for me to do a tutorial on wiring here, because it’s such a huge topic and there are so many situations to cover. If you are interested in wiring, there are some excellent starter books. We have the Black and Decker home wiring guide (an older version) and really love it, but there are a bunch of options. Make sure you are comfortable with all the core concepts and do all your work to code and under permit. You may find you love it, particularly if you are a left-brain person. But don’t try to guess your way through a wiring situation! When you get to that junction (heh!) as we did, it’s time for a professional

And so begins the big fun of finding another licensed professional for this project. Scorecard on that:

Electricians contacted to date: 3

Of those, electricians advertising same-day call-backs: 2

Number of electricians who have called back, same day or otherwise: 0

Well, tomorrow is another day. There are still a million electricians anyway. Or maybe we will return to the old deal and wire EVERYTHING. It’s a fluid situation, people.

Posted in D'oh!, Electrical, Family | Tagged , , , | 2 Comments

Vent Stack Calls it a Day

Boom! I am outta here, I’m a dot, I’m gone, okay?

– James Woods

The vent stack from the kitchen ran through the loft space, but the plumber was relocating it.

Before the plumber started working on it

Before the plumber started working on it

I don’t have a picture, but the plumber had cut off the narrower pipe leading up to the cast iron thingy indicated by the arrow. That part was hanging from the ceiling. “Don’t bump your head on that,” I said to the AC guy the other day. See, I figured it was in there pretty solidly and wouldn’t give in any direction.

I was wrong.

I was wrong.

The only thing holding it up, it turns out, was some mastic. AND WHAT A MASTIC. It’s been hanging there unsupported for days. Until today, when it said, “What’s the point, anyway?” and let go. One of the AC guys was up there and he said when he turned to see why a bomb had just gone off next to him, the thing was still bouncing.

Luckily, it had something to bounce on! There were two 2x6s spanning the hole in the floor underneath it; otherwise, it would have gone straight through the dining room ceiling. It’s 50 pounds if it’s an ounce.

That crack in the left board is new.

That crack in the left board is new.

We are all kinds of lucky. No one was in its way and it damaged nothing except that board. Scared the everliving snot out of Inigo, but who wants a snotty cat?

If I have a point (I don’t), it’s to not assume heavy things are supported in any way. So don’t stand under them. Actually, I guess my point is, “Hey, y’all! This thing fell out of the roof and made a big noise!”


Posted in Construction, D'oh!, Plumbing, Siding & Roof | Tagged , , , | Leave a comment

Escape from the Home Depot

D’oh!

The new upstairs bathroom will have a shower. A shower needs a base (unless you are having the situation custom tiled, and we are too cheap for that). We found a base that met our space constraints and didn’t make me feel sad.

Bootz Showercast at Home Depot (see it here)

Bootz Showercast at Home Depot (see it here)

It’s porcelain over steel (instead of porcelain over cast iron in tubs), so it has an old-school enamel finish, but in a shower base. It’s a miracle product, people.

Step 1. We buy the shower base.

Tubs and showers are “handed” based on where the drain is as you are looking at it. Assume you are getting into the shower — which side is the drain on? On your right, it’s right-handed. That’s what we need, that’s what we buy. Pan is listed at $189, but rings up at $159. Bonus!

Step 2: Plumber cruelly rejects shower base.

Tells Kev it’s the wrong way around and the drain needs to be at the “other end.”

Step 3: We exchange the base.

We suppose that the plumber wants a left-handed shower base (even though the shower is at the right end), because…well, who knows what plumbers need or want? He wants it the other way. I lead the charge to return it for a left-handed base.

Step 4: Plumber cruelly rejects shower base.

Tells Kevin that the base is the wrong way around. Kevin texts me this information. I make this face.

shaq-face

Step 5: I think unkind things about the plumber.

Step 6: We exchange the base.

We go back for a new right-hand drain base. Every shower base exchange, Home Depot does a full return and puts the total on store credit, then we go get the new shower base and check out. Also every time, some poor soul has to go to receiving to find the base, which for some reason doesn’t live on the retail floor. It’s not easily accessible, if time expended is anything to go by.

I should add that everyone is very nice about all this at the Depot.

Step 7: I notice that shower base 3 is strangely familiar.

“This is the first one we bought,” I insist. “I remember that dent in the box, and it’s been re-sealed.” The Kev makes this face:

exasperated puppy

We open the box in the Depot’s parking lot.

It’s a left-handed base in a right-handed box.

problem

Step 8: I revise my opinion of the plumber.

Step 9: We exchange the base.

We go straight back into the store. The return clerk starts to process it as a full exchange. I’m torn between tears and laughter. “Can’t we please just please have them bring up a different one? Please?” I ask.

pussinboots

At this point, Brandon the Good appears on the scene. Brandon went to receiving for the base only ten minutes earlier. The return clerk was not totally clear on what I was begging her to do (my bad, not hers — I may have been keening incoherently). Brandon looks in the box, understands, says he’ll take care of it…and he does. HE DOES! HE BRINGS US ANOTHER BASE AND WE ALL CHECK IT TOGETHER AND IT IS RIGHT! Correct and right-handed.

Instead of the orange apron, dude might as well have been wearing this shirt:

I'm here to rescue you

Brandon already doesn’t remember us, but I am FOREVER GRATEFUL. ALL HAIL BRANDON.

Anyway, my point: check the drain orientation on the first unit before driving home.

Posted in Bathroom, D'oh!, Plumbing | Tagged , | Leave a comment

Staying Flexible

I can’t stand it any longer. This whole plant is insane. Insane, I tell you! Daaaaaaaaaaaah! Ahhhhhhhhhhhhhhh!

– Frank Grimes

We were doing really well with the remodel. After stuffing things out of the way, we had almost as much room as we’ve had in a few flats. Last week Tuesday, though, I was out of town when the plumber asked Kev to empty the hall and bedroom closets for pipes. I returned Wednesday night to stacks of STUFF everywhere. Neat stacks, but it still felt like this:

Hoarding-Buried-Alive

With the environment turned upside down, the Kev tends toward exasperation, while I tend toward crazy. Kev asked me where something was, and I got all dramatic: “I DON’T KNOW WHERE ANYTHING IS! INCLUDING ANY UNDERPANTS I AM NOT CURRENTLY WEARING!” With that, I flounced meaningfully from the room and tripped over a cat.

keep-calm-and-believe-in-karma-3

After some weekend organizing, we both felt better, but yesterday was challenging. We’ve reached the part of the project we’re calling “the part where you find out you’re going to have less floor than you thought.”

The bathroom floor, to be precise. Here’s the framed bathroom:

OLYMPUS DIGITAL CAMERA

The shower will be on the right, and the sink and toilet will be on the left. There will be a skylight in the middle. Our thought was that we would build in cabinetry along the knee wall for (a) storage and (b) a buffer zone to prevent walking into the ceiling.

bathroom with cabinet

The working concept was to salvage kitchen uppers for the carcasses, then add the doors, top, and trim we want. But then I found this:

perfect cabinet

This is a former built-in cabinet that plainly was meant for our bathroom. It was exactly the right size and the sliding doors would save room — plus, it’s just lovely! When I found it (Craigslist, of course), the loft framing was ongoing so dimensions were not final. I wrote to the seller (paraphrasing):

Hey, um, we totally might want that thing you have there! But we don’t know yet. You wanna contact me if you don’t sell it right away in case we do want it?

Surprisingly, she was game for this ditzy arrangement. Last week, I contacted her and said we did want it, and started scheduling pick-up. And then:
bathroom with problemThe AC installer needs to put an air return in the hallway, and the duct is larger than others in the system and must go across joists. Translated, this means it needs to go above the floor.

The first hole, presaging the later larger hole for a big ole above-floor duct.

The first hole, presaging the larger hole for a big ole above-floor duct.

Well, ratfart. Good-bye, lovely cabinets; hello, embarrassing call to cabinet seller. (Fortunately, we expressly said she should take any earlier offer until we scheduled pick-up.)

Also, hello, new bathroom plan.

bathroom solution cupboard

Usually, we’re the ones figuring out that something won’t work in our old place, and since we’re doing the work, we have time to dwell on the issue until a solution occurs to us. It’s a different experience to adapt on the fly to “this is how it has to be.” But we’re adapting — watch this rationalization:

That space would have been too narrow for the cabinet anyway! This solution makes MUCH more sense. SO GLAD THIS HAPPENED!

The ability to rationalize happily is a sign of maturity. Or experience, one or the other.

Posted in Bathroom, Construction, D'oh!, Walls & Floors | Tagged , , , | Leave a comment

What You Have There is an Ex-Plant

We’re all gonna die!!!!!!!!!!!!!!!!!

– Bart Simpson

It was rainy on Sunday, so I decided to run some errands. I took this plant with me because I thought a drive might make it feel better.

OLYMPUS DIGITAL CAMERA

This is a Hetz Midget arborvitae that I put in last spring, along with six of its friends. The others are fine, and I don’t know what the problem was with this one. So I returned it, 354 days after purchase.

Many of the big box stores and most nurseries have guarantees on perennials, shrubs, and trees that are hardy in the local area. The receipt or the plant tag should indicate whether a plant is guaranteed, but ask about the policy if you aren’t sure. The guarantee is usually (but not always) for a year.

If I know that I did something wrong that killed a plant, I figure that’s on me. I’ll only return one that died inexplicably. But it’s worth noting that the return clerk probably won’t care one way or another, especially at a big box store. (I did once receive a short lesson in fertilizing technique at a nursery return desk, though.)

Yeah, dirt from Honeybear Gulch. That'll do it.

Yeah, soil from Honeybear Gulch. That’ll do it.

If you want to return a deceased plant, you’ll probably need all of the following things:

  1. The plant itself — heard of proof of life? This is the opposite.
  2. The pot it came in, with stickers or bar codes intact.
  3. The receipt (of course).
  4. Any hanging tags that came with the plant.

When I buy guaranteed plants, I stack the pots on a shelf in the garage with the hanging tags inside, and I file the receipt. If it croaks for no good reason, I can pull everything together quickly.

OLYMPUS DIGITAL CAMERA

Note that mail-order nurseries often have a guarantee that does not require any proof other than your word (and some information about the purchase from your order confirmation email). Most such places mainly sell unkillables, though, so requesting a refund should be a rare event.

It’s still a minor walk of shame hauling a dead plant in for return, but the store wouldn’t offer a policy it could not commercially handle. Just square your shoulders, look the clerk right in the eye and say, “I WANT TO RETURN THIS DEAD PLANT, PLEASE.” Think of it as a character-building exercise.

Related Posts Plugin for WordPress, Blogger...
Posted in D'oh!, Yard & Garden | Tagged , , | Leave a comment