Tiiiiiiiiiiiin Hinge…Rusty

Extended warranty? How can I lose?

– Homer Simpson

When we updated the basement bathroom, we chose items that were simple and functional. It’s a basement bathroom, and you (currently) walk through unfinished space to get there. The shower enclosure and the toilet are good-quality items. The vanity…well, we selected the vanity from an economy range presented by one of the big DIY chains.

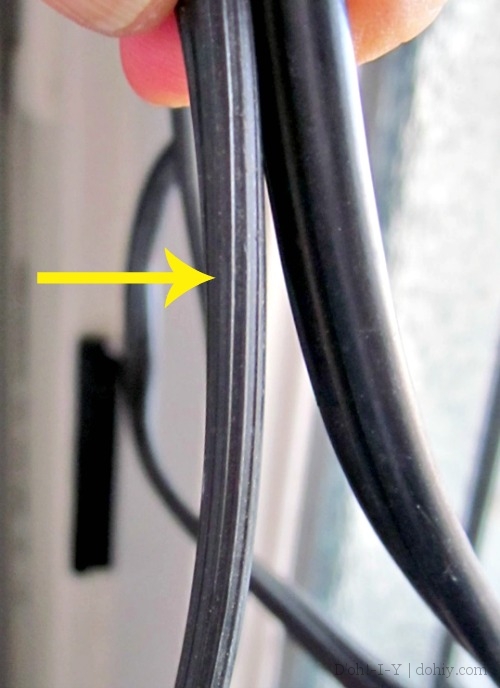
We knew it was cheap. But still, you don’t expect this kind of hinge corrosion just months later.

Bathroom cabinet hinge that has rusted.

It’s a vanity cabinet for a BATHROOM. We have one of those modern bathrooms with indoor plumbing, which delivers water to us inside the house. It’s actually not that unusual a luxury these days, so this is just a willfully bad material choice. (Yes, yes, and we chose it as well—but would you have expected this to happen?) What the heck, Unnamed Manufacturer for The Big Orange Store? I know the thing was designed for a low price-point, but have a modicum of pride!

Anyway, easily remedied. This is a so-called “European” hinge. The magic trick to replacing these without need for chiseling and wood filler is to buy the exact same hinge in the same size (but hopefully in a better material). Brilliant, huh?? I also use this “buy the same type of thing again” technique for car batteries and pantyhose, and I can’t recommend it too highly.

I did some rough measurements and found my replacements at Menards, a regional DIY warehouse. If your specific hinge is not findable locally, there are several online vendors. Once you have your replacement, check it against your old hinge before proceeding to make sure you have the right match.

The replacement hinge came with coarse-threaded screws that are only slightly longer than the original fasteners. There’s not a lot of traction to be gained in particle board with a screw, so I reused the original fasteners, after first buffing them down with steel wool and oiling the heads to slow future rust.

Changing a hinge on a lightweight door like this is easy. Support the door when removing the old hinge so you don’t tear the puppy up. Start removal with the bottom hinge for best stability; the top hinge carries more weight. Once removed, clean any rust debris from the cabinet and door before slapping on the new hardware. I installed the replacements cabinet side first, then opened each hinge (careful! they are snappy when they are not under load). Maneuver the door behind and on to the opened hinges, and support it (in my case, with a lady-like extended leg while I sat on the floor). Loosely set in the top fastener on the top hinge, then the top fastener on the bottom hinge, and tighten up about 80%. Add the other two, and tighten all completely.

Check for function and alignment; since you are replacing like with like, everything should be good. If not, tweak the adjustment screw(s) to get where you need to be.

Aaaaand after I fixed this little problem, the cat decided that we must be keeping food in the vanity and started scratching the door to shreds. The next vanity is going to be made of Kryptonite.

Posted in Bathroom, D'oh!, Repair & Maintenance | Tagged , , , , , , , | Leave a comment

Replacing Garage Siding, Part 2: Less is More

Facts are meaningless. You could use facts to prove anything that’s even remotely true!

– Homer Simpson

In part one of this post, I talked about wanting to replace the rotten siding on our garage. We wanted to use low-maintenance siding that matched the three inch clapboard siding on the house. We also wanted it to be durable and cheap.

In order of price, from cheapest to most expensive, the siding materials we considered were:

Vinyl Siding

We would never consider replacing the siding on the house with vinyl, but somehow, it’s OK on the garage. The kind were were looking at does a pretty good job of mimicking three inch clapboards, as long as you don’t get too close.

The advantages of vinyl are:

  • It is durable,
  • It needs very little maintenance,
  • It won’t dent, and
  • It comes with a long warranty.

The disadvantages are:

  • Its appearance: it looks like plastic, and
  • The seams are visible.

Engineered Wood Siding

Engineered wood is made from little bits of wood, sawdust, and glue. It seems to only come in boards that are wider than three inches.

The advantages of engineered wood are:

  • It is strong and lightweight, and
  • It can have a factory-applied coating.

The disadvantages of engineered wood are:

  • It has to be painted to stop weather damage, and
  • It has to be maintained to avoid moisture related deterioration.

Metal Siding

We looked at vinyl coated steel. Like vinyl, it can mimic three inch clapboards pretty well.

The advantages of steel are:

  • It doesn’t need to be painted,
  • It is durable, and
  • It keeps the factory finish indefinitely.

The disadvantages of steel are:

  • The color can fade,
  • It can dent, and
  • It can rust if the coating is scratched.

Fiber Cement Siding

This is made from sand, portland cement, wood fiber and other additives. It is probably the most attractive of the low-maintenance options.

The advantages of fiber cement are:

  • It is more durable than wood,
  • It is guaranteed to last 50 years, and
  • The factory applied coating is usually guaranteed for 25 years.

The disadvantages of fiber cement are:

  • It is heavy, and
  • Cutting it produces lots of dust.

And the winner is…

In the end, we went with the vinyl. We were attracted to the durability and look of fiber cement, but we were put off by the high price. The steel looks very similar to the vinyl, but it has the rusting and denting problems. And as for the engineered wood, I don’t know about you, but that’s not my idea of low-maintenance.

Posted in Construction, Garage, Outdoor Building Projects, Repair & Maintenance | Tagged , | Leave a comment

House Parts: The Fine Line Between Prudence and Hoarding

Marge! That’s the Rhinestone Nights fashion gun! I need it to rhinestone up my old clothing.

– Homer Simpson

Yesterday, we replaced an exterior door. Today, I am licking my wounds (not literally, of course, because I’m too dang sore to move, much less lick anything). “Replacing a door” is, of course, code for “punching a huge hole in the house that you must fill before nightfall.”

removing door frame

We’re committed now.

Opening a wall provokes anxiety because of the high chance of a major “d’oh!” moment. In this case, we were lucky.

Damaged floor board

Only a minor d’oh!

That last floor board inside the threshold is disintegrating. On this occasion, the problem was quickly remedied because we have a stash of matching floorboards that we pulled out of the bathroom a couple of years ago. In the throes of a project, nothing beats having the exact thing you need, especially for an unscheduled task.

I love architectural salvage shops and reuse centers—they are my idea of a Saturday afternoon well-spent. At least the afternoon: finding vintage house parts is no quick run to Home Depot. The Kev and I have quite a few items in storage because we just might need (or want) them later. Having a spare matching doorknob when you want it is waaay better than eventually finding one that’s close for $15. There were lots of bits and pieces secreted around the house when we arrived, and we save items from our own renovations, reusing everything from sash pulls to a buffet-sized cabinet.

Having said that, I’m not sure why we have most of the original electrical boxes we replaced over the years. Or the box of antique sandpaper. We did scrap the spare radiator pipes after I tripped over them in dramatic fashion, but not before we moved them around the house and garage for some years.

If I had to boil it down? Save your own architectural antiques, and let go of non-compliant infrastructure. Or try to let go. Some of that stuff is pretty cool.

DIY Tip: When insulating around your new door frame, look for expanding foam that’s not all that expansive. Some of the products for filling cracks are hard to control in a small space. Minimally expanding foam sprays grow less than 20% or so, which is just the sort of expansion you need to tuck your door in neatly.

Posted in D'oh!, Repair & Maintenance, Salvage, Windows & Doors | Tagged , , , , , | Leave a comment

Replacing Garage Siding, Part 1: The Horrible Truth

I’m in a place where I don’t know where I am!

– Homer Simpson

We needed to replace the siding on our detached garage because it looked terrible. It was rotting and falling apart. Also, we didn’t like that the siding on the garage didn’t match the siding on the house, which was rotting and falling apart in a different way.

Garage siding rotting and falling apart.

The old garage siding

I’m not from Minnesota. When I start a home improvement project, I often have some learning to do. The way that buildings are put together here is different to how it’s done in England. Buildings in England have cavity walls made from fired bricks and concrete blocks. Buildings here are made from wood, so before I could even begin this project, I had to learn about timber frame construction and siding.

For our British readers, what I found is that to build an American wall, the first thing you have to do is make a wooden frame. The frame is made by nailing together horizontal (top and toe) and vertical (studs) pieces of wood. This is called framing. Once you’re made a frame, you stand outside the building and cover the frame in housewrap. Then, you get some siding and nail it to the frame. The role of the siding is to weatherproof the building.

Our house was built in the 1920s, when wooden clapboard siding was common. The problem with wood siding is that it must be maintained. Without regular repairing and painting, the wood would quickly rot. This is really hard for me to get used to, since I grew up with brick houses that require no maintenance. Now I have to think about preventing the outside of my house from falling off!

It turns out that I’m not the only one who had this reaction, and now you can get low-maintenance siding that needs to have much less attention paid to it. There are a few different types of low-maintenance siding available.

Since Stacey insists that the wood siding stays on the house, my goal was to find aesthetically pleasing, low-maintenance siding for the garage that would match the the house. That’s what I’ll be writing about in part two of this post.

Posted in American vs English, Construction, Garage, Repair & Maintenance, Siding & Roof | Tagged , , , , | Leave a comment

Reader, I Spraypainted It

Mmmm, free goo.

– Homer Simpson

For me, one of the most memorable comment threads from the past year was a bit of a scuffle on Apartment Therapy over a painted furniture project. (I’ll let that sink in.) One entry in particular really made me laugh:

There needs to a be a seperate section on apartment therapy for the featuring of “crap I spray painted.”

[multi-sic]

We are redoing the living/sitting room – long (and forthcoming) story, but we added built-ins, which had Consequences for where the existing furniture lives out its days. We had a fabuloso desk in one corner that also served as an end table. The changed layout meant we needed to move the desk out of the corner and replace it with a smaller end table. So hellooooooooooooo, Craigslist!

A picture of the end table before it was painted.

End table in the raw

This little puppy isn’t really something I’d normally be drawn to, but (a) it’s an END TABLE, and (b) $20! And (c) I was totally going to spraypaint it. Between the woodwork and the piano and the cabinetry, there is a LOT of wood in that room, and we don’t need another end table’s worth.

Picked it up, cleaned it up, fixed the drawer…aaaand spraypainted. NO PRIMING. NO SANDING. This end table and me, we’ve got iconoclastic verve.

One can of Rustoleum “Oregano” (gray-green) later, and it was wholly presentable for our purposes. And then…and then…I decided to wax the top. TO PROTECT IT! The Internet said I could! AND? Uncle Fred gave us his “pure beeswax polish” some time ago. What could be better??

Uncle Fred! Gurning champion you might have been, but labeling compliance guru you were not. There was Something in that “pure beeswax”—possibly something petroleum-based—that melted the paint.

picture showing paint coming off the end table onto my thumb

End table (and me) covered in goo

D’OH!

Mineral spirits helped melt the rest so I could start the heck over. Design karma?

Posted in D'oh!, Decor, Furniture | Tagged , , , , , , , | Leave a comment

Tie Me Gazebo Down, Sport

Beer. Now there’s a temporary solution.

– Homer Simpson

A few years ago, I built a floating deck in the back yard. We wanted to put a gazebo on it to provide shade. One day, I intend to build a permanent structure, but for now our gazebo came in a box from Menards. It’s a nice gazebo with a roof made from canvas, and mesh sides that fend off mosquitoes quite successfully. The frame is made from steel that is about the thickness of graphene, but what do you expect for $130?

Unpacked and assembled, the gazebo looked very attractive sitting on the deck. There simply remained the matter of attaching it. At the bottom of each of the gazebo’s legs was a square, flat plate. Each plate had been thoughtfully furnished with several screw holes. So, this should have been an easy procedure.

I realized it wasn’t going to be so easy when Stacey asked me “How are you going to fasten the gazebo to the deck?” Now, she’s as sharp as they come, so I knew that she’d seen the screw holes, and that she understands the potential a deck screw has for securing itself in a deck board. Accordingly, it was with some trepidation that I ventured, “With screws?” “Hmmm,” she said. We’re not using screws, I thought. This was an interesting problem: attach the gazebo to the deck without defacing the deck boards in any way.

After some thought, the answer came to us. Use zip ties. The idea was to pass them through the screw holes and around a deck board. Our ties were too short, so we zipped several together. Stacey got the ties around the board by passing wire under the deck board, duct taping a tie to the end of the wire that emerged, and pulling the whole thing back under the board.

It worked like a charm, and has survived high winds (80 mph just the other night). When we take the gazebo down for the winter, we simply cut the ties and use new ones the following spring. And our deck boards remain unadulterated! Which was, apparently, more important than I knew.

Posted in Outdoor Building Projects, Porch, Yard & Garden | Tagged , | 4 Comments

He’s So Phi-ne

I can’t believe it! Reading and writing actually paid off!

– Homer Simpson

Stacey (regarding tweaks to the arbor design): “That looks nice.”

Kevin: “I used the Golden Ratio.”

Stacey: “Of course you did.”

The guy could not be more delightful to me.

UPDATE: Check out our Golden Ratio Calculator!


Posted in Outdoor Building Projects, Romance, Yard & Garden | Tagged , , , , | Leave a comment

You Say Potato Chips, I Say Crisps

English? Who needs that? I’m never going to England!

– Homer Simpson

OK, before we go any further, I want to get one thing clear. I am not from here. I am an Englishman living in Minnesota. And I’ve got to tell you, Americans do things differently to the English. There are the obvious differences that everyone knows. An American car has a hood, a trunk, a windshield, and turn signals; an English car has a bonnet, a boot, a windscreen, and indicators. All that’s fine. In fact, it’s fun! Like learning a new language without the hard grammar stuff.

One area I find particularly tricky, is that of home improvement. I have the hardest time referring to that thing on the sink as a faucet. To me, it always has been, and, probably, always will be a tap. But, I have learned the language, and know that, to be understood here, I need to call it a faucet.

Recently, I needed a tool to remove a headless screw from a cabinet door. So, off I went to Menards, our favorite home improvement store. “Excuse me,” I said to the young man at the desk, “I am looking for a stud extractor.” Immediately, I could tell from his expression that this conversation was not off to the best start. “A what?” he said. To buy myself time, I said it again. He looked puzzled.

It’s at this point that I usually change tack and describe the activity that I would like to perform. When I did this, he exclaimed, “Oh! A screw extractor!” And I suddenly realized how my request had sounded to him. In England, a stud is a type of screw, whereas in America, studs are pieces of wood used to build wall frames that sheet-rock [plaster-board in England] is attached to.

So, to him, I was asking for a tool that would remove framing members from a wall. Perhaps he thought someone was playing a prank on me, in the same way that apprentices might be told to go for a long stand or some striped paint. I can only imagine that, given my apparent age, he must have thought me amongst the most gullible of people to have ever lived.

Posted in American vs English, D'oh! | Tagged , | Leave a comment

What Light Through Yonder Mason Jar Breaks?

I bet Einstein turned himself all sorts of colors before he invented the light bulb.

– Homer Simpson

Over the last few months, I’ve had a few rewiring projects on lamps and small appliances. I’ve mainly been replacing switches and plugs, typically following catastrophic failures of the original equipment. Not that I didn’t have warning in most cases. The Exploding Rheostat Incident is spoken of only in whispers now, but none dare speak of the earlier Hot Pedal Foot Episode. So, yeah, I did know the sewing machine control was about to go out of commission, but I was just! finishing! this! one! seam!!!! (*bang*)

Small electrical stuff is a nice change from working on hard wiring, what with all the ladder-standing and neck-craning. I got to feeling a little self-congratulatory, and even branched out from repairs, making a jar into a hanging lamp for the alcove in the kitchen. Like so many bloggers before me!

Alcove light fixture made from a mason jar.

Alcove light fixture made from a mason jar.

Mason jars are having a moment, but there’s other glassware that could be made into lights. Perrier hanging lamps. Wine bottle lights. A friend reminded me of the fabulous Grain Belt chandelier at the now-defunct Harry’s in Minneapolis. But it’s highly validating to see the same sort of thing going for about $150 over materials cost at someplace au courant.

Mason jar light.

Mason jar light with Ikea high-efficiency bulb

People, this light can be yours for $9 in materials + a smug sense of accomplishment!

New light fixture illuminating the alcove.

New light fixture illuminating the alcove.

I originally had a blue jar on this fixture, but the light was too…blue for the alcove. Since this was a light for light’s sake, rather than just for cuteness, the clear version worked better for us.

A few things about small wiring projects – first, they are SMALL, which is great. But second, they are SMALL, which means you often have to deal with that multistrand small-gauge wire. I hate that stuff because I often find that tightening up connections just ends up with the dang thing fraying out all over the place. If you give it a twist or two first, though, you end up with something much easier to work with. Also, if you need to hook this type of thing (or, really, any wire) under a screw to make the connection, make the “hook” face right. As you tighten the screw (“righty-tighty”), you won’t be working against the wire.

Wire attached to light fixture using a screw.

Like this! Not the other way ’round.

On lamp cord and similar, it’s not perfectly obvious which wire would be black or white in sheathed cable. You strip lamp cord, and you have two bits of weenified copper that look exactly alike. How do you choose a side for neutral or hot, and how do you keep track of it over the length of the cord? I will admit to using markers and tape to track one side of lamp cord to maintain polarity. Turns out, manufacturers anticipated this problem, but they didn’t send me the memo. If you look closely at the outside of the lamp cord, the wire that would be white and that would go to the silver side (neutral) has ridges running length-wise down the outside of that side of the cord, as indicated by the arrow below.

Same cord, looped around to show both sides

Same cord, looped around to show both sides

The other, unridged side goes to the brass screw. This is true for most flat lamp and small appliance cord – check it out! This makes swapping plugs and stuff really simple. “Silver Ridge” is easy to remember, too – no one’s beating down the trademark office door to register “BRASS Ridge.”

Wine bottle label that reads "Silver Ridge Pinot Noir."

Mnemonics Anonymous
via 365corks.com, used by permission

If you would like to make your own jar light, all you need is a lidded jar, some lamp cord, a plug, and an adaptor kit. Avoid overheating with compact, low-power bulbs and some holes in the lid. Pop the adaptor kit through the lid and screw it on. Easy-peasy!

I wanted to operate the light with a switch, so I also bought an electronic light switch. I ran the cord from the light along the ceiling and down alongside the molding to an outlet.

Note the wire running along the ceiling and down the side of the cabinet to connect the receiver.

Note the wire running along the ceiling and down the side of the cabinet.

To use the switch, plug the light cord into a small receiver unit, and then stick that into the wall. In this alcove, the power is behind the fridge, so I waved the camera behind there to show you the receiver plugged into a power strip I hung on the wall.

There it is!

There it is!

A remote that looks and acts like a light switch sends a signal to the receiver unit to turn on the power. There’s a tiny delay when you throw the switch before the light responds, but that’s no big deal. The only other issue with it is that it protrudes from the wall slightly to accommodate the electronics for the remote. Like this:

switch

Feels slightly cheesy, but I can live with it.

The alcove in question is a tiny bump off the back of the kitchen where the fridge lives. It also houses an exterior entrance and the door to the basement. There is a lot going on in this corner, but it had no light for any of it. Here’s the whole alcove (or as much as I can fit into a photo of it) with the light and the switch.

OLYMPUS DIGITAL CAMERA

Much less fumbling around in the alcove now! And I can read all our fridge magnets. Clearly, we’ve got our priorities straight.

Posted in Decor, Electrical, Kitchen | Tagged , , , , , , , , | Leave a comment

Wall Button Says No

You tried your best and failed miserably. The lesson is: never try.

– Homer Simpson

The garage door openers mysteriously stopped working the other day, and could we find the manual?? What a ridiculous question.

Internet to the rescue! We have a Chamberlain (Chamberlain also manufactures the Craftsman openers), but I could not find the manual for our specific model on the site. It’s probably there (or elsewhere, like Manuals Online), but I stopped looking. Because I found the generalized instruction for reprogramming the remotes. And assumed that was the problem.

Reprogrammed the remotes. (If you need to do this, it’s easy-peasy – just involves some button-pushing while standing on a stepladder.) Wait – now the touchpad and wall button don’t work. Did they work before I reprogrammed?? I didn’t check.

[Insert annoyed hour of trying to individually reprogram each thing while accidentally deprogramming other things before finally deciding that I hadn’t really given the Internet a chance.]

The Kev pointed out that the symptom I had not Googled was the flashing wall button. (I assumed that this was the result of my rewiring job on the button after I hit its wire several times with a hammer, thereby fraying it beyond use. Accidentally. Well, “coincidentally” at least.) Turns out a flashing wall button means it has been set (accidentally) to “vacation lock-out” mode, making the remotes inoperable.

My searches indicated that one would need to press the button and the “lock” button together to achieve lock-out. Umm…I don’t have a model fancy enough to have a “lock” button! I just have a button. So I tried just pushing the button down for a couple of seconds. No more flashing! Wall button works! Keypad works! Remotes do not work because of the inappropriate reprogramming, so I just reprogrammed them again. Remotes work! Awesome!

One last note–when and if you get up next to your opener, you may notice a loose wire dangling out of the back of the box. This is the antenna for the remotes, so do NOT trim it back, as tempting as that may be.

Related Posts Plugin for WordPress, Blogger...
Posted in Electrical, Garage, Repair & Maintenance | Tagged , , , , | Leave a comment