Extended warranty? How can I lose?
– Homer Simpson
When we updated the basement bathroom, we chose items that were simple and functional. It’s a basement bathroom, and you (currently) walk through unfinished space to get there. The shower enclosure and the toilet are good-quality items. The vanity…well, we selected the vanity from an economy range presented by one of the big DIY chains.
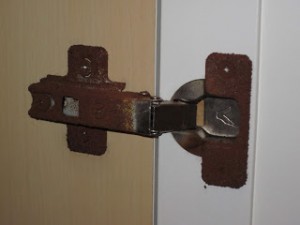
We knew it was cheap. But still, you don’t expect this kind of hinge corrosion just months later.
It’s a vanity cabinet for a BATHROOM. We have one of those modern bathrooms with indoor plumbing, which delivers water to us inside the house. It’s actually not that unusual a luxury these days, so this is just a willfully bad material choice. (Yes, yes, and we chose it as well—but would you have expected this to happen?) What the heck, Unnamed Manufacturer for The Big Orange Store? I know the thing was designed for a low price-point, but have a modicum of pride!
Anyway, easily remedied. This is a so-called “European” hinge. The magic trick to replacing these without need for chiseling and wood filler is to buy the exact same hinge in the same size (but hopefully in a better material). Brilliant, huh?? I also use this “buy the same type of thing again” technique for car batteries and pantyhose, and I can’t recommend it too highly.
I did some rough measurements and found my replacements at Menards, a regional DIY warehouse. If your specific hinge is not findable locally, there are several online vendors. Once you have your replacement, check it against your old hinge before proceeding to make sure you have the right match.
The replacement hinge came with coarse-threaded screws that are only slightly longer than the original fasteners. There’s not a lot of traction to be gained in particle board with a screw, so I reused the original fasteners, after first buffing them down with steel wool and oiling the heads to slow future rust.
Changing a hinge on a lightweight door like this is easy. Support the door when removing the old hinge so you don’t tear the puppy up. Start removal with the bottom hinge for best stability; the top hinge carries more weight. Once removed, clean any rust debris from the cabinet and door before slapping on the new hardware. I installed the replacements cabinet side first, then opened each hinge (careful! they are snappy when they are not under load). Maneuver the door behind and on to the opened hinges, and support it (in my case, with a lady-like extended leg while I sat on the floor). Loosely set in the top fastener on the top hinge, then the top fastener on the bottom hinge, and tighten up about 80%. Add the other two, and tighten all completely.
Check for function and alignment; since you are replacing like with like, everything should be good. If not, tweak the adjustment screw(s) to get where you need to be.
Aaaaand after I fixed this little problem, the cat decided that we must be keeping food in the vanity and started scratching the door to shreds. The next vanity is going to be made of Kryptonite.


