Cheap and Cheerful Christmas Crafts

Let me see… that’s three Christmases I saved… eight I ruined… two were kind of a draw.

– Homer Simpson

This year, Stacey decided to go with old-fashioned homemade paper chains for our Christmas decorations. She bought a big wadge of multicolored construction paper and glue sticks, drafted a nephew, and commenced festooning.

This set me thinking that maybe I could make some different decorations with construction paper. In traditional style, I began Googling home made paper Christmas decorations (except I probably didn’t capitalize Christmas).

I found a few different ideas, but most of them were a bit too two-dimensional: snowflakes, that kind of thing. I found the most interesting ideas in the Christmas section of a site devoted to archeology, of all things. These paper Christmas decorations are both easy to make and visually striking. (Update: the instructional link we had here is broken! Check out the video in our updated post instead for a good how-to.)

Home made paper christmas decorations

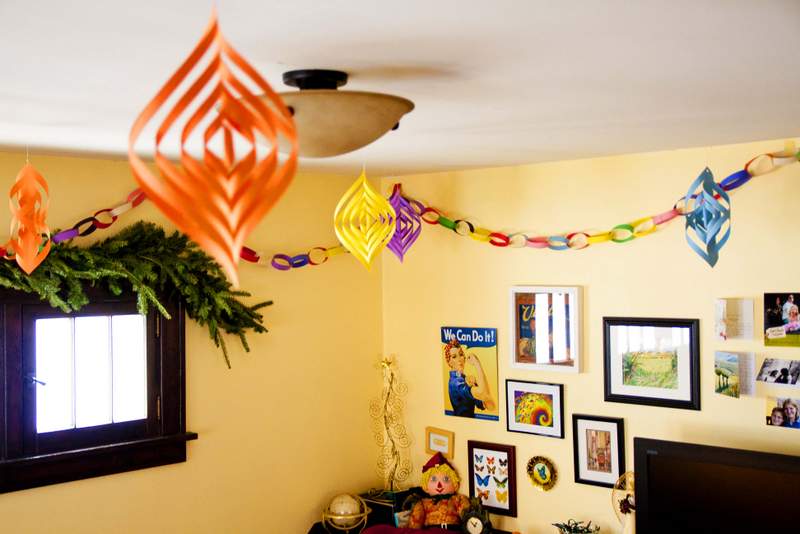
Our homemade paper Christmas decorations

It was fun to experiment by cutting the strips different widths. I made some with ½” wide ribs.

home made paper christmas decoration

An orange one with half-inch ribs

And some with ¾” wide ribs.

home made paper christmas decoration

A blue one with three-quarter inch ribs

Of course, making the ribs wider reduces their number.

home made paper christmas decoration

They look interesting from different angles.

All our visitors have been very complimentary about our crafty Christmas ideas.

565a-001

A totally different look for our Christmas decorations for this year. I hope you have as much fun decorating as we did.

Wishing you and yours all the best for the holiday season and hoping you have a very merry Christmas.

Posted in Decor | Tagged , , | Leave a comment

Recent Projects: Providing Closure

British Fonzie is right.

-Homer Simpson

A kind friend (above-referenced) pointed out that I’m quite keen to blog about the process, but not so good on posting results. That is, of course, because I’m rather judge-y about my results, and more so about my photographic abilities. But it’s the holidays and Ben (of the manly chest of drawers update) is here with his camera and his mad skillz. Yay, Ben!

The Mason jar light in the kitchen:

Light in a jar

Light in a jar

Originally, I had a blue jar as the shade, but found that in this dark corner of the kitchen, we needed every bit of white light we could get, so I replaced with a clear jar.  I bought pasta sauce expressly for the dimensions of the jar! I also braided twine around the cord as shown by Kara Paslay’s Mason Jar Pendant tutorial.

Braided twine covering the cord -- also, check out my faux zinc lid, achieved by wiping white paint on a plain jar cap

Braided twine covering the cord — also, check out my faux zinc lid, achieved by wiping white paint on a plain jar cap

Replacing the exterior door also helped throw some light into our north-facing kitchen:

What a difference a window makes!

What a difference a window makes!

We chose a door with a half-lite to brighten things up. It’s a different brand than our front door, but has a similar pattern in the glass (although the front door glass is smaller). It gives us some continuity, but more daylight. Such as the daylight is this time of year.

From the outside

From the outside

We updated the storm door as part of the same project, and we love it.

Storm door with "screen-away" and a keyed lock by Larson (huge improvement)

Storm door with “screen-away” and a keyed lock by Larson (huge improvement)

And, finally, my Very Special Spraypainting Project:

Picked this photo because you can see a peek of our holiday construction paper projects, which I get a kick out of

Picked this photo because you can see a peek of our holiday construction paper projects — they make me grin.

I wanted to add that I used spray-can water-based spar polyurethane for the top of this table, and it has been great!  I did three and a half coats — the can ran out halfway through the fourth coat. No brush strokes, but still a strong finish.

Quality Inspector Inigo checks out the polyurethane finish.

Quality Inspector Inigo checks out the finish.

The paint store guy said it was impossible to achieve good protection with a spray formula. That might be true outdoors, but even for an oft-used piece of furniture, I’ve been pleasantly surprised.

New year’s resolution: post more after pictures!

Posted in Before & After, Decor, Furniture, Repair & Maintenance, Windows & Doors | Tagged , | Leave a comment

There’s Deck Screws in the Jar-O

It’s not just a store, Marge. It’s a MEGA STORE! Mega means good and store means thing.

– Homer Simpson

After doing a few DIY projects, you’ll probably find that you have a small collection of left-over screws, nails, assorted fasteners and pieces of hardware. Throwing them away is not an option, so you stick them on a shelf or in a drawer in the basement or the garage. Eventually, you can end up with enough fasteners, brackets, hinges, etc., to open a small hardware store.

I made a few halfhearted attempts at organizing our supplies. I even bought a plastic cabinet with little drawers. But it wasn’t a very workable system. I’d spend a lot of time searching through assorted boxes and tins looking for the right screw or nail. More often than not, I’d give up and run to the hardware store.

Clearly, I had to get properly organized. I began researching commercially available storage systems. Those racks that have removable bins were quite appealing. You know, like the one my nephew uses to store his giant Lego collection.

http://www.harborfreight.com/media/catalog/product/cache/1/image/9df78eab33525d08d6e5fb8d27136e95/i/m/image_3349.jpg

This storage rack with bins from Harbor Freight would store a small part of my nephew’s Lego collection. 

With this kind of small-part storage system, it’s easy to see the contents of the bins. There are quite a few choices for this type of storage system. They come in all shapes and sizes, with one thing in common: they all cost way more than I was willing to spend.

So, I began to think about making my own rack with containers. I liked the idea of clear containers, because it’s easy to see the contents of each container.

2.75"X5" Viewtainer from Menards

A clear container from Menards

I decided that the containers for my system should be transparent. I had a look around the house. It so happens that, being British, I like pickled beetroot. The pickled beets come in small glass jars that are 4½” high and 3″ in diameter.

Clean pickled beetroot jar

One of the pickled beet jars that I collected to make a storage system.

I’d been throwing these jars into the recycling for years, but now I began collecting them. I wanted all the jars to be the same size, so they would all fit onto the rack that I had yet to make.

Over the course of about a year, every time I finished a jar of beets, I would clean the jar and lid, and put them into a box in the basement.

My original thinking was that the lids would be attached to a wall, or to the underside of a ‘shelf’, so that the jars could be removed by unscrewing them from the lids. But in the end, I decided to go with the simplest method, and stand them on shelves.

Pickled beet jars on shelves

Pickle jars all in a row.

The shelves are 3″ wide, the same as the jars. I wanted the shelves to have lips to stop jars being knocked off. After making one lip, I wasn’t satisfied with how effective it might be. So, I used bungee cords stretched in front of the rows of jars. This works very well. The Bungees stretch, making it easy to remove and replace jars.

jars close up

Lag screws in pickle jars

So that’s my system. It cost me nothing, apart from a year of eating beets (possibly a price too high for some). It works well, and I can easily find the right screw now; or, at least know for sure that I don’t have the right screw before I go to the store. Also, the jars are handy for carrying screws and nails to wherever I’m working.

Posted in Construction, Food & Drink, Repair & Maintenance, Salvage | Tagged , , , , | Leave a comment

Using Craigslist for Home Improvement and Decor

Internet? Is that thing still around?

– Homer Simpson

I recently read an excellent post on Young House Love about buying and selling on Craigslist.  There are a lot of posts on the topic, but the YHL edition is the most complete Craigslist primer I’ve seen, addressing a whole range of crazymaking issues associated with the site.  And I loooove their tips on messages to sellers!  When selling, I will jump a dozen early responders to favor a would-be buyer with some basic manners.

I’m a bit of a cheapskate Craigshound my own self.  It’s great for tools — our table saw and router were Craig-based — and materials.

This cabinet top started as century-old joists found on CL for $20. Victory!

We’ve also found furniture, including an end table, a couch, and a fantastic rocking chair project piece that is waiting its turn in the basement.  We’ve sold or given away doors, electronics, sod rolls (that’s turf, Brits!), and an Oldsmobile.

Based on our experiences as Craig-ers, I have just a few more items to add to YHL’s excellent primer.

1.  Learn to Love Misspellings

The YHL post suggests that buyers search for different terms that might be used to describe the desired item.  In addition, some generalized browsing can show some common misspellings that you can use to search (and for amusement).  Examples:

  • “Rod iron” for “wrought iron”
  • “Chester drawers” for “chest of drawers”
  • “Armor” (and, once, “amour”) for “armoire”

If you are selling an item that seems to be prone to misspellings, you might want to include the misspelled version in your listing.  People sometimes list “keywords” at the end of a Craig’s list post, which would be a good place both for different terms to describe the item and for misspellings.

2.  Categories = Suggestions

When I am hunting for a specific item, I tend to focus on the category that makes the most sense.  I cleverly look in “Furniture” for furniture, for instance.  But sometimes, expanding your search categories can be helpful. If you are looking for a specific piece of furniture, check Furniture, but also check Antiques.  Some things in Antiques are surprisingly affordable (and sometimes not really antiques!).  Garden items are often in Farm+Garden, but frequently show up in General or Household.

3.  Be Flexible But Firm

Most Craigslist posters are casual sellers with day jobs and other demands on their time.  Whenever I email about an item, I include at least one phone number to reach me at, and I say that I’d like to see the item at a convenient time for them.  What is good for them might not be a supremely convenient time for you, but if you can reasonably make it work, it’s worth making it easy on the seller.

On the selling side, we have a “no holds” rule.  When we gave away a pallet of high quality turf rolls, several people asked us to hold it for them, but we politely refused to do so.  We’ve had a bunch of no-shows, and it’s unfair to expect a seller to potentially turn down another buyer.  Having said that, we do otherwise strive to make the sale as easy as possible for the buyer.  We want whatever it is gone!

4.  Appreciate a Good Story

Other than killer deals, my favorite thing about Craigslist is the potential for meeting interesting people in unusual locations.  Craigslist as conversation fodder — who knew?!

Happy Craigslisting!

Posted in Decor, Furniture, Salvage | Tagged , | 2 Comments

Dry Wells: Everything You Ever Wanted in a Well, And Less

If you’re going to get mad at me every time I do something stupid, then I guess I’ll just have to stop doing stupid things!

– Homer Simpson

One of the solutions to window well drainage problems that I mentioned last week, was a dry well. A few years ago, we installed a dry well as part of an effort to keep rainwater out of the basement.

To begin, we laid out all the components of our drainage system.

Laying out the components of the drainage system to the dry well

Laying out the components of the drainage system leading to the dry well.

We dug a pit for the dry well.

Pit for the Dry Well with trenches for the drain tile.

The pit we dug for the dry well. Note the trenches for the drain tile.

Then, we dug trenches from the back of the house to the pit. The fall on the trenches is 1 inch every 4 feet.

A close up of one of the trenches

Worm’s eye view.

The pit and trenches were lined with high quality landscape fabric. We left enough fabric to wrap around the contents of the trench at the end.

Then, we poured a layer of gravel over the landscape fabric in the bottom of the trenches and the dry well pit.

Six inch catch basins were used at each corner of the house. One collects water from a downspout, and the other one drains a paved area.

Catch Basin

Catch Basin

A large drum went into the dry well pit. The drum was filled with large rocks. The rocks prevent the drum popping out of the ground, or being crushed.

55 gallon drum for dry well

The fifty five gallon drum for holding water in the dry well.

Plastic drain tile in the trenches connects the catch basins to the dry well.

The plastic drain tile to connect the drains with the dry well.

Unremarkable 4″ drain tile.

We poured gravel around the catch basins, dry well drum, and drain tile.

Then, we wrapped the landscape fabric over the top of the whole lot.

Plastic Drain Tile and Dry Well Drum Surrounded by Gravel and Wrapped with Landscape Fabric

Drain Tile and Dry Well Drum Surrounded by Gravel and Wrapped with Landscape Fabric

We finished by topping off the trench with soil up to ground level.

Water is carried to the dry well, from where it seeps away into the soil. This system works very well for us, and we rarely have water infiltrate the basement any more.

Posted in Outdoor Building Projects, Yard & Garden | Tagged , , , | 2 Comments

Before and After: French Provincial Dresser Made Manly

Homer: Quit running, son! I just wanna give you a big hug.
Bart: It’s gotta be a trick. Run like the wind!

– The Simpsons

Stepson Ben is coming to town for Christmas, and the excitement Chez D’oh is PALPABLE.  You could totally palp it!  In preparation, I decided to do some work on his room to make it more manly.  You see, up until now, Ben’s room has been graced by my childhood bedroom furniture: an ornate, princess-worthy set of dressers in white and gold.  Completely inappropriate for a manly man of Ben’s caliber.

My mom and I hid the baroque drawer fronts with wallpaper — a good but temporary solution.

While painting and updating Ben’s room, I decided to reuse this chest of drawers.  I originally hoped to remove the drawer fronts and end up with flush-set drawers, but the drawer boxes are made to accommodate drawer fronts, and were too short to work.  After thirty years, I realized that the drawer fronts were MADE OF PLASTIC, and therefore would not be good candidates for wood filler.  So, first thing was making new drawer fronts.

The new drawer fronts would be plain with a simple routed edge.  I considered both plywood and MDF; I decided not to use plain planks because the fronts needed to be dead flat and I was concerned plain old wood would bow.  I was initially inclined toward furniture-grade plywood, but decided that MDF would be the most uniform material.  We don’t have a particularly powerful router or very many router bits, so MDF was a little scary because it’s supposedly really hard on bits.

I will not use MDF. MDF is the bit-killer.

I am hard on bits, too!  How bad could it be?  I measured for the drawer fronts and had MDF sheet cut to size at Home Depot.  Best thing HD ever did for me!  Back home, I ran a simple ogee edge around the pieces (the bit survived!), then measured and drilled holes for the handles to match the holes in the drawer box.

Since the drawer handles would bolt through the front and the box, I decided the only further bonding required would be Gorilla Glue.  I was right!  But my execution started out poorly.  My logic was that the drawer pulls would be enough to clamp the new fronts to the boxes, while also being adequate to pull everything into appropriate alignment.  BUZZZZZZ!  No, but thank you for playing.  I was halfway through gluing the second front when I noticed the first one was not square to the drawer box.  Panic!  Once I removed the new (and manly) drawer pull, I had to remove the drawer front by stomping on the edge and swearing a lot.  The glue was still viable, so I quickly measured up what the overlap should be top and bottom, then reattached and clamped and clamped and clamped.  Many were the clamps.  The lesson here?  Swearing always helps.  Also, you can’t clamp something through the middle and expect things to stay square out on the edges.

While the drawers set, I deep cleaned the body of the piece and used wood filler on the routed curliques on the front.  After the filler cured, I sanded the area flat, and did a light sanding of the whole chest, then removed all residue with a tack cloth.  Ready to paint!  Well, to prime at least.  I used a foam roller to apply Kilz primer to everything (including the new drawer fronts), then added three coats of paint (five on the top), sanding lightly between coats.  I used a small brush to get into the corners and the foam roller to keep everything smooth as possible.

I chose the paint color from about a jillion paint chips: Behr’s Night Shade.  Before purchasing, I Googled the color to see how it came out on other projects — searches give a sense of how the color might work.  Well re-SULT here: Jenny Komenda of Little Green Notebook used this very color on her kitchen island.  She had lots of pictures and some insight into how the color actually works (“it looks navy in the picture, but it actually has a lot of green in it”) that were very useful in making my decision.

I sealed with Varathane’s Soft Touch Matte Finish Polyurethane.  I had not used this before, but wanted to try it because I was going for a low-luster finish on the dresser.  It’s a little tricky to use, because you need a fairly thick coat for it to settle down flat, but not so thick that it pools.  After reading the instructions about Not Going Too Thick, my first coat was almost dry-brushed on, but later, thicker coats gave the finish I was looking for.  I did three coats everywhere but the top, which received an extra layer.  The “soft touch” is that the poly coat doesn’t feel or look as hard and shell-like as the stereotypical polyurethane finish.  I like it.

And here it is:

I feel manly, oh so manly…

My photos show up more of the green that Jenny at LGN mentioned.  The chip itself does look really navy, so thank you, Ms. Komenda!

Posted in Before & After, Decor, Furniture | Tagged , | Leave a comment

Window Well Drainage: The Options

Following on from my thoughts about installing window wells around basement windows, I just wanted to add a few items about drainage.

Putting in window wells was part of a larger project to prevent water infiltrating our basement. With that in mind, I designed the wells to take water well away from the house. But I still had concerns that water might backup, since our soil has a lot of clay in it.

Soil type determines how easily water seeps into the ground. Water flows through sandy soils better than through clay soils. As it turned out, we were lucky and didn’t have a problem.

If you’re thinking about installing window wells, you might want to read this article called The Basics of Window Wells. It talks about some disadvatages of window wells. It will give you an overview of possible problems you could run into when installing window wells, including poor drainage.

So, what to do if you find that water is collecting in your window wells?

There are a number of ways  to deal with this problem, unfortunately, they usually involve digging. You will have to install a drain to take water away. Where the water goes is up to you. There are a number of alternatives:

  1. Foundation Drains – If your house has foundation drains, you can divert water to them. Dig down with a post hole digger and put in a pipe to send the water flowing from the window wells into the foundation drain.
  2. Dry Well – If you don’t have foundation drains, you might want to think about putting in a dry well. Install plastic drain tile to take water from the window wells to the dry well.
  3. French Drain – Alternatively, a French drain can be a good option. In this case, create a large underground collection area filled with gravel. Here is an excellent account of how to make a french drain.
  4. Sump Pump – Of course, if none of these ideas works for your house, you could always deliberately divert the water into your basement, then deal with it using a a sump pump.

But really, I hope you don’t need to worry about any of this stuff, and that your window well installation goes swimmingly.

Posted in Construction, Outdoor Building Projects, Windows & Doors, Yard & Garden | Tagged , , | 1 Comment

Basement Windows Update

So much violence on the surface world, I’m going back.

– Homer Simpson

We have an unfinished basement, which is brilliant. Houses in England don’t have basements, so this is a new experience for me. Now, all my English relatives wish they had basements, and they’re jealous of ours.

However, there was one problem with the basement, it used to flood after a big storm. Water often came into the basement at the back of the house during heavy downpours. Attempting to prevent this, we fitted new gutters, installed a dry well, and changed the grade at the back of the house.

Changing the grade meant raising the ground level next to the house. Which, in turn, meant we had to put window wells around the basement windows to let in light and keep soil away from the windows.

Installing Window Wells

I found that installing a window well is quite easy, as long as you keep a few things in mind:

  • The top of the window well should be about 6″ above the final ground level,
  • slope the bottom of the hole away from the building, and
  • put about 4″ of gravel under the window well.
One of the window wells that we installed at the back of the house.

The reason for sloping the bottom of the hole away from the house and filling it with gravel are to create an escape route for any water that gets in there.

Dig the hole deep enough to allow for a few inches of gravel below the installed window well. The bottom of the hole should slope away from the house to keep water from infiltrating the basement.

Attach the window well to the wall. Then, pour gravel in the hole up to the lower edge of the window well. To keep soil from washing in under the window well, I like to put a bit more gravel inside, almost up to the bottom of the window.

The window well installation is complete

Window well installation completed. Notice the the extra gravel inside the window well.

On the outside of the window well, put some good quality landscape fabric on top of the gravel, before covering it with soil. The landscape fabric will prevent soil washing down into the gravel and impeding water flow.

So there you have it. Once the window wells are installed, you can grade away to your heart’s content.

Window Well Covers

When you go to the home improvement store of your choice, you’ll notice that right next to the window wells are the window well covers. I imagine that these are handy for keeping debris from accumulating in the window well. We don’t have any covers, because we felt they would cut down on the amount of light getting into the basement.

The only things that ever accumulated in our window wells were leaves and snow. The leaves are easy to scoop out, and I imagine that snow would also accumulate on the cover.

So, it’s up to you. If you would prefer to keep your window well voids void of debris, a cover would be your best bet. But I don’t think it’s an essential.

Posted in Construction, Outdoor Building Projects, Windows & Doors, Yard & Garden | Tagged , , , , | Leave a comment

Choosing a Lampshade: I Choo-Choo-Choose…?

I did not venture into lamp shade shapes or colors or textures or finials or such in my sizing a lampshade post. I am not a decorator, nor do I play one on TV. But I am a world champion Googler, so I have gathered some relevant resources from smart decor folks hither and yon.

The lamp, the shade, the bulb — it’s all a rich tapestry! Go forth and shop with confidence.


Posted in Decor, Electrical | Tagged , | Leave a comment

Choosing a Lampshade: Don’t Hide Your Light Under a Bushel

She found my one weakness…that I’m weak!

– Homer Simpson

Everybody’s good at something, so it makes sense that everybody is also bad at something else.  I’m bad at many things, but what causes me the most trouble around the house is my inability to guesstimate sizes. I demonstrated this to the Kev once by showing him the screw I picked out of our Bin of Random Leftover Stuff to pin a plastic vent cover to the outside wall. It was a three-inch deck screw. YOU ARE GOING NOWHERE, VENT!

(Tangent: I read once that cows can’t tell how big anything is in comparison to themselves. I was looking for a reference to that when I found the Ben and Jerry’s Cow Cam. I no longer care about how large cows think things are; I just want ice cream.)

I told you that story (and the cow one) so I could tell you about lamp shades. My inability to judge spatial relations translates to some silly-ass lampshade choices. And a lot of time in returns lines. As an example, I have a lamp made from a vintage cologne bottle. I’ve had it for years, so I thought I remembered its size. The result?

That’s a whole lotta shade for that tiny lamp.

Fortunately, there are a few good guidelines for lamp shade proportions that can help you avoid my cow-like shade purchasing habits. For each method, start by measuring your lamp! Despite my known estimation weakness, I often neglect simple measuring. You want to know the overall height of the puppy, as well as the height of the base versus the height of the bulb fitting/harp part.

  1. Lamp Shade Selection Method 1:  Buy a shade with a height that is about 40% of the overall lamp height.  Note that lampshade sizing is by the shade’s bottom diameter.  Take that tape measure with you to the store!
  2. Lamp Shade Selection Method 2:  Use the height of the base as a rough estimate for the width (diameter) of the lower side of the shade.  Lampshade sizing helps you out here: if your base is 16” tall, you just need to look for a 16” shade. This rule will give you a nice, balanced look.
  3. Lamp Shade Selection Method 3:  If your lamp has a harp for holding up the shade, the shade should be about the same height as the harp, or a little taller.  Such a lampshade will cover the bulb but let the base show. And presumably you like how the base looks. (You can use this technique in conjunction with Method 2 as well.)

These are extremely useful guidelines, but as with anything design-y, feel free to chuck the rules out the window. If it looks good to you (and isn’t going to start a fire), go for it!

Measuring your lampshade also doesn’t do much for deciding on its style, but fortunately, there is a wealth of information out there on choosing and decorating lamp shades.  Thrifty Décor Chick in particular has a bunch of great entries. Check out how to stencil a lampshade or cover a shade with fabric on her blog.

Enjoy a more balanced home and fewer trips to Returns!

Related Posts Plugin for WordPress, Blogger...
Posted in Decor, Electrical | Tagged , | Leave a comment