
This is the fourth in a series about making a built-in unit in our sitting room. In the last post, I talked about how we found and prepared a cabinet to use as part of the built-in. Now it was time to fix the restored cabinet in place.
The first thing was to fit the existing cabinet to its new home. We were not going to remove the baseboard behind the built-in, because we thought future owners may want to dismantle our handiwork. I cut the cabinet to fit around the baseboard rather than the other way around.

I cut around the baseboard with a coping saw. This cracked piece is pinned together at this point, with wood filler and attention to follow.
A spare piece of baseboard that we’d removed during a different project made a handy template. (We did remove the shoe molding behind the cabinet, but we labeled it and put it in the basement.)
Because we were going to be using the built-in unit to hold our electronics, we pulled an electrical permit and wired up some outlets to go behind the built-in (that was a project unto itself, despite the passing reference here). I cut holes in the beadboard at the back of the cabinet to allow access to the outlets.

The mitered trim on the opening wasn’t very stable, and we later removed it.
Of course, our living room floor isn’t level. The wonkiness of this house is well documented. Fortunately, leveling the cabinet was a fairly straightforward task. Quite surprisingly, the floor slope increases linearly with distance from the wall. I had expected the slope of the floor to be greatest next to the wall, and then level off.
I intended to put three leveling strips of wood under the cabinet, one at the end furthest from the wall, and two either side of the middle drawers. The gap under the cabinet where the first leveling strip was going was 5/16”, under the second was 5/8” (10/16”), and the third was 15/16”. So I used 5/16” thick strips, one where the gap was smallest, then two, and three at the end furthest from the wall.

The leveling strips are visible beneath the cabinet.
With the cabinet leveled and cut to fit, it was time to fasten it to the wall. We wanted to avoid putting holes through the floor underneath the cabinet for the same reason that we wanted to preserve the baseboard–someone might want it as floor again someday.
Now that the unit was sitting solidly on the floor, it only took a few screws through the horizontal rails at the back of the cabinet into wall studs to hold it securely in place without drilling through the floor. The bottom back of the cabinet was up against the baseboard, so there was a gap between it and the wall at the top. I found some scraps of wood to use as spacers, so that I could tighten up the screws through the spacers without pulling the cabinet towards the wall.
With the cabinet fixed in place, I began working on the part of the built-in where the fireplace would go. The plan was to build a frame and attach heat resistant tile backing to enclose the fire.

The back section of the frame for the fireplace.
I made the fireplace frame from 2” x 4” construction lumber. End-lap joints made flush corners for the front and back sections of the frame.The height and depth were determined by the height and depth of the cabinet. The width was determined using the golden ratio.
The front and back sections were joined together to make a frame that was ½” narrower than the cabinet to allow for the thickness of the tile backer.

The frame is narrower than the cabinet to allow for the thickness of the tile backing.
With the frame finished, it was time to apply the tile backer. We decided to create a box with heat resistant tile backer to contain the fire and prevent the heat warping any of the other elements of the built-in.
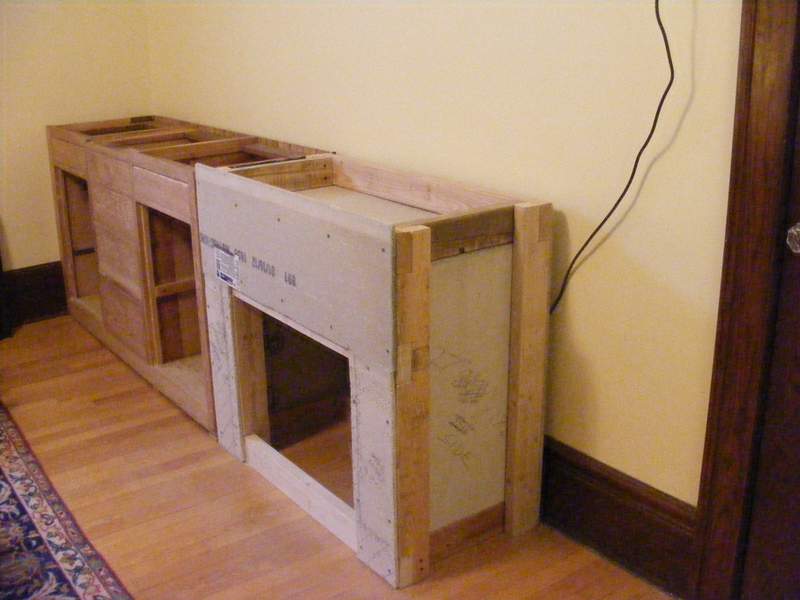

The enclosure for the fireplace. There was a new electrical outlet behind the fire, so we needed to cut a hole for that. The electric firebox runs through a surge protector into this line.

Once the frame was finished, I removed the bottom front section of stud.
And with that, the main structure was complete. Next time, how we made this basic structure look more like a mantel.
Update! Links to the other posts in this series:
1: Genesis–how we decided to add a fireplace with cabinetry
2: Light My Fire–how we selected a fake fireplace
3: You Don’t Know What You’ve Got–how we found and prepped the cabinet
5: A Firry Tale–how we found and used vintage wood for trim
6: The Tiling–how we picked and installed fireplace and hearth tiles
7: If You Build It–the finishing touches and the final reveal

2 Responses to Cabinet of Dreams, Part IV: The Building Part of the Built-In