Conquering the Stoop

Previously on D’oh…we removed our old concrete steps and started the base for the new steps. This time, the focus is on building the platform for the top of the deck.

building steps 026

Maybe we could make a seesaw to get into the house.

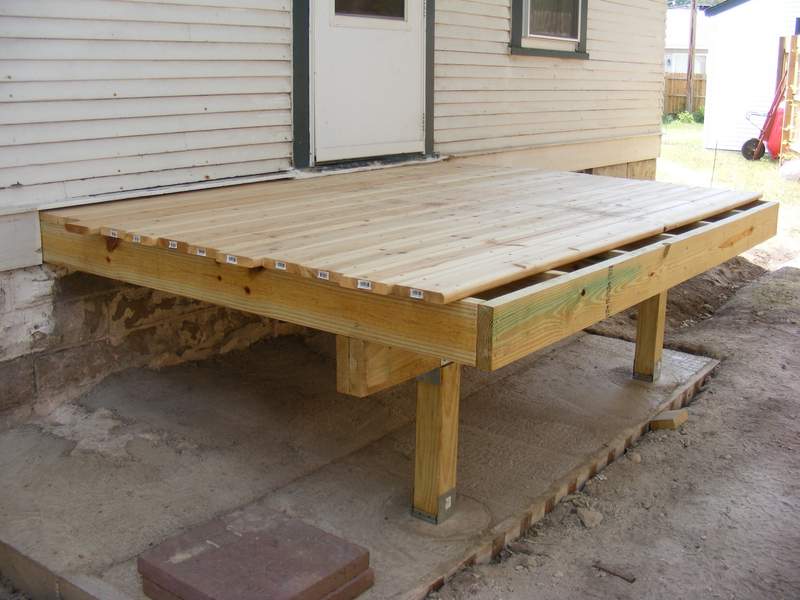
Building a platform is about making sure everything is well-supported. Think it through from the top layer down. The platform surface is 1″ x 4″ cedar deck boards. The deck boards are supported by 2″ x 6″ treated lumber joists. And so on down to the center of the earth (or at least down into the fully cured concrete piers holding the uprights).

By the way, that board size system seems backwards to me. In England, the bigger dimension goes first, so it would be a 4 x 2. But then, I’ve gotten used to putting the month before the day, listing the home sports team second, and using the word ‘gotten.’ So putting the smaller dimension first is fine. By which I mean, it’s wrong but I can work with it. But I digress.

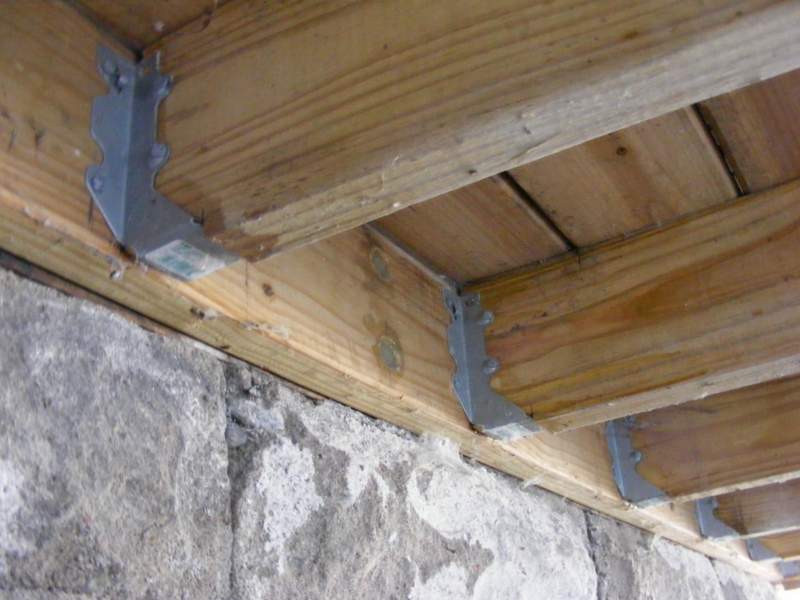
Back to the steps. The joists are supported by a beam, held up by posts at one end, and a ledger board (the board attached securely to the house) at the other. The joists are connected to the ledger board with joist hangers.

048

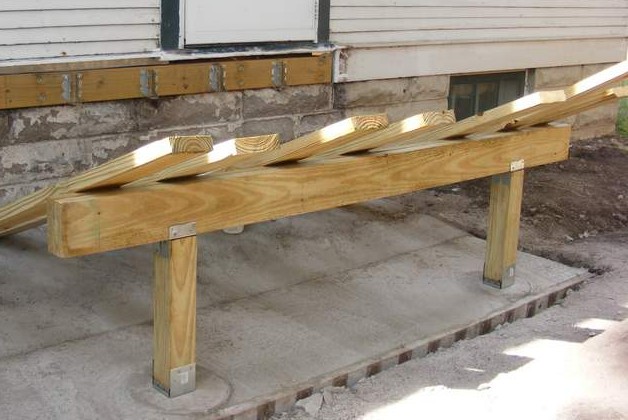
Underneath every deck is a set of underappreciated joists.

You need to make sure that the platform is square, with each corner measuring 90º. This is best done by first fastening together the outside joists into a square or rectangle. The joists should be attached loosely, with just one nail or screw, so that the corner angle can be adjusted. Fit the two outside joists into the joist hangers, and attach the header joist to the ends of the outside joists.

Then, measure corner to corner diagonally across the frame (this goes better with two people). When you measure the diagonals, it doesn’t matter which part of the corner you measure to, as long as you do it the same on both sides. When both diagonals have the same measurement, the frame is square. Now, fasten the corners securely, so the frame doesn’t move out of square.

Once the frame is square, mark the position of the rest of the joists on the header joist. Pre-drill the header joist for the nails. Put nails through the joists into the joist hangers, diagonally in the top of the beam, and through the header joist into the ends of each joist.

building steps 034

When you’ve finished fitting the joists, you’ll have something like this, only attached to your house.

With the joists in place, it’s time to fit the deck boards. You can use nails or screws. I prefer screws, but I don’t have a good reason. (Others do.) Chances are, you’ll have to rip the last deck board lengthwise to fit the space that’s left. Let the deck boards overhang at each end. When they’re all connected, use a Skilsaw to trim them up.

building steps 038

The last deck board needs ripping.

Having made the frame with treated lumber and the top of cedar, I finished it off by attaching pieces of 1″ x 8″ cedar around the frame. Mitering the corners makes it neat because there aren’t any raw edges exposed. It’s not necessary, but finishes it off nicely.

building steps 049

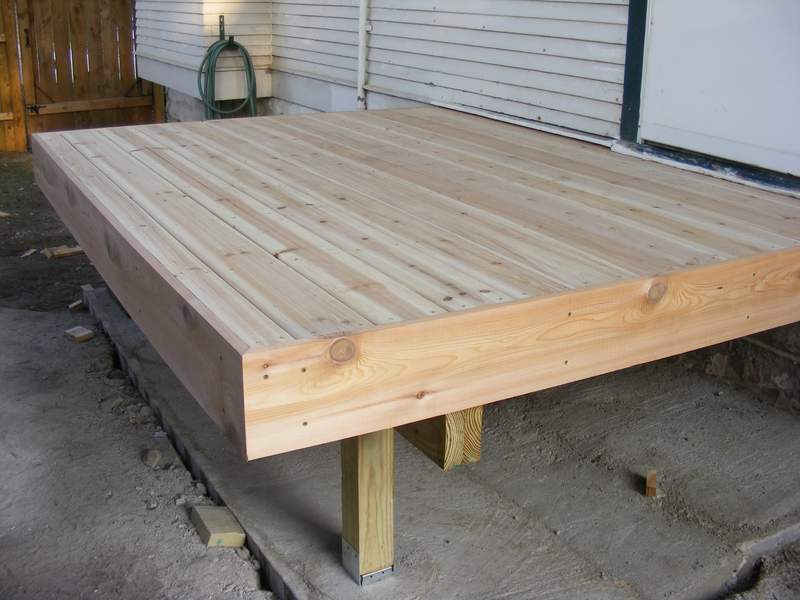
Finished plaform. Stacey’s celebratory dance was somehow deleted from the memory card.

Now we have a platform that means we can walk straight out of our side door. Progress! Of course, we’re still left with a very big step down to the ground. Next time: what I did about that.

Posted in American vs English, Construction, Outdoor Building Projects, Porch | Tagged , , | Leave a comment

Love in the Time of Radiator Repair

Marge: Homey, do you think the romance has gone out of our lives?
Homer: *belches*

– The Simpsons

© Dawn Hudson | Dreamstime Stock Photos

© Dawn Hudson | Dreamstime

In February, This Old House ran a feature on why home improvement is good for relationships. Item 7 made me laugh: “You do more date nights — at the Home Depot.”

The Kev and I do have a proper night out from time to time — we do! — but it’s not unusual to find us at a hardware store on a Friday night. But particularly since Christmas and with winter wearing on, we’re going out less, even to Menards.

The cabin fever is starting to get to me, so my ears perked right up last night when Kev said, “On Saturday, maybe we should take a ride out…

“…to that plumbing supply house.”

LoveConnection

It wasn’t what I was expecting him to say, but the thing is…I really do want to go to the plumbing place!

Posted in Repair & Maintenance, Romance | Leave a comment

Two by Two, Hands of Blue

Farmer: Well lah-dee-dah, Mr. Park Avenue manicure.
Homer: I’m sorry, I believe in good grooming.

– Homer Simpson

Most paint and hardware stores sell boxes of disposable gloves. Generally, you have a choice between latex or nitrile. These are great for particularly messy jobs like painting or staining.

We have both on hand. (And in boxes in the basement! BAZINGA.) Assuming you don’t have a latex allergy, the latex versions are good for most painting and cleaning tasks. If you aren’t going to go completely nuts with a project, lined latex dish gloves are reusable AND iconic.

Incidentally, these are called “marigolds” in England (well, at least the usual ones without the faces are), which is a lot simpler than saying, “You know, those old-school yellow dish gloves.”

I’m pretty bad about wearing gloves at any time, and I’ll generally let my hands get painted up rather than use disposables. But if I’m working with stains or polyurethane, it’s harder to wash off the mess, and I will pull on a pair of blue nitrile gloves.

Why nitrile gloves?? Depending on where and when you attended high school, you may recall the health teacher emphasizing that petroleum jelly and latex are natural enemies with infant-based outcomes. Well, many stains, coatings, and solvents also contain petroleum products, and they erode latex gloves. (This is why you may see the guys at the Jiffy Lube wearing blue gloves. I can’t explain the TSA’s blue-glovedness.)

I didn’t put these data points together until I worked with a golden oak shade of gel stain in latex gloves. Which broke open at the fingertips, to the everlasting smugness of health teachers everywhere. The golden oak stain is yellow-brown in its gel state, so my open-fingered latex gloves resulted in a scrub-resistant, long-lasting, poop-colored manicure.

Learn from my d’oh! When staining, go for nitrile.

But try to avoid going all evil when you do so.

But try to avoid turning all evil whilst wearing them.


Posted in American vs English, D'oh!, Furniture, Repair & Maintenance | Tagged , | Leave a comment

Introducing Our Cubic Yards to Bags Concrete Converter

Get five bags in case I eat four on the way home.

– Homer Simpson

Check out our new Cubic Yards to Bags Concrete Converter, for those times when you don’t need a truckload of ready-mix.

A little while ago, I was looking for online concrete calculators that work out how much concrete you need for any given project. Many of those calculators will work out the number of cubic yards (or cubic feet) you need for ordering ready mix, but what if you’re buying concrete in bags?

We normally buy bags of concrete, because it’s cheaper and more convenient for small projects. I tried to find a calculator that would convert cubic yards, or feet, to bags, but I didn’t have much joy. So I decided to make my own concrete bag calculator and put it online for anyone to use.

To use the concrete bag calculator, you enter the number of cubic yards or feet of concrete you need. If you aren’t sure, use either a formula for calculating volume or an online calculator. You can see our calculator recommendations by following the links below:

I hope this helps with your project planning. Happy mixing!

Posted in Calculators, Construction, Outdoor Building Projects, Repair & Maintenance | Leave a comment

Crowning Contradictions

I’ve done everything the Bible says, even the stuff that contradicts the other stuff.

– Ned Flanders

We have the original crown molding for the living room and dining room. It’s in the garage, coated in mint-colored lead paint. With rusty nails sticking out of it. Lurvely. For years, I intended to strip it and reinstall, but that paint is just nasty and the molding is not a particularly rare or spectacular type. The only huge advantage would be miter-avoidance. I admit that’s truly good as advantages go, but we’re talking a very lot of poisonous mint paint.

Given all that, I’m roughly 123% certain that we’ll buy and fit new crown molding (a/k/a, and if concave, cove moulding), as we have in the kitchen and bedrooms. Of course, the possibility of buying and installing something new means the Internet and I have been spending a lot of quality time together. We have 8.5’ ceilings, and while I think that’s plenty tall, I don’t want to bring the ceiling down substantially. I easily found molding I liked, but wasn’t sure about the width or finish I should choose. Helloooooo, Google! In short order, I read the following authoritative pronouncements:

  • Crown molding lowers the visual height of the ceiling.
  • Crown molding raises the visual height of the ceiling.
  • Crown molding lowers the ceiling, but sometimes you want to lower the ceiling.
  • White crown molding raises the ceiling, except when it lowers it.
  • Stained molding lowers the ceiling.
  • Stained molding draws the eye up, effectively raising the ceiling.
  • Molding painted the same color as the walls raises the ceiling…
  • …or lowers it.
  • You should never use crown molding if your ceiling is under nine feet.
  • You should always use crown molding, regardless of height.
  • Crown molding should always have the same finish as other woodwork in the room.
  • Crown molding should always be white, regardless of other woodwork in the room, because white is classic.
  • Crown molding should always be white, regardless of other woodwork in the room, because molding was originally made of white plaster.
  • It should be the color of the ceiling.
  • It should be a completely different color altogether.
  • It should be the same color throughout the house.
  • It should be the same size as your baseboards.
  • No, 50% the size of your baseboards.
  • Thin, if your ceiling is under nine feet.
  • Proportionally sized using a specific formula.

And then, my head exploded.

The kitchen and bedrooms were easier because the woodwork in those rooms is painted white. We just carried on with that, although we have wavered a bit on size.  Here’s the kitchen, with thin moldings (around 2″):

Kitchen molding

Kitchen molding

And the 4″ version we later used in Ben’s room:

Bedroom molding

Bedroom molding

Incidentally, two things: Thing one, despite appearances here, these paint colors are not the same. The kitchen is Benjamin Moore’s Quiet Moments (lighter and grayer) and the bedroom is Benjamin Moore’s Woodlawn Blue (tending more aqua). Thing two, it looks like the wider bedroom molding is close to what they are getting ready to install over at Young House Love, so I now feel super-classy!

Of the two, we prefer the wider version, and think it will be more appropriate to the living room/dining room. The remaining question is whether to go with white or stain to match the original woodwork. Here’s white:

Drewald at home

From the Canadian House & Home Forums, 17 Feb. 2010 (Drewald)

And here’s some stained:

As per usual practice, we’ll mock up both to make a decision (and to avoid a d’oh!). Our woodwork is not quite as dark as the second picture, so I’m increasingly leaning toward stained. But really, both are good, and it’s really up to the homeowner — don’t let some self-proclaimed ceiling molding guru tell you otherwise! That only leads to head explosions.


Posted in American vs English, D'oh!, Decor, Salvage, Walls & Floors | Tagged , , , | Leave a comment

That First Step’s a Doozy

Anything that requires twelve steps is not worth doing.

– Homer Simpson

Recently, I wrote about demolishing concrete steps from the side of our house. Writing that post, and looking at those photos, brought it all back. I had to go and have a bit of a lie down. Talk about suffering for your art!

Of course, back then with the stoop demolished, there was no time to recover. We had a giant step up to the side door that we needed to do something about. That meant designing and building new steps.

After the stoop was gone

After the stoop was gone, there was a giant step up to the side door.

One of the things we liked about the old steps was the large platform area outside the door. It was easy to maneuver large items in and out of the house. So, I wanted to keep that feature with the new steps.

Concrete piers for new steps

Even with the plastic stool, it’s still quite a big step up into the house.

The platform would be built like a small deck, with a ledger board attached to the house with lag screws. At the other side, a bearer would be put on top of two four-inch square stumps that would be stood on concrete piers. The piers were built using 12″ diameter cardboard tubes. One bolt was set into the top of each pier to secure the bottoms of the stumps.

The base for the steps is complete.

That looks a lot tidier, but it’s still a big step.

A base of crushed rock and concrete was put into the bottom of the trench, and four-inch thick concrete was poured into a rectangular form around the piers. Finally, hollows in the rough remains of the old stoop were filled with concrete, ensuring that drainage was away from the house.

Supports for each end of the deck joists.

Now we’re getting somewhere…we can either take a big step or a big leap!

We fitted the stumps and doubled up two joists to make a bearer. The bearer supports one end of the joists, the other ends go into the joist hangers on the ledger board. At this point, we started to have some hope that it would soon be easier to get into the house.

Posted in Construction, Outdoor Building Projects, Porch, Yard & Garden | Tagged , , , , | Leave a comment

Rug-o-rama: Rug Pads on the Cheap

 Ooooh, cushy!

– Homer Simpson

It is freakin’ impossible to research rugs and rug-related topics without running across many, many Big Lebowski references. So please allow me to get this out of the way:

We recently bought a new rug that really pulls the room together.

Mayya is skeptical. It may pull the room together, but it clashes with her outfit.

Mayya is skeptical. It may pull the room together, but it clashes with her outfit.

This acquired, I turned my attention to rug pads. Because of the cold, cold winters, I wanted a thicker rug pad, but a thick pad for a large area rug can be a big chunk of the price of the rug itself. Never one to be drawn to the idea of spending money for, well, anything, I pondered the options.

The Dude Thinks

The Dude, thinking, by If We Don’t, Remember Me

Yeah, I lied about being done with Lebowski references. I just love Jeff Bridges and have ever since I saw Tron in the theater back when dinosaurs roamed the earth. If you haven’t seen the remake of True Grit, I highly recommend it. Tron: Legacy? Not so much. Except for the Jeff Bridges parts.

Did I mention I enjoy the theatrical stylings of Mr. Bridges?

Did I mention I enjoy the theatrical stylings of Mr. Bridges?

Hey! That reminds me. Back when I was first developing my interest in Jeff Bridges, my parents had weird, foamy pads under all the wall-to-wall carpeting. What about THAT? Well, it turns out that’s a lot cheaper than the spendy ones specifically for area rugs. You can buy it by the square foot off rolls. The carpet department guy will make a half-hearted attempt to talk you out of it, but it’s been working great for us. Total spend? Under $40.

Drawbacks? They’d have to be BIG drawbacks at this price, but the biggest is that this stuff is meant to be a permanent and unmoving sub-layer. It’s just bits of foam attached to a loose grid, so it can pull apart easily. Our rug is staying in one place and is pinned under two couches and a coffee table. If you are planning to rearrange regularly or reposition the rug often, this may not work for you.

This kind of thing (from Home Depot)

This kind of thing (from Home Depot)

On size, go for 3/8” thick or less to avoid an inordinate floor height transition to the be-rugged area. For length and width, you’ll have to cut the pad to size after buying the total square footage you want. Piece it together (I used duct tape, natch, but you could do some rough loop stitches instead) to make the right size, which should be a little smaller than your rug (about 1 to 1.5 inches from each edge).

Put the pad down where you want it on top of a clean and DRY floor. Get another pair of hands and lift and position the rug on top so you don’t have to drag the rug around on the pad. If you are covering tile or wood, you may want to check from time to time that the pad is not damaging the surface through chemical or other processes. We’ve never had a problem, but this was the best argument the sales guy had against the idea.

This is an easy way to save yourself some money and still make your floors all cushy. Pour yourself a Caucasian and enjoy your luxurious floors!

Posted in Decor, Food & Drink, Walls & Floors | Tagged , | Leave a comment

Better Living Through Chemistry: Stripping Door Hinges in Place

Johnny: So, what do you think of the Lady Krusty Mustache Removal System now, Angelique?
Angelique: It’s Krusteriffic, Johnny Unitas. But is my upper lip
supposed to bleed like this?
Johnny: Probably.

 – The Simpsons

I’ve enthused at length about the power of Crockpots to remove paint from old hardware, but some things can’t be readily thrown into a slow cooker.  Sometimes the piece is too big. And sometimes I’m too dang lazy!

In that last category are door hinges. I don’t want to take a door off its hinges, much less take the hinge off the door and the jamb. Those screws are holding just fine, thank you, and I like to avoid too much lifting and fiddling. But once the rest of the door hardware has been stripped and reattached, those hinges start looking pretty gooptacular.

(The Kev, of course, would happily take the door down. He’s more highly evolved than I am.)

I decided to experiment with stripping door hinges in place. I fully expected to be spanked for my laziness, but it actually came out really well. LAZINESS FOR THE WIN!

First, I masked the door from the hinge in an excessive fashion.

Door Hinge Masked

I protected the door and the floor south of the hinge so that any drips would not cause unsightly burns (many layers of paper on top of plastic). Then I applied Zinsser’s Magic Strip. The instructions say to paint it on generously and to wait for 4-24 hours until it turns “light green.” Well, it IS light green to begin with, so thanks for the Mega Clue, Mr. Zinsser. I covered the hinge to deter cat sniffage, and randomly picked eight hours as the trial period.

Dohiy.com: Half-assed home improvement ideas, now on clearance!

Dohiy.com: Half-assed home improvement ideas, now on clearance!

Eight hours later, the stuff was exactly the same color, but an investigatory poke with a scraper brought the paint right off. Holy chemical processes, Batman!

Eight is enough!

Eight is enough!

After maybe three minutes of scraping and working the hinge over with stripper cleaner on steel wool, the hinge is back! MUCH easier than taking down the door.

And then the angels sang.

And then the angels sang.

One disclaimer: the stripper seeped under the masking tape on the door side, with the result that it slightly marred the paint surface (see the purple paint peeking through in the last photo). This didn’t bug me too much because I need to touch up the door paint anyway. If you have a perfect surface you want to maintain, you should probably take the hinges off. Next time I do this, I’ll use more serious masking tape, and report back on whether it performs better.

Update: See my later attempts at hinge stripping!

Posted in Before & After, Repair & Maintenance, Salvage, Windows & Doors | Tagged , , | Leave a comment

Get Set for More Concrete Calculators!

Ready for more concrete information? In Finding Online Concrete Calculators: is it Getting Harder? I recommended the best calculators for a base or pad. As I mentioned there, many online calculators can help you to work out how much concrete you need for a project. But many are basically volume calculators — for some projects, you may want a little more help.

In this post, I look at calculators for piers, walls, and foundations. As with the base/pad calculators, I looked for online tools that go a bit further than the norm. Some can work with more complex shapes than just squares and rectangles. I even found some that will calculate how many bags you need.

Concrete Piers

When you are building a structure such as a deck, you might need to build concrete piers for support. Piers are often made using cylindrical cardboard tubes, which come in different diameters to suit your needs. There are many online calculators that will help you work out how much concrete it’s going to take to fill a tube.

The Lowes calculator is the most useful as it will tell you how much concrete you need in cubic yards and bags.

If your piers are not cylinders, but have a square section, the BlockLayer.com calculator is the only one that can help you.

And if you want to use spread footings under your piers, the Fine Homebuilding calculator will calculate how many cubic yards and bags you need. What they don’t tell you is what size bags they’re talking about. For that info, use our Concrete Bag Calculator.

This table summarizes the better calculators for building concrete piers.

Website Input Output
Better Homes and Gardens
  • Diameter, and
  • Height.
  • Cubic feet, and
  • Cubic yards.
BlockLayer.com
  • Number of columns,
  • Diameter, or
  • Width and thickness, and
  • Length.
  • Cubic feet, and
  • Cubic yards.
Concrete.com
  • Diameter (inches), and
  • Height.
  • Cubic yards.
Decks.com
  • Diameter,
  • Height, and
  • Number of piers.
  • Cubic feet,
  • Cubic yards, and
  • Number of 60 and 80 pound bags.
Fine Homebuilding Pier calculation:

  • Diameter,
  • Height (inches),
  • Number of piers

Pier footing calculation:

  • Type of footing, and
  • Size of footing.
  • Cubic yards, and
  • Number of bags


  • Additional cubic yards, and
  • Additional bags.
Lowes
  • Diameter,
  • Height, and
  • Number of piers.
  • Cubic feet,
  • Cubic yards, and
  • Number of 40, 60, and 80 pound bags.


Concrete Walls

There are not many concrete wall calculators, but that’s ok — you can get the information you’re looking for from one of the two reviewed here.

If you want to build a wall by pouring concrete into a form, Lowes have the calculator for you. It will tell you the how many of cubic yards and bags you need.

If you want to know how much concrete it will take to fill the cavities in a concrete block wall, then you should try out the Concrete.com calculator. It gives the result in cubic yards; here’s the link for calculating the number of bags.

These two resources are outlined in the following table.

Website Input Output
Concrete.com
  • Wall length,
  • Wall height, and
  • Block size.
  • Cubic yards.
Lowes
  • Wall length,
  • Wall height, and
  • Wall thickness.
  • Cubic feet,
  • Cubic yards, and
  • Number of 40, 60, and 80 pound bags.


Concrete Foundations

If you need to build a foundation, there are two excellent foundation calculators, which deal with different foundation types.

Monopour/Slab

If your building will have a slab foundation, the BlockLayer.com calculator is easily the best. It will calculate the amount of concrete needed for a number of different shapes with different profiles. There are helpful diagrams, and there is a rebar calculator at the bottom of the page.

Stem Wall and Slab, Crawl Space, or Basement

If you need a deeper foundation than a simple slab, Construction Resource has the calculator for you. It will calculate the amount of concrete needed for stem wall, crawl space and basement type foundations.

You can find more information about these calculators in this table.

Website Input Output
BlockLayer.com
  • Slab shape,
  • Lengths,
  • Thickness,
  • Edge foundation width, and thickness,
  • Internal foundation length, width, and thickness, and
  • Splay or no splay.
  • Square yards and square feet,
  • Cubic yards and cubic feet,
  • Perimeter in feet,
  • Scaled plan and profile, and
  • Number of 60 and 80 pound bags.
Construction Resource
  • Building Perimeter.

Footing:

  • Width (inches), and
  • Depth (inches).

Stem Wall:

  • Height, and
  • Width (inches).
  • Cubic yards for footing,
  • Cubic yards for stem wall,
  • Cubic yards for footing, including waste,
  • Cubic yards for stem wall, including waste, and
  • Total cubic yards.

You can easily spend several hours hopping from calculator to calculator online, finding different results along the way. If you have a concrete project coming up, I hope these reviews will help streamline the planning and shopping stages. The sooner you are done, the sooner you can start the next project!

Posted in Calculators, Construction, Outdoor Building Projects, Porch, Repair & Maintenance, Walls & Floors, Yard & Garden | Tagged , , , , | Leave a comment

Finding Online Concrete Calculators: Is It Getting Harder?

Careful, Bart. You might break my calculator… by which I mean my head!

– Martin Prince

If you spend much time doing home improvement projects, sooner or later you’re going to need to use some concrete. We’ve used concrete in quite a few projects. For instance, we used concrete to:

  • Make piers to support a small deck,
  • Form a base for the compost bins, and
  • Set fence posts and a pergola in the ground.
Concrete piers

Concrete piers we made to support a small deck

There always comes that point where you have to work out how many bags, or cubic yards, of concrete you need. I usually do a bit of mental arithmetic to calculate the volume I need to fill. This is normally only a very rough estimate, and always involves erring on the side of caution initially, and then having to go back to buy more.

That’s really fine. But it would be nice to be able to estimate my concrete needs more accurately. And, if you are ordering ready mixed concrete, you really need to calculate the volume much more precisely.

So, I’ve been looking around the webosphere for help. There are a lot of online concrete calculators out there, and their utility and quality vary dramatically. Some are thoughtfully designed to be as useful as possible. Others are quite basic, and not really very helpful. Some of the websites with the less useful calculators have other good information, but I’m only going to cover calculators here.

Home improvement project calculators fall into two groups:

  • those that work out how much material you need, and
  • those that work out how much the material will cost.

Here, I’m going to focus on the first kind, but some of the ones that are better at calculating material will also calculate cost if you want them to.

There are quite a few different ways you might want to use concrete, such as:

  • Making a base or pad.
  • Forming piers,
  • Filling block walls, and
  • Building foundations and walls.

There are many online calculators that are made with one of these scenarios in mind. After sorting through them all, I am in a position to recommend the most appropriate calculator for you to use in each of these situations. I will begin with the simplest: a base or pad.

Concrete Base for Compost Bins

We made this concrete base for compost bins.

Concrete Pads

Often, you will want to lay a concrete base that is a few inches thick. There are many online calculators that will help you work out the amount of concrete needed for such a job.

For a simple, rectangular slab, Lowes has the most useful calculator. It will work out how many bags and cubic yards of concrete you need.

For a more a complicated slab with right angle corners, such as ‘L’, ‘U’ or ‘H’ shapes; use the BlockLayer.com calculator, leaving out the edge foundation and internal foundation information.

If your slab is a circle, triangle, hexagon, or octagon, the Home Advisor calculator is the one to use. You first choose the shape, then it prompts you for the dimensions it needs to calculate volume. However, it only tells you the number of cubic yards. Use our Concrete Bag Calculator to calculate the number of bags.

You can find extra information about my favorite calculators in this table.

Website

Input

Output

Better Homes and Gardens
  • Square Footage
  • Thickness
  • Cubic Yards
  • Cubic Feet
BlockLayer.com
  • Slab shape,
  • Lengths, and
  • Thickness.
  • Square yards and square feet,
  • Cubic yards and cubic feet,
  • Perimeter in feet,
  • Scaled plan and profile, and
  • Number of 60 and 80 pound bags.
Decks.com
  • Length and width, or diameter,
  • Height, and
  • Number of pads.
  • Cubic Feet,
  • Cubic Yards, and
  • Number of 40 and 60 pound bags.
Home Advisor
  • Shape
  • Length and width, or diameter
  • Thickness
  • Cubic Yards
ImproveNet
  • Shape
  • Length and width, or diameter
  • Thickness
  • Cubic Yards
Lowes
  • Length,
  • Width, and
  • Depth.
  • Cubic Yards,
  • Cubic Feet, and
  • Number of 40, 60 and 80 pound bags.

I hope you found some of that useful. Next time, I’ll find you some calculators for other types of concrete projects.

Related Posts Plugin for WordPress, Blogger...
Posted in Calculators, Construction, Outdoor Building Projects, Porch, Repair & Maintenance, Walls & Floors, Yard & Garden | Tagged , , , | Leave a comment