
The way you put it, it sounds so perfect. But it’s not.
– Homer Simpson
Sometimes, I look at this place and don’t see how far we’ve come, but how far there is to go. Our attic project stalled (more on that later/update: here), and I’m having trouble picking the next big thing to focus on. Meanwhile, I’ve got a stack of almost-finished things that I should just DO: the dang slipcover for one (should be done this week), and the window treatments in the bedroom (from LAST YEAR’S bedroom project). And I’ve been feeling a little out of sorts when it comes to DIY stuff.

At times like these, I tend to dither over smaller issues, such as tile patterns and picture framing. These are parts of real projects, but they are also delaying tactics–and I’ve done a bunch of them lately!
1. LED Cabinet Lighting
After I mirrored our glass-doored kitchen cabinet, I thought it would be cool to be able to light it up. I ordered a battery-operated LED strand (under $7 on Amazon):

(via)
I tucked the short strand inside the front frame of the cabinet, using masking tape to keep it in place and out of sight. When I’m feeling fancy-pants, I just flip the switch on the battery pack.
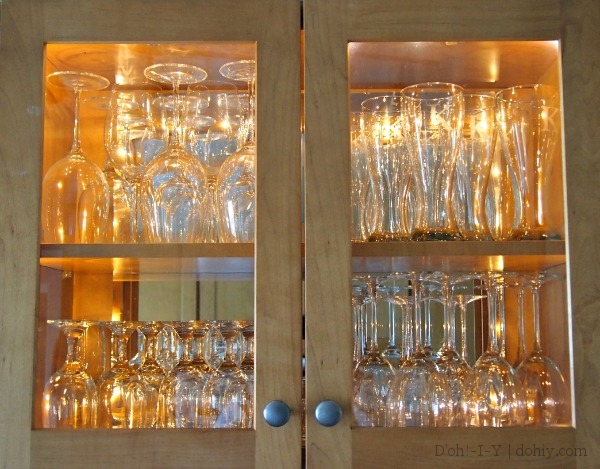
Easier than hard wiring! Especially when we’re going to use this approximately six times a year (which is exactly how often I feel fancy-pants).
2. Bed Finish Touch-up
When I posted our storage bed review, I included a picture that gave me pause.
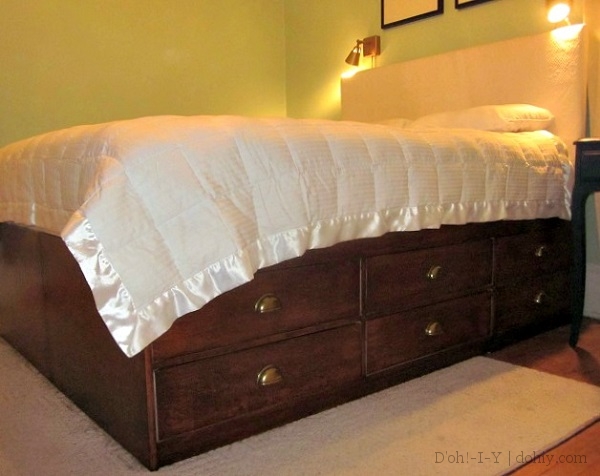
It gave me pause because my photography skills need serious improvement, but also because the photo emphasized where the stain job stopped. I did not stain inside the frame, and I was surprised how obvious that was with the inset drawers.
So I ran a stain pen (from the walnut vs. stain pen competition) around the first half-inch or so of each drawer and frame and that’s all it took!

Sure, I stained the entire interior of this piece!
3. Countertop Bracket
Since we installed the Riverstone countertop, I’ve removed the faux beadboard wallpaper, repaired and primed the walls (from wallpaper and old backsplash removal damage), and caulked between the counter surface and the walls. All of these tasks are necessary and part of the larger backsplash project.
I also added a completely unnecessary bracket under part of the countertop. We have two overhang areas, and neither one really needs additional support, but I just thought it would make these areas look more finished. The piece I worked on is a small area that wraps around the chimney chase at the end of the kitchen.

I cut down a piece of small crown molding and added a flat piece to the top, then sank plugs into the plaster for the screws. I pushed the piece up against the underside of the overhang and screwed it into place. It probably does provide some support, insofar as if someone huge fell in the kitchen and grabbed that overhang to break their fall, it might (a) actually help, and (b) not break off. Mostly, though, I thought there should be something under this piece so it looked solid.
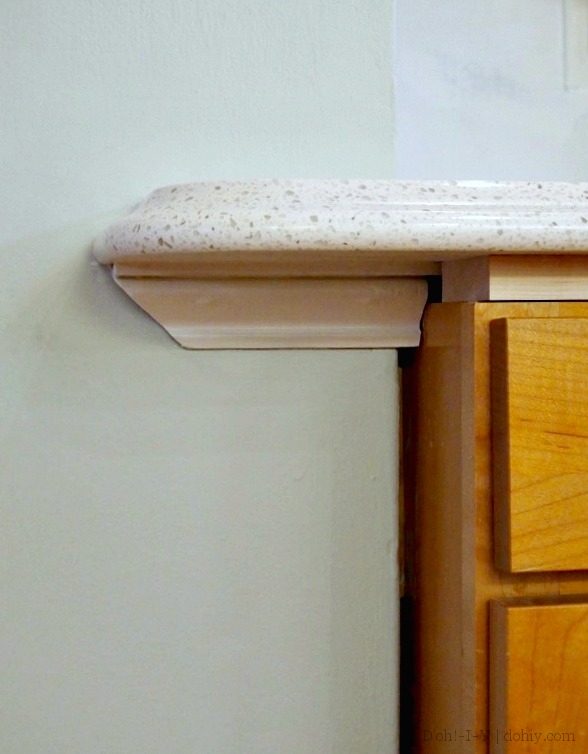
We still need to add molding to cover the substrate between the cabinets and the countertop, and to cover the gap between the cabinet and the chimney wall, but this pointless little piece is done!
Delaying tactic or not, tiny tweaks like these provide quick gratification and a little bit of forward momentum.

EXCELSIOR!!!
Postscript: Despite my enthusiastic use of products here, this post was not sponsored by anyone (as if!).
