
If your mother wasn’t so fancy, we could shop at the gas station like normal people.
– Homer Simpson
Just quick before we start — a shout-out to Amy at Commona My House, who selected our recent bookcase project as a feature for “Give Me The Goods Monday.” Thanks, Amy!
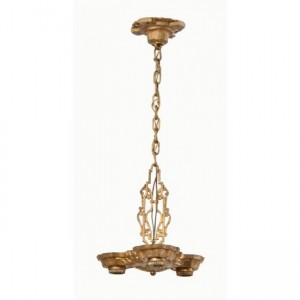
I recently restored a vintage ceiling light. I started with most of the original pieces, but I did not have the ceiling canopy. The ceiling canopy is the part that attaches to the electrical box and covers the wiring. Old lights like mine (or like the one to the left from Urban Remains) originally had a canopy that matches the rest of the fixture (also like the one to the left), but they are often reused when the fixture is removed, or just lost.
Instead, I started with a utilitarian version from the hardware store:
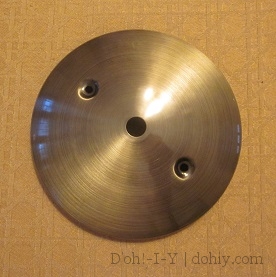
So sexy! Actually, it’s fine for most purposes, but for a fixture that should have a coordinating canopy, a simple top like this could prove distracting. Not as distracting as pasting cutlery handles to it, obviously, but distracting.
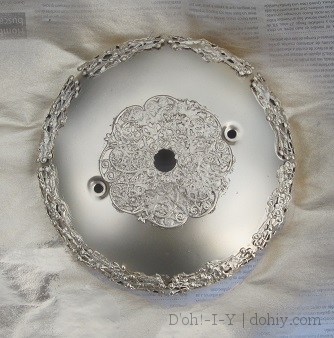
I decided to just add a little texture. After a couple of trips to Michael’s, I had a stack of filigree to choose from. One of the medallions fit neatly on the top.
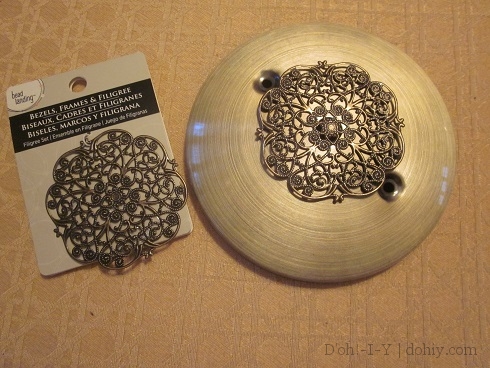
I trimmed the detail from the middle, glued that thing down and clamped it. I always feel like I know what I’m doing after I’ve clamped something, even when I really don’t. That momentary feeling of competence is a nice break in the day.
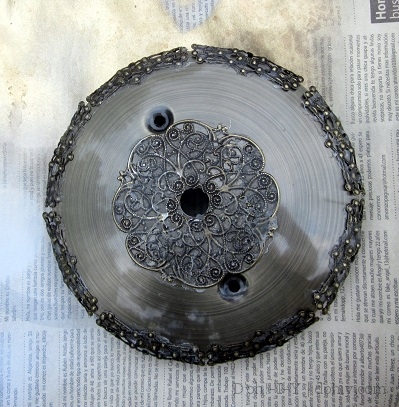
On the edges, I used some straight pieces that had been joined together in a chain. I used needlenose pliers to fold and bend them so that they would wrap around the canopy’s edge. Fortunately, these were about the right size to go around the circumference with minimal spacing. Here it is once released from the clamps:
I don’t have a glue gun (I know!), but that’s partly because I swear by GOOP glue. I grabbed it at the Hobby Lobby checkout as part of a model rocket project, and it is great. How can you fault a glue that holds a rocket together on re-entry?? Ok, not re-entry strictly speaking, but it held together despite several parachute failures. Rockets crash really hard!
Quick aside: I hope it is needless for me to say that canopies should only be fancified on the ground. Don’t start smearing glue on canopies covering actual wiring, people! That’s a good start on getting out of the gene pool.
Next step was gold spray paint:
At this point, I hated it. It’s just so prissy! What am I, twelve?? It’s more Victorian uptight than art deco fabulous. I was about to toss it like a Frisbee, but the Kev said it was “good” and that it would “be on the ceiling anyway and who’s going to look that hard?” He reminded me that I was just trying to put a little texture on it so that it didn’t clash with the fixture, not create a Standalone Showpiece of Magnificence. That man, he’s useful in so many ways.
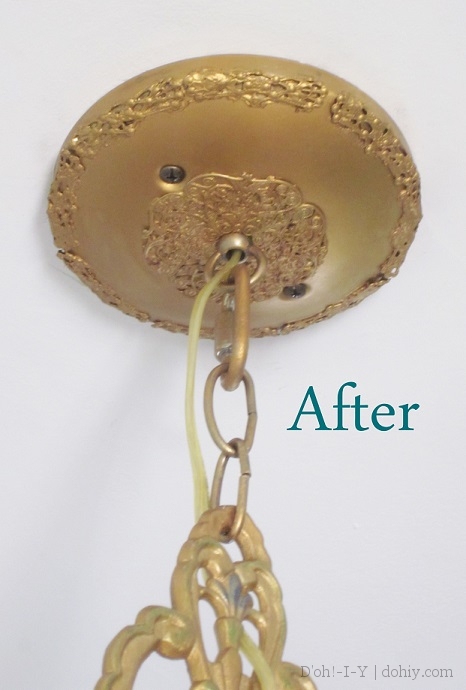
So I kept going. I top-coated with Grecian Gold Rub ‘n Buff to match the fixture, and called it a day.
And the whole kit and kaboodle:
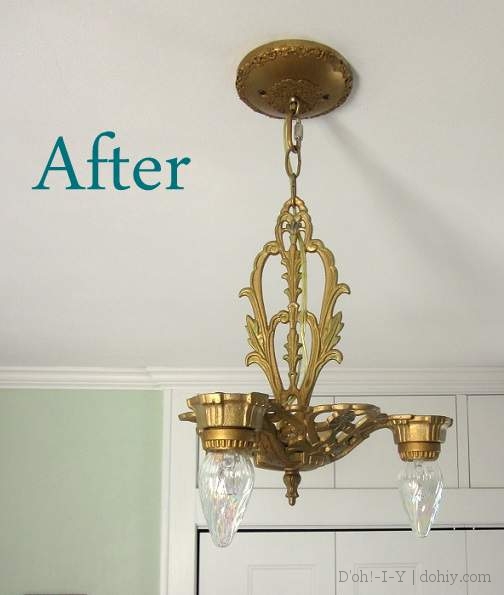
It sort of blends. And I don’t notice it now, which was my goal. If I found an old salvage canopy that suited the fixture, I’d change it out right away, but in the meantime, it’s fine. It’s FINE.

2 Responses to Before and After: Ceiling Canopy Fancification